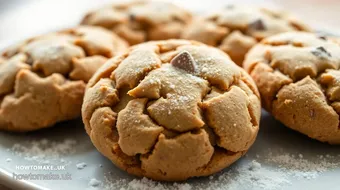
Lorac Cookies: Sweet and Chewy Delights Ready in 25 Minutes
Craving something sweet? Bake Delicious Lorac Cookies in 25 Minutes! These chewy delights are simple to make and a family favorite – delicious and comforting!

- Bake Delicious Lorac Cookies in 25 Minutes
- Sweet Memories and Quick Fixes
- Cookie Goodness with Benefits
- Time to Gather the Ingredients
- Essential Ingredients Guide
- Mastering the Professional Cooking Method
- Pro Tips & Secrets for Baking Lorac Cookies
- Perfect Presentation to Impress
- Storage & Make-Ahead Tips
- Creative Variations to Spice Things Up
- Complete Nutrition Guide
- Expert FAQ Solutions
- Recipe Card
Bake Delicious Lorac Cookies in 25 Minutes
Oh my gosh, i still remember the first time i baked cookies on a whim! a rainy sunday afternoon, i found myself yearning for something sweet.
You know that feeling? i threw on my apron, opened up my pantry, and started pulling out ingredients. and that’s how i discovered these wonderful lorac cookies .
Let me tell ya, they’re a game changer! if you’ve ever craved a cookie that’s both rich and chewy, and you want to whip them up fast, you’re in for a treat!
Sweet Memories and Quick Fixes
The lorac cookie is a delightful mashup of classic cookie recipes with a twist of flavor. they pop with sweet vanilla and a hint of almond that adds pizzazz to each chewy bite.
Legend has it that these cookies were born out of the need for a quick, satisfying snack, and they’ve skyrocketed in popularity ever since.
Today, you’ll find them at every family gathering and bake sale, perfect for impressing guests or simply tucking away for yourself.
And let’s talk about how quick these babies are to make! total prep and bake time? just 25 minutes ! yup, you read that right.
In just 10 minutes you can slide those dough balls into the oven, and in 15 minutes , you’ll have cookie perfection on your hands.
Honestly, it’s one of the most accessible easy cookie recipes out there—perfect for anyone, even if you’re a beginner in the kitchen!
Now, what's even better? it won’t hurt your wallet. with basic pantry staples like flour, sugar, and butter, you can make about 12 cookies for under $5, depending on what you’ve got lying around.
Talk about a win!
Cookie Goodness with Benefits
Now, let’s get real! cookies sometimes get a bad rap, but lorac cookies are kind of a superstar in the snack game.
For one, they pack a delicious punch of flavor with minimal ingredients . and if you’re curious about their health benefits, while they're undeniably a treat, they include some decent proteins and fats from the butter and egg yolk.
Plus, if you add in some nuts or dark chocolate, you’re elevating the health game even more!
These cookies are definitely family-friendly, perfect for kids’ snack time, or when you have friends drop by unexpectedly. they’re also adaptable! want to throw in some chocolate chips? go for it! how about a sprinkle of sea salt on top? tempting, right? the cookie variations are nearly endless, which is why these are often referred to as the best cookie combinations out there.
If you’re planning a cozy gathering, whip up a batch of these and watch everyone gravitate towards them! they’re perfect for an evening with friends or even a relaxed family movie night.
Who wouldn’t want to sink their teeth into a warm, chewy cookie paired with a cold glass of milk?
Time to Gather the Ingredients
So, ready to dive into baking these delightful treats? you’ll need some cookie baking essentials like all-purpose flour, baking soda, and, of course, butter.
Keep those baking tips for beginners in mind as we get going. grab your measuring cups and let’s bring these sweet, chewy wonders to life.
It’s time to pull everything together and create some magic in the kitchen. just imagine the aroma wafting through your house as the cookies bake—it’s like a warm hug.
Trust me, you don’t want to miss out on this! let's check out the ingredients that will help you bake delicious lorac cookies in 25 minutes !

Essential Ingredients Guide
When it comes to baking, knowing your ingredients is half the battle. trust me, i’ve had my fair share of baking fails in the kitchen! let me walk you through premium core components that will make your cookies pop.
Premium Core Components
Detailed measurements:
for all you measuring ensoiasts, here’s the deal—whether you’re using cups or grams, accuracy is key. use 1 cup (120g) of all-purpose flour for your cookie base, but make sure to spoon the flour into your measuring cup instead of scooping it in.
This keeps the flour fluffy and prevents your cookies from being dense.
Quality indicators:
look for butter that is soft but not melted—like the texture of a cozy couch! when it comes to eggs, a fresh egg will have a firm yolk that stands high.
Storage guidelines and shelf life:
keep your flour in an airtight container to avoid those pesky bugs. most baking ingredients can hang around for months, but eggs? use them within a few weeks to ensure freshness.
Freshness Tips:
Always give your ingredients a quick whiff. If it smells weird or off, toss it! Trust your nose—it's a baker’s best friend.
Signature Seasoning Blend
Now let’s chat about flavor. essential spice combinations can elevate your cookies to gourmet status. a pinch of cinnamon and nutmeg will add that warm vibe.
And don’t skip the vanilla extract ; it’s like a hug for your taste buds!
Herb selections:
pair your vanilla with a smidge of almond extract for a delightful twist. it’s like candy without all the fuss, turning your cookies into vanilla almond cookies in a matter of minutes.
Flavor enhancers:
want to kick things up a notch? consider mixing in some fresh zest from an orange or lemon! they’ll give you a zesty ping that brightens everything up—perfect for those quick baking recipes you’re looking for.
Smart Substitutions
Sometimes life throws you a curveball and you need smart substitutions . No eggs? Use 1/4 cup of applesauce or mashed bananas instead. They’ll keep your cookies chewy, trust me!
Common Alternatives:
Don’t have white sugar? Brown sugar can work too. It adds a delightful, rich flavor that dances on your palate.
Dietary Modifications:
For you health-conscious bakers, substitute coconut oil for butter for a dairy-free option. Your cookies will still be rich and chewy , I promise!
Kitchen Equipment Essentials
Now on to the fun part— kitchen equipment essentials. You don’t need the fanciest gadgets to whip up delicious cookies. A simple mixing bowl and a spoon can be your best friends.
Must-have tools:
a baking sheet and parchment paper are a must to ensure your cookies don’t stick. a cookie scoop helps make uniform cookies, but you can totally use a spoon if that’s what you have.
Preparation Tips:
Preheat your oven to 350° F ( 175° C) before you even start mixing! This will ensure you bake those cookies perfectly every time.
Embracing Home Baking
Now that we’ve covered the essentials, let me just say this: bake delicious lorac cookies in 25 minutes and enjoy that cozy feeling of home baking.
Picture this: the scent of cookies wafting through your home while you kick back with your favorite movie. best part? it’s all thanks to your newly acquired knowledge.
Look, cookies are more than just snacks. They’re conversations , memories , and a quick way to bond. So grab your ingredients and let’s get to the fun part—making some delicious cookies!
Next up, let’s dive into the step-by-step instructions for your Lorac Cookies! You’re gonna love it!
Mastering the Professional Cooking Method
If you’ve ever drooled over perfectly baked cookies or gourmet meals and thought, “how do they do it?” , you’re in the right place.
Today, we’re diving into professional cooking methods . whether you’re a beginner or just looking to polish your skills, this will help you whip up those rich and chewy cookies in no time!
Essential Preparation Steps
Let’s kick things off with mise en place . i swear this is the secret sauce of getting organized. it means “everything in its place,” and trust me, it makes such a difference! start by gathering all your ingredients and tools before you even think about turning on the oven.
Have your measuring cups, spoons, and mixing bowls ready. it makes everything smoother than butter on a hot biscuit!
Next up is time management . you’ve got to learn to juggle tasks! while your oven preheats to 350° f ( 175° c) , get busy mixing your dry and wet ingredients.
I find that multitasking saves tons of time—it’s like a dance in the kitchen.
And organization strategies ? Don’t overthink it! Just have a specific spot for everything. Keep your baking sheet and parchment paper handy; you’ll thank me when it’s go-time.
Let’s not forget safety considerations . Always remember to use oven mitts when pulling out hot trays. And don’t forget to keep those surfaces clean to avoid cross-contamination!
Step-by-Step Process
Okay, now onto the nitty-gritty. Here’s a step-by-step guide for whipping up those Lorac Cookies .
- Preheat your oven to 350° F ( 175° C) .
- In a bowl, whisk together 1 cup of all-purpose flour , 1/2 teaspoon baking soda , and 1/4 teaspoon salt . Set that aside.
- Grab another bowl and cream 1/4 cup unsalted butter with 1/4 cup granulated sugar and 1/4 cup brown sugar until it’s smooth. Oh my gosh, that combo smells incredible!
- Mix in 1 teaspoon vanilla extract and 1/2 teaspoon almond extract along with 1 large egg yolk —it’s time to bring that flavor alive!
- Gradually add the dry ingredients into the wet mixture until just combined. Don't go crazy mixing; we want tenderness in our cookies!
- Now, add 1/2 cup chocolate chips or whatever mix-ins you fancy – I love throwing in nuts for some crunch.
- Scoop those batter blobs onto a baking sheet lined with parchment paper. Leave a little space; they’re gonna spread.
- Bake for 10- 12 minutes . Visual cues for doneness? Look for golden edges and a barely set center.
- Let them cool on the sheet for 5 minutes before transferring them to a wire rack. This step is crucial for that perfect cookie texture.
Expert Techniques
Now, let’s kick it up a notch with some expert techniques. one critical step? monitor that baking time . ovens can be tricky! be prepared to adjust if needed; we’re gunning for perfection.
And check for those quality checkpoints—like the smell wafting from your oven. if it’s making your mouth water, you’re on the right track!
And here’s a classic mistake: overmixing! I can’t stress enough to just stir until combined. Nobody wants dense cookies—let’s aim for those tender, chewy cookies we all love.
Success Strategies
Avoid a cookie catastrophe! One common mistake is not measuring ingredients correctly. Those flour mountains in the bowl can lead to flat cookies. Use the spoon-and-level method for accurate measurements.
For a little quality assurance, always taste your cookie dough (I know, it’s the best part!). If it’s good, those cookies are bound to be even better.
And let’s touch on make-ahead options. You can chill your dough overnight! Just scoop it out when you’re ready to bake. Boom—you've got quick family desserts whenever the craving hits!
Now that you're well-primed for success, you’re all set to create the absolute best cookie combinations ! bake delicious lorac cookies in 25 minutes and get ready to impress friends and fam with this easy recipe.
Additional Information
Stick around, because we’re going to talk about even more ideas to jazz up your cookie game and extend that sweet treat experience! Cheers to your baking adventures, and may your kitchen be filled with the joyful smell of freshly baked cookies !

Pro Tips & Secrets for Baking Lorac Cookies
Oh my gosh! baking cookies can be an absolute delight, and if you want to bake delicious lorac cookies in 25 minutes , listen up! here are some pro tips that’ll elevate your game.
First off, measure accurately ! i can’t tell you how many times i’ve ruined a baking endeavor because i tossed in flour willy-nilly.
Spoon it into your measuring cup and level it off for the right texture. trust me, this tip will prevent flat cookies, turning them into those captivating, rich and chewy cookies we all love.
Another gem? don’t overmix that dough. you want to mix things until just combined. overmixing leads to tough cookies, and nobody wants that! and seriously, keep an eye on the clock.
Ovens can be sneaky. check those cookies at around 10- 12 minutes . golden edges and slightly soft centers mean you’ve nailed it!
Perfect Presentation to Impress
Alright, so you’ve baked those Lorac Cookies to perfection. Now let’s talk about presentation because we eat with our eyes first, right?
Try some fun plating techniques ! stack a few cookies on a cute plate for height. drizzle a little melted chocolate on top or sprinkle some powdered sugar for a chic touch.
It makes those vanilla almond cookies look so fancy!
When it comes to garnishing , fresh mint leaves or a sprinkle of sea salt on top can add a beautiful pop of color, contrasting with the golden cookie.
It looks amazing and gives that sweet-salty thing we all crave. finally, don’t forget about color combinations. use a plate that contrasts with the cookie color to make them stand out.
After all, it’s all about making those cookies pop !
Storage & Make-Ahead Tips
So, you’ve whipped these up, and they’re delightful! but what if you have leftovers? don’t fret. these cookies can be stored perfectly! just toss them in an airtight container and they’ll last up to a week.
If you want to keep them fresher longer, toss them in the fridge.
For those of you who love to meal prep or make-ahead goodies, did you know you can freeze the dough? scoop your cookie dough onto a baking sheet, freeze them for a couple of hours, then pop them into a ziplock bag.
You’ll have gorgeous cookie dough balls ready to bake fresh anytime you want some tasty snack ideas . just add a few extra minutes to your baking time if they’re frozen!
Creative Variations to Spice Things Up
Let’s get a little creative! want to switch things up? make cookie variations if you feel adventurous. add some spices like cinnamon or a handful of crushed nuts.
You can even swap chocolate chips for dried fruit for a delightful twist.
Feeling seasonal? Try adding a bit of pumpkin spice during fall. Or go wild with holiday flavors! Just imagine, the aroma of homemade cookies filling your house. Pure bliss!
And hey, if you have dietary restrictions, you can go for almond flour instead of regular flour, or even coconut oil in place of butter. Talk about cookie baking essentials !
Complete Nutrition Guide
Last but definitely not least, let’s chat nutrition. each lorac cookie has roughly 120 calories . that’s not too shabby, right? you get a nice little boost without overdoing it.
Plus, the adorable combo of almond and vanilla gives you those delightful healthy fats!
Before you dive in, remember your portions. three cookies with a glass of milk is a classic but keep your servings realistic.
Nothing wrong with indulging a bit, but balance is key, folks!
Expert FAQ Solutions
Still have questions? you’re definitely not alone! many home bakers wonder about common cookie pitfalls. if your cookies come out too hard, they might just need a little less baking time.
Or maybe you used too much flour! you can tweak your recipe a bit until you find that sweet spot.
And if you’re ever in a baking rut, remember—it’s all about experimenting. incorporate cookie dough mix-ins of your choice, whether it’s a little sea salt or some crushing caramel bits for a yummy indulgent treat.
Conclusion
So, there you have it. with just 25 minutes , you can whip up some of the tastiest, chewiest cookies ever.
Whether you’re making them for a cozy afternoon snack or a gathering, these lorac cookies will definitely impress. remember, cooking can be just as much about the process as it is about the end result.
So, get in that kitchen and start baking these beauties! your friends and fam will thank you (and so will your taste buds)! happy baking!

Lorac Cookies: Sweet and Chewy Delights Ready in 25 Minutes Card
⚖️ Ingredients:
- 1 cup (120g) all-purpose flour
- 1/2 teaspoon baking soda
- 1/4 teaspoon salt
- 1/4 cup (55g) unsalted butter, softened
- 1/4 cup (50g) granulated sugar
- 1/4 cup (50g) brown sugar, packed
- 1 teaspoon vanilla extract
- 1/2 teaspoon almond extract
- 1 large egg yolk
- 1/2 cup (90g) chocolate chips
- 1/4 cup (30g) chopped nuts
🥄 Instructions:
- Step 1: Preheat your oven to 350°F (175°C).
- Step 2: In a mixing bowl, whisk together flour, baking soda, and salt; set aside.
- Step 3: In a separate bowl, cream together softened butter, granulated sugar, and brown sugar until smooth.
- Step 4: Add in vanilla and almond extracts and egg yolk; mix until combined.
- Step 5: Gradually add dry ingredients to the wet mixture, stirring until just combined.
- Step 6: Gently fold in chocolate chips and nuts, if using.
- Step 7: Use a cookie scoop or spoon to portion dough onto a baking sheet lined with parchment paper, spacing them apart.
- Step 8: Bake for 10-12 minutes or until edges are golden brown and centers are set but slightly soft.
- Step 9: Allow cookies to cool on the baking sheet for 5 minutes before transferring to a wire rack.
Previous Recipe: How I Make the Best Fried Chicken Quesadillas - Cheesy Goodness!
Next Recipe: How to Bake American Biscuit with a Kufi on Delight: 5 Delicious Tips!