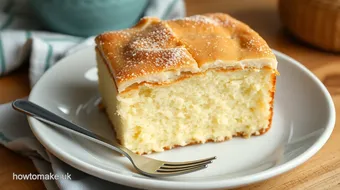
Classic Vanilla Joy Cake
Looking for a delicious treat? Bake Old School Cake - Traditional Vanilla Joy takes you back to my grandmother's kitchen! Enjoy this light, fluffy delight.

look into Into Nostalgia with the Classic Vanilla Joy Cake
Have you ever taken a bite of a dessert that immediately transports you back to your childhood? oh my gosh, i can still remember my grandma pulling her classic vanilla joy cake from the oven —that warm, buttery scent filling the kitchen, making it feel like a big hug.
If you're like me and have this soft spot for old-fashioned desserts , you're in for a treat! today, we’ll explore how to bake old school cake - traditional vanilla joy from scratch.
A Slice of History
Let’s be real: cake has been around for ages. the classic vanilla joy cake has roots stretching back to early american kitchens.
It’s one of those traditional cake recipes that have stood the test of time. but you know what? it’s still super relevant today.
Everyone is on the nostalgia train right now, craving those comforting bites from their childhood. plus, it’s a big hit at family gatherings, birthdays, and any day that calls for a sweet pick-me-up.
You might be wondering about the time commitment. well, this cake is easy-peasy! you’re looking at roughly 15 minutes for prep and about 30 minutes of baking time.
Total? under an hour, and it serves about 8 hungry folks. now, you can definitely whip this up without breaking the bank—most ingredients are pantry staples.
It’s an economical way to treat yourself and your buddies!
Why You'll Love It
So, what makes this cake a must-bake? let’s not forget the health benefits lurking behind those layers. okay, cake isn’t exactly a health food, but it can fit into a balanced diet if enjoyed in moderation.
Plus, we can use quality ingredients to avoid the junky stuff.
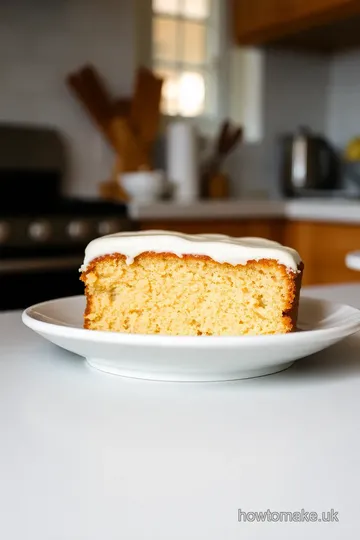
This moist vanilla cake brings a unique charm to any occasion. when you think of vanilla flavor desserts , the classic vanilla joy cake is a star player.
Its light, fluffy texture paired with dreamy vanilla frosting will have everyone reaching for seconds. you can also dress it up with seasonal fruits or top it off with some whipped cream serving ideas for a festive vibe!
Now, when to serve it? honestly, it’s a classic dessert for celebrations—birthdays, anniversaries, or even a cozy sunday brunch. but, i’ll let you in on a little secret: it’s also fabulous on lazy afternoons with coffee.
And let’s not forget, there’s something special about baking it; it’s a fantastic activity for kids. you can teach them simple baking techniques while making memories.
Just picture it—a day of flour flying, laughter, and delicious cake!
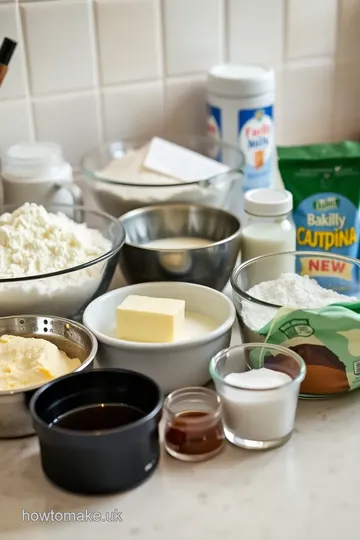
Getting Started: The Ingredients
Alright, folks, now that i piqued your interest, let's get into what you need to make this nostalgic treat. we're looking at simple, everyday ingredients that you probably already have at home.
Get ready!
The next section will dive into the ingredients for the Classic Vanilla Joy Cake. Trust me; you’re going to want to have your measuring cups ready because this cake is about to become a new family favorite!
Essential Ingredients Guide
When it comes to baking, knowing your essential ingredients can make or break your delicious endeavors. let’s dive into what you really need for traditional cake recipes , especially when you’re ready to bake that old school cake – traditional vanilla joy .
Premium Core Components
First off, let’s chat about the premium core components you’ll want on hand. We’re talking straight measurements here. For the classic vanilla cake , you’re gonna need:
- 2 cups (240g) of all-purpose flour
- 1½ cups (300g) of granulated sugar
- ½ cup (113g) unsalted butter
- 1 cup (240ml) whole milk
- 3 large eggs
- 1 tablespoon (15ml) pure vanilla extract
- 2 teaspoons (10g) baking powder
- ½ teaspoon (3g) salt
It’s essential to know that fresh ingredients make a huge difference. look for butter that’s soft but still cool to the touch.
That way, it mixes well into your batter, helping you achieve that light and fluffy cake texture we all crave.
Signature Seasoning Blend
Now, onto the signature seasoning blend . this is where it gets fun! the right spices and herbs can elevate your old-fashioned dessert .
For our vanilla joy cake, vanilla is the star, but you might consider cinnamon or a hint of lemon zest if you're feeling adventurous.
These little tweaks can add a whole new layer of flavor that’ll turn your cake into a family favorite.
Smart Substitutions
And let’s face it, life happens. sometimes, easy homemade frosting or even the cake ingredients might be missing. here’s where smart substitutions come into play.
Got no eggs? try applesauce or flaxseed meal . gluten-free? a one-to-one flour substitute will keep your cake dreamy. these common alternatives can really save the day.
Kitchen Equipment Essentials
Alright, moving on to the tools of the trade! You don’t need a fancy kitchen to whip up your cake. Grab:
- 9-inch round cake pans (2)
- A mixing bowl (or two)
- An electric mixer (a whisk works, too!)
- Rubber spatula for easy folding
- Measuring cups and spoons — accuracy is key!
Make sure your workspace is neat. It’s super important when you’re prepping that fluffy goodness!
Wrapping It Up
So there we go! with these baking tips for beginners , you’ll be set to tackle simple baking techniques to create that beautiful moist vanilla cake .
Knowing your ingredients, having the right tools, and being ready to substitute when needed can make baking as fun as eating!
Now that you’ve got this essential ingredients guide under your belt, let’s jump into those step-by-step instructions for the bake old school cake – traditional vanilla joy .
Trust me, you’re not just baking; you’re creating a little piece of nostalgia that’ll leave everyone at your gathering grinning from ear to ear! time to whip up some deliciousness!
Mastering the Art of Baking: Professional Cooking Method
Baking can feel like a spontaneous blast of creativity, but let’s be real—it’s also about precision and method. ever heard of the term mise en place ? it’s more than just a fancy french phrase; it’s about setting yourself up for success before you even preheat that oven.
Ready to learn a few professional cooking methods that can make your baking adventures easier? great! let’s dive into it.
Essential Preparation Steps
First off, let’s talk mise en place . this simply means “everything in its place.” before you start whipping up that classic vanilla joy cake , gather all your ingredients and tools.
Seriously, nothing’s worse than scrambling for eggs when your butter is creaming with sugar. i mean, i've been there and it's a chaos.
Pre-measure your flour, sugar, and other dry goods. it’s like having your ducks in a row!
Next up, time management . keep an eye on the clock. prep time for the classic vanilla cake is just 15 minutes , and then you'll bake it for 30 minutes .
But don't get too cozy on the couch! use those 30 minutes to clean up, or prep your frosting ingredients.
Now onto organization strategies . keep your workspace tidy. a clean kitchen will help you focus. i can’t tell you how many times i’ve found a rogue egg shell in the batter because i was too lazy to clean as i went along.
Lastly, safety considerations are super important. keep your equipment in good shape. don't use dull knives or faulty mixers. and for heaven's sake, don’t wear sandals while whisking.
Trust me; burnt feet are not part of the recipe!
Step-by-Step Process
Now that you're set up, let’s break it down step by step!
-
Preheat your oven to 350° F ( 175° C) . This is crucial. If you forget to preheat, your cake won't rise!
-
Prepare your pans . Greasing and flouring your cake pans helps your cake pop out seamlessly once baked.
-
Mix dry ingredients . It’s easy! Just whisk together 2 cups flour , 2 teaspoons baking powder , and a pinch of ½ teaspoon salt in a bowl. Simple, right?
-
Cream the butter and sugar . using softened ½ cup butter and 1 ½ cups sugar , beat until light and fluffy.
You’re looking for that light and airy texture that sets the foundation for a moist vanilla cake.
-
Add eggs and vanilla . Dump in your 3 large eggs one at a time, adding 1 tablespoon vanilla extract too. Just mix it all up!
-
Combine it all . Alternate adding the dry ingredients and 1 cup milk to your wet mix, starting and ending with the dry stuff.
-
Bake away ! Pour that batter into your prepared pans and pop them in the oven. Bake for 25- 30 minutes or until a toothpick comes out clean.
-
Cool down . Let your cakes cool in the pans for 10 minutes then transfer to a cooling rack. This is important, so be patient!
-
Prepare your frosting . mix together 1 cup powdered sugar , ½ cup butter , 2 tablespoons milk , and another dash of vanilla extract .
You want that perfect vanilla frosting to top off your nostalgic baking masterpiece.
-
Frost it up . Once cool, lay down frosting between the layers and all over that cake!
Expert Techniques & Success Strategies
So you’ve made it this far—awesome! now, let’s make sure you nail the finish. avoid common mistakes like overmixing your batter.
When you add the flour, just blend until everything disappears. you want a light and fluffy cake , not a rubbery mess.
And while you’re at it, keep quality checkpoints in mind. Check that your cakes are even on top—trim them if needed to ensure a flat surface.
Having trouble? No worries! If your cake domes, just level it out with a serrated knife. Nobody’s judging you, promise!
Remember to chill your cake layers completely before frosting. This will ensure that your frosting doesn’t melt into a gooey mess.
Lastly, enjoy the process of traditional baking . it’s not just for the pros. with simple baking techniques and easy cake recipes, you’ll find the joy in nostalgia.
Bake that old-fashioned dessert with love, and don’t be afraid to put your spin on it.
Now that you’re ready to whip up that Classic Vanilla Joy Cake , let’s move on to additional information that’ll help you keep those baking adventures rolling!
Additional Recipe Information for Your Classic Vanilla Joy Cake
Pro tips & secrets
oh my gosh, let’s dive into some pro tips and secrets that can totally elevate your baking game when making the bake old school cake - traditional vanilla joy ! first off, always start with room-temperature ingredients .
It makes mixing easier and helps create that light, fluffy cake texture we all love. if you're short on time, consider doing a batch prep : mix your dry ingredients ahead of time and store them in a sealed bag; just add the wet ones later.
For flavor enhancement, i swear by a splash of almond extract in the batter. trust me, it takes that vanilla flavor to another level! and presentation? a sprinkle of powdered sugar on top or fresh berries can transform your cake from “nice” to “wow!”
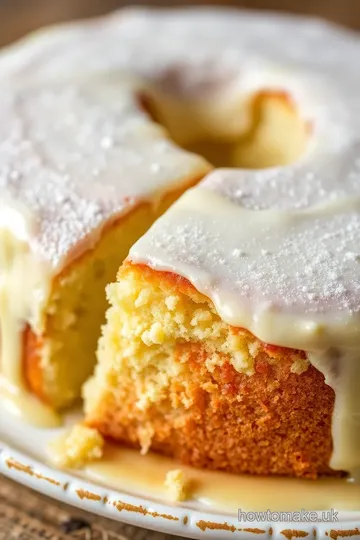
Perfect presentation
now, let's talk presentation because honestly, we eat with our eyes first, right? plating techniques here can be simple but effective.
Try placing the cake on a rustic wooden board to add that homey touch. for garnishes, fresh mint leaves or vibrant edible flowers bring a pop of color.
And speaking of colors, consider how your frosting plays with your cake; vanilla frosting against a golden-yellow cake looks sumptuous! if you want to take it a step further, drizzle some melted chocolate on top for that elegant vibe.
Remember, a cozy presentation is all about making it look inviting and warm, just like those family gatherings from your childhood.
Storage & make-ahead
alright, if you want to make this old-fashioned dessert ahead of time, it’s super easy! store your cut pieces in an airtight container in the fridge for up to five days .
Want to keep it longer? freeze those slices! just wrap them tightly in plastic wrap followed by foil, and they’ll be good for about three months .
Don’t forget to label the date! when you’re ready to indulge again, just let it thaw in the fridge. if it’s been frozen and you want it warm, pop it in the oven at 350° f ( 175° c) for about 10- 15 minutes .
Creative variations
let’s stir things up a bit with some creative variations . you can totally make this recipe your own! want a chocolate twist ? mix in a cup of chocolate chips for an exciting surprise in every bite.
If you’re feeling seasonal, try adding spices like cinnamon or nutmeg for an autumn touch. for those with dietary considerations, you can easily whip up gluten-free cake recipes by swapping out the flour for a gluten-free blend.
It’s all about making it work for you and what you’ve got at home!
Complete nutrition guide
looking to keep track of what you’re munching on? here’s a complete nutrition guide : this classic vanilla joy cake has around 290 calories per slice.
It’s not just tasty but also offers a respectable shot of carbs for a quick energy boost. plus, it has that comforting feeling of homemade treats—definitely a win in my book! just be mindful of portions, especially if you're serving this for a party or family gathering.
You can always serve smaller pieces paired with some fresh fruit or easy homemade frosting on the side!
Expert faq solutions
got questions? i’ve got answers! one common question is, “why did my cake sink?” well, my friend, it could be overmixing or not properly measuring your flour.
As a safe tip, use the spoon-and-level method for the flour to avoid that. another common question is “can i use margarine instead of butter?” short answer: yes, but it might not give you that same rich flavor .
And, if you’re wondering about baking time , check your cake at the 25-minute mark ; every oven is a bit different, you know?
In conclusion, baking the bake old school cake - traditional vanilla joy is not just about making a dessert; it’s about creating memories.
So grab those ingredients, gather your family, and maybe even let the kids join in. it could become a cherished family recipe, passed down through the years, causing nostalgia and joy in every delicious bite! happy baking, y'all!
Classic Vanilla Joy Cake Card
⚖️ Ingredients:
- 2 cups (240g) all-purpose flour
- 1 ½ cups (300g) granulated sugar
- ½ cup (113g) unsalted butter, softened
- 1 cup (240ml) whole milk
- 3 large eggs
- 1 tablespoon (15ml) pure vanilla extract
- 2 teaspoons (10g) baking powder
- ½ teaspoon (3g) salt
- 1 cup (120g) powdered sugar
- ½ cup (113g) unsalted butter, softened
- 2 tablespoons (30ml) milk
- 1 teaspoon (5ml) pure vanilla extract
🥄 Instructions:
- Step 1: Preheat the oven to 350°F (175°C).
- Step 2: Grease and flour the cake pans.
- Step 3: In a bowl, whisk together flour, baking powder, and salt.
- Step 4: In a separate bowl, beat the softened butter and granulated sugar until light and fluffy.
- Step 5: Gradually add eggs one at a time, along with vanilla extract, mixing well after each addition.
- Step 6: Alternate adding the dry mixture and milk into the butter mixture, starting and ending with the dry ingredients.
- Step 7: Divide the batter evenly between the prepared pans and bake for 25-30 minutes or until a toothpick comes out clean.
- Step 8: Allow to cool in pans for 10 minutes before transferring to a cooling rack to cool completely.
- Step 9: In a mixing bowl, beat together softened butter, powdered sugar, milk, and vanilla extract until smooth and fluffy.
- Step 10: Once the cake layers are cool, frost the top of one layer, place the second layer on top, and frost the entire cake.
Previous Recipe: How to Juice Apples for Refreshing Healthy Juice: My Family's Secret
Next Recipe: How to Make No-Bake Chocolate Cornflake Cakes Delight: A Sweet Memory