Chill Rocky Road Treats
Have you tried Chill Rocky Road Treats - Irresistibly Sweet? These no-bake delights are packed with chocolate, marshmallows, and nuts—perfect for any occasion!

- A Sweet Memory That Stays Chilled
- A Quick look into into Rocky Road
- Why You're Gonna Love Them
- Ready to Get Cooking?
- Essential Ingredients Guide
- look into Into the Joy of Professional Cooking
- Pro Tips & Secrets for the Perfect Chill Rocky Road Treats
- Perfect Presentation: Make Your Treats Shine
- Storage & Make-Ahead: Keep ‘em Fresh!
- Creative Variations: Because Why Not?
- Complete Nutrition Guide: Know What You’re Eating
- Expert FAQ Solutions: Got Questions?
- Wrap Up with Sweet Encouragement
- Recipe Card
A Sweet Memory That Stays Chilled
Oh my gosh, i remember the first time i made chill rocky road treats - irresistibly sweet for a family gathering.
I was probably about twelve, standing on a kitchen stool, trying desperately to reach the counter while my mom looked on with a smile.
I mean, who wouldn’t want to mix chocolate, marshmallows, and nuts into something that’s basically a party in a pan? it was one of those recipes that felt like magic.
I whipped up a treat so delicious, it vanished in minutes. and honestly? nothing says “i love you” quite like a homemade no-bake dessert that you can enjoy with family and friends.
Trust me, these treats are a total crowd-pleaser!
A Quick look into into Rocky Road
Now, let’s backtrack for a second. these chill rocky road treats actually stem from the classic rocky road ice cream.
Can you believe it’s been around since the great depression? people were looking for a little joy, and what better way than to toss together chocolate, marshmallows, and nuts? fast forward to today, and these bad boys are not just a nostalgic treat.
They’re a go-to for many summer parties, summer bbqs, or just when your sweet tooth cravings hit!
These delights take just 15 minutes to whip up and seriously need only an hour in the fridge to chill.
No oven? no problem! they’re as easy as pie—or, well, easier since there’s no baking involved. plus, they yield about 16 square treats , so there’s plenty for everyone (if you're willing to share!).
Why You're Gonna Love Them
Alright, let’s talk benefits. first off, these rocky road variations are not just tasty; they’re also packed with nutrition. you’ve got the rich chocolate, which has antioxidants (yes, please!), marshmallows for a chewy texture, and nuts adding that great crunch along with some healthy fats.
Talk about a backyard bbq hero!
These treats shine during special occasions like birthday parties, holiday gatherings, or just for a cozy family movie night. let’s be real—who wouldn't want to dig into these while catching up on the latest netflix show? plus, they beat a slice of cake any day, especially when i can customize them to my heart’s desire.
Oh, and you can obviously switch it up with your favorite mix-ins. like, how about throwing in some chocolate chips or making a mint version?
Another perk? they’re super budget-friendly. seriously, almost all the ingredients are pantry staples. and if you’ve ever found yourself staring at a nearly empty pantry, you can slip in any fun crunchy bits you have lying around.
It really makes for a quick treat recipe without breaking the bank.
Ready to Get Cooking?
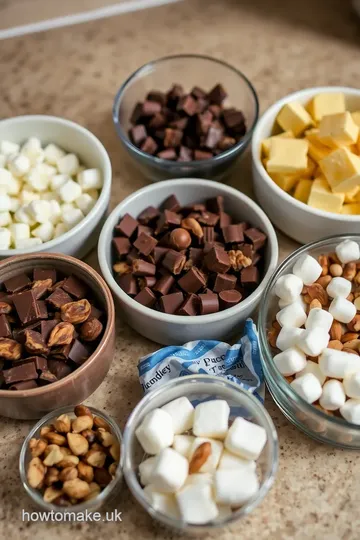
So now that i've convinced you, let’s gather up our goodies. you’ll need graham cracker crumbs, melted butter, marshmallows, chocolate chips, and nuts.
Easy, right? just a few basic bits, and you’re ready to make these sweet little bars.
I know you’re itching to mix it all up, and trust me, you won’t believe how simple these treats are.
They're the kind of easy summer desserts you can make with kids, turning a regular day into a bit of kitchen adventure! so, let’s dive into the ingredients that will bring this delicious creation to life.
Get ready to indulge your family and friends with these delicious and easy treats . 💖
Essential Ingredients Guide
When diving into the yummy world of dessert-making, knowing your ingredients is half the fun! whether you're whipping up chill rocky road treats - irresistibly sweet or exploring other delightful no-bake dessert recipes, it's good to have a solid grasp of the essentials.
Premium Core Components
Let's start with the basics. Every recipe has its premium core components . You’ll want to measure things right, so here’s a quick sneak peek:
- Graham Cracker Crumbs: You’ll need 2 cups (300g) . Ideally, go for the brand that snaps easily—lightly toasted is a win!
- Cocoa Powder: Use 1 cup (240ml) of unsweetened goodness. It should feel velvety and smell like chocolate heaven.
- Unsalted Butter: A cup at 225g will kick up the richness. Look for that golden-yellow hue; it should be smooth and creamy—no funky smells, please!
- Granulated Sugar: A solid 1 cup (200g) . Granulated is a must unless you love your treats crunchy!
Storage tip: Store your dry ingredients in a cool, dry place—most last about 6 months if kept fresh!
Signature Seasoning Blend
Okay, let’s spice things up! Each dessert has its signature taste, made by signature seasoning blends . For our Chill Rocky Road Treats , you don’t need a cast of thousands, but you do need:
- Mini Marshmallows: Grab 2 cups (300g) . Look for the freshest bag at the store—fluffy is the key here!
- Semi-sweet Chocolate Chips: Go for 1 cup (150g) . I’m telling you to get the good stuff; it makes a world of difference.
For a flavor explosion, consider mixing in some chopped walnuts or almonds (1 cup or 130g). Nuts not only give a satisfying crunch but also balance the sweetness beautifully.
Smart Substitutions
Life happens, right? So, let’s chat about smart substitutions . This is where you can mix and match your ingredients for ease and accessibility:
- For the graham cracker crumbs , crushed digestive biscuits will do in a pinch! Just make sure they have that same sweet, buttery vibe.
- No chocolate chips? You can use chunks from a chocolate bar instead.
And listen up—these treats are adaptable! Got dietary restrictions? Substitutions are your friend, like using a dairy-free spread instead of butter for a vegan version.
Kitchen Equipment Essentials
Every home cook needs some key kitchen equipment essentials :
- Mixing Bowls: Make sure they’re large enough. You’ll be mixing plenty of goodies!
- Baking Pan: A good 9x9 inch (23x23 cm) pan works wonders. If you don’t have one, a casserole dish can do the trick.
- Parchment Paper: Seriously, this is your best buddy here. It eliminates that sticky situation we all dread!
Also, pro tip: If you’re worried about cleanup, invest in some disposable gloves for mixing. Keeps your hands clean while you blend those melt-in-your-mouth ingredients!
Let’s Get Cooking!
Now that we’ve covered the essentials, you’re all set to dive into a world of easy dessert ideas and indulge your sweet tooth with no-bake delights like our chill rocky road treats! grab those ingredients and let’s get mixing! you won't believe how simple it is to whip up these decadent, chocolate-drenched, marshmallow-filled bars.
Seriously, these are going to be a hit at your next potluck, birthday party, or just a cozy night in.
With a feeling that takes you back to childhood, these goodies are perfect for anyone looking to treat themselves, especially if you’re in the mood for rocky road variations or just want something special without the oven heat! I can't wait for you to try these out!
look into Into the Joy of Professional Cooking
Now, you might be wondering why we’re chatting about professional cooking methods when all you wanna do is whip up some chill rocky road treats - irresistibly sweet .
Well, let me tell ya, understanding a bit about professional techniques can seriously elevate your dessert game! so, grab a snack (preferably chocolate) and let’s dive into the essentials.
Essential Preparation Steps
Let’s kick things off with mise en place . it’s fancy french for “everything in its place.” think of it as laying out all your ingredients before starting.
Trust me, you don’t want to be elbow-deep in melted chocolate and then realize you forgot the marshmallows. just take 15 minutes to prep , and you’ll save yourself a lot of chaos later.
Time management is crucial too. while you’re waiting for your treats to chill (which takes about 1 hour ), why not clean up? keep it organized, folks! if you organize your workspace, you’ll feel like a kitchen rockstar.
And safety—oh my gosh, safety! Always keep an eye on those sharp knives and hot surfaces. Even if no actual cooking is happening here, spilled ingredients can be slippery!
Step-by-Step Process to Sweet Success
Ready for some easy-to-follow instructions? This should help:
-
Prepare the Baking Dish: Line a 9x9 inch pan with parchment paper.
-
Mix the base: in a big bowl, combine 2 cups of graham cracker crumbs and 1 cup cocoa powder . add 1 cup of melted butter , 1 cup of sugar , and a splash of 1 teaspoon of vanilla extract .
Stir and make it fancy!
-
Fold in the Mix-Ins: Toss in 2 cups mini marshmallows , 1 cup chocolate chips , and 1 cup chopped nuts . Fold gently so you don’t squish the marshmallows!
-
Transfer to the Pan: Press this mix firmly into the pan. You want it dense, don’t skimp here!
-
Chill to Set: Refrigerate those beauties for at least 1 hour so they firm up.
-
Optional Drizzle: Melt a few chocolate chips and drizzle that goodness on top. Yup, it’s optional, but c’mon—who can refuse extra chocolate?!
-
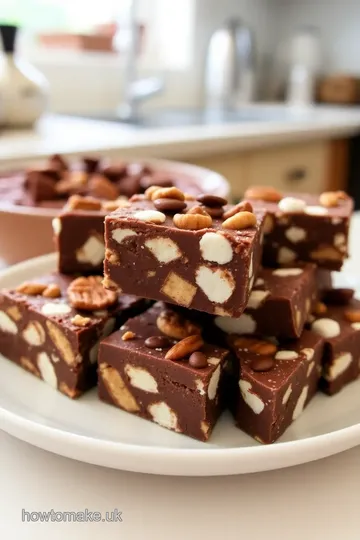
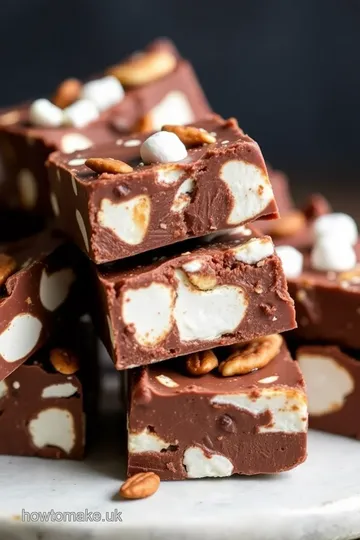
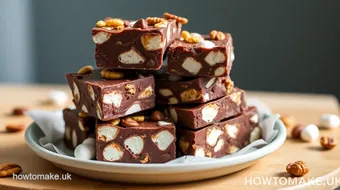
Cut and Serve: Once chilled, lift them out using the parchment, cut into squares, and voila!
Expert Techniques for Perfect Rocky Road
Okay, let’s get real for a second. one of the critical steps here is letting those treats cool completely before cutting them.
Otherwise, your bars might look like jumbled chocolate chaos—which, honestly, can be a vibe too, but let’s aim for neat squares.
Check for quality—if the mixture sticks to your fingers, it might need more chilling time. and if they don’t look firm before cutting, they’ll just crumble.
No one wants sad dessert bars, right?
Also, troubleshooting tips: if you find your mixture too dry and crumbly, adding just a dash of melted butter can rescue the day.
Success Strategies
Let’s wrap this up with some wisdom. avoid common mistakes like not pressing your mixture firmly enough into the pan.
Always ask yourself if it could be firmer before chilling. trust me; i’ve baked at least six batches that were sad, crumbly messes before figuring that out!
For quality assurance , a taste test (of course!) is always a good idea. It’ll help you see if the balance of chocolate and nut-based flavors is perfect.
And hey, if you want to make-ahead , these treats can last up to a week in the fridge, turning into an awesome family-friendly snack when the craving hits.
Now, if you’re feeling fancy, you can even customize these bars! Swap nuts for some dried fruit or even throw in some popcorn for a crunchy twist!
Additional Information
So there you have it: a little peek into professional cooking methods and how to turn them into something fun and sweet! as you embark on this chocolate adventure, give those chill rocky road treats - irresistibly sweet a shot.
Trust me, they’ll be gone before you can say “no-bake dessert recipe!” happy cooking!
Pro Tips & Secrets for the Perfect Chill Rocky Road Treats
Oh my gosh, let me tell you, making chill rocky road treats - irresistibly sweet is a breeze! i swear i can whip these up in no time, and they always hit the spot.
Here’s the skinny on taking these no-bake dessert recipes to the next level, straight from my kitchen tales!
Chef's Personal Insights
When i first tried making these bad boys, i thought, “no way can i make something that delicious at home!” but honestly, these treats require so little effort that it’s almost embarrassing how quickly they disappear.
I learned that if you melt the butter just right , it mixes in perfectly without clumping. trust me, patience pays off here!
Time-Saving Techniques
Now, here’s a little insider tip: instead of grinding the graham crackers yourself, grab a bag of pre-crushed graham cracker crumbs .
Saves you a step and a bit of mess too! also, keep the butter a little warmer when mixing; it spreads the love through all the ingredients more efficiently.
Flavor Enhancement Tips
Want to take these treats to an epic level? add a sprinkle of sea salt to the top just before they chill! sweet and salty is a combo that can change your life! you can also swap out regular chocolate chips for dark chocolate chips or even white chocolate for a fun twist.
Trust me on this!
Presentation Advice
Food is all about the visuals , right? for a pinterest-worthy display, use a cute knife to cut the bars evenly.
Drizzle some melted chocolate over the top with a ziplock bag (just cut off the corner) to create those fancy designs.
Nobody has to know how easy it actually was!
Perfect Presentation: Make Your Treats Shine
Remember, people eat with their eyes first! to plate your rocky road treats , use a vibrant plate — maybe something bright or funky to make that chocolate pop.
Here are a couple of my favorite tricks:
Plating Techniques
Stack them in a pyramid or zigzag pattern on a platter. This makes them look irresistibly inviting, like an art piece at a gallery!
Garnish Ideas
Fresh berries always jazz things up, especially against that rich chocolate backdrop. Sliced strawberries or blueberries on the side of your treats will make everything look fancy and delicious !
Color Combinations
Balance is key, so consider serving them with a scoop of vanilla ice cream or a dollop of whipped cream. The contrast between colors and textures will have everyone reaching for seconds.
Visual Appeal Tips
Even a sprig of mint can transform the boring into the beautiful. Little touches matter, folks!
Storage & Make-Ahead: Keep ‘em Fresh!
A pro tip? make these in advance for parties or gatherings! store your treats in an airtight container in the fridge — they last about a week.
Here's how to keep that freshness:
Storage Guidelines
Use parchment paper between layers to prevent sticking. Who wants to battle with that?
Preservation Methods
Consider wrapping individual treats in plastic wrap for easy grabbing, especially for kids or on-the-go snacks. Super convenient!
Reheating Instructions
Honestly, they don’t need reheating. The cool and crunchy texture is what makes them so phenomenal! But if you insist, a few seconds in the microwave isn’t a bad idea.
Freshness Duration
After about a week, they might start to harden a bit. If your family is anything like mine, they’ll be gone long before that happens!
Creative Variations: Because Why Not?
Get quirky with your treats! I mean, why stick to the basic recipe? Here are a few fun spins I've tried that are total game-changers :
Flavor Adaptations
Love coconut? Throw in some shredded coconut flakes! Trust me, it's a dream come true.
Dietary Modifications
Need a nut-free option? Swap walnuts for crushed pretzels to keep that salty crunch without the allergy scare.
Seasonal Twists
During the holidays, add some crushed peppermint candy! Instant festive vibes in your chocolate treat recipes, and you’ll be the star of the gathering.
Regional Variations
How about Southern-style with a touch of pecans? It's like bringing a piece of nostalgia right to your table.
Complete Nutrition Guide: Know What You’re Eating
While these Rocky Road Treats are indulgent, they have a plus side too. Let’s break it down:
Detailed Breakdown
Each treat has about 220 calories. You can indulge without the guilt if you've been sweating it out at the gym, right?
Health Benefits
These treats do pack a punch! Nuts offer healthy fats and some protein, while balsamic marshmallows and cocoa can satisfy your sweet tooth without going overboard.
Dietary Considerations
They're vegetarian-friendly! So it’s perfect for most diets, just be mindful of the nut allergies.
Portion Guidance
Cut these into smaller squares to keep the cravings at bay. Trust me on portion control; you’ll thank me later!
Expert FAQ Solutions: Got Questions?
Let’s tackle the usual queries:
Can I make these gluten-free? Absolutely! Just find gluten-free graham crumbs, and you’re golden!
What if my mix doesn’t hold? Try chilling it longer. If still a no-go, add a bit more melted butter or a splash of milk.
How do I know when they’re set? They should be firm to the touch after a few hours in the fridge. They should not stick to your fingers!
Wrap Up with Sweet Encouragement
Don’t hesitate! chill rocky road treats - irresistibly sweet are an easy dessert idea perfect for any summer get-together or cozy movie night.
They’re fun to make, equally fun to eat, and provide a wonderful opportunity for family bonding in the kitchen. so gather your loved ones, get creative, and whip up a batch of these quick treat recipes .
I guarantee they’ll bring smiles all around! enjoy those delicious and easy treats, my friends!
Chill Rocky Road Treats Card
⚖️ Ingredients:
- 2 cups (300g) graham cracker crumbs
- 1 cup (240ml) unsweetened cocoa powder
- 1 cup (225g) unsalted butter, melted
- 1 cup (200g) granulated sugar
- 1 teaspoon (5ml) vanilla extract
- 2 cups (300g) mini marshmallows
- 1 cup (150g) semi-sweet chocolate chips
- 1 cup (130g) chopped nuts (walnuts or almonds)
- 1/2 cup (90g) chocolate chips, melted (for drizzling)
🥄 Instructions:
- Step 1: Line the baking pan with parchment paper, leaving a slight overhang for easy removal.
- Step 2: In a large bowl, combine graham cracker crumbs, cocoa powder, and sugar.
- Step 3: Add melted butter and vanilla extract. Mix until well combined.
- Step 4: Gently fold in mini marshmallows, chocolate chips, and chopped nuts until evenly distributed.
- Step 5: Evenly press the mixture into the prepared baking pan, smoothing the top.
- Step 6: Place in the refrigerator for at least 1 hour until firm.
- Step 7: Melt additional chocolate chips and drizzle over the chilled treats before cutting, if desired.
- Step 8: Lift the treats out using the parchment overhang, cut into squares, and serve.
Previous Recipe: How to Make Quick Pickled Beetroot: Easy & Delicious Tangy Treat
Next Recipe: How to Bake Delightful Bread Pudding in 45 Minutes: My Cozy Recipe