Delightful Easy Marshmallow Rice Crispy Treats
Looking for a fun treat? These Easy Marshmallow Rice Crispy Treats are perfect for nostalgic moments, picnics, or cozy nights. Let’s create something delightful together!

- A Sweet Blast from the Past
- Recipe Overview: A Nostalgic Treasure
- Wholesome Goodness: Key Benefits of Homemade Treats
- Essential Ingredients Guide
- Mastering the Professional Cooking Method
- Pro Tips & Secrets
- Perfect Presentation
- Storage & Make-Ahead
- Creative Variations
- Complete Nutrition Guide
- Expert FAQ Solutions
- Wrapping Up with Some Encouragement
- Recipe Card
A Sweet Blast from the Past
You know that feeling when a whiff of something suddenly takes you back to your childhood? for me, it’s the smell of marshmallows melting on the stove.
One summer evening, i was rushing to make my favorite rice cereal dessert —the classic easy marshmallow rice crispy treats - delightful .
You remember those, right? creamy, gooey, and wonderfully sweet, they held a special place during my childhood snacks. the best part? the whole house smelled divine as the sweet marshmallows melted and mixed with buttery rice cereal!
Making these treats is like reliving a moment—good times with friends, laughter, and just pure joy. Honestly, who doesn’t want to mix up a batch of chewy rice crispy squares that are just as magical today as they were back in the day? You know? They're the kind of no-bake treats that can literally make you feel like a kid in a candy store again!
Recipe Overview: A Nostalgic Treasure
The origins of this treat go back to the 1930s when a clever marshmallow company published a recipe for what they called "rice krispie treats.
" since then, it has evolved into a beloved dessert in many american households. fast forward to today, and guess what? these treats are super popular for kids' birthday parties, school lunches, and even cozy movie nights.
They’re a staple at potlucks and gatherings, and if loved by many, they definitely deserve a spot in your sweet snack repertoire!
Now, let's get real—this recipe is as uncomplicated as it gets. it requires just a few ingredients and takes only about 50 minutes from start to finish, including chilling time.
Sound too good to be true? i promise, it’s easy! with a mix of melting, mixing, and only a small amount of patience, you'll have treats that yield 12 generous squares —or if you're like me, just a few for you and a whole lot to share!
When it comes to cost, it doesn’t break the bank. you’re looking at minimal ingredients that won’t have you scrambling to the grocery store.
Seriously, if you can find yourself some mini marshmallows , butter, and crispy rice cereal , you’re already halfway there!
Wholesome Goodness: Key Benefits of Homemade Treats
Beyond the nostalgic vibes, these marshmallow snacks bring a bunch of joy and health benefits—sort of. yeah, they’re not exactly health food, but when made at home, you control what goes in! start with fresh marshmallows and quality butter, and you’ve got a crowd-pleaser that’s about love and sweetness.
Plus, they’re a fantastic way to introduce kids to fun baking with kids . i mean, how else will they learn kitchen skills?
Also, i can’t even begin to tell you how versatile these treats are! want to jazz them up for a birthday party? you can easily make them into marshmallow dessert variations .
Toss in some sprinkles or even make chocolate and marshmallow treats .
Hosting a casual get-together? Cut them into smaller squares for sharing , because, let’s be real, these delicious dessert bars look great on any table spread!
If you're into creative rice crispy variants , you could fold in some peanut butter or even go with s'mores-inspired treats by adding crushed graham crackers and chocolate.
The world of easy dessert recipes is your oyster with these.
So, ready to dive into the ingredient section? Grab your apron or your favorite comfy tee, and let’s whip these up together for a delightful taste of nostalgia combined with the fun of one of the simplest dessert recipes with marshmallows ever!
Essential Ingredients Guide
When diving into the world of easy marshmallow rice crispy treats - delightful , it’s all about knowing your essentials.
Let’s break down the stuff you need, plus some golden tips on selection and storage! trust me, these little gems are more than just a dessert; they're a ticket back to those carefree childhood days.
Premium Core Components
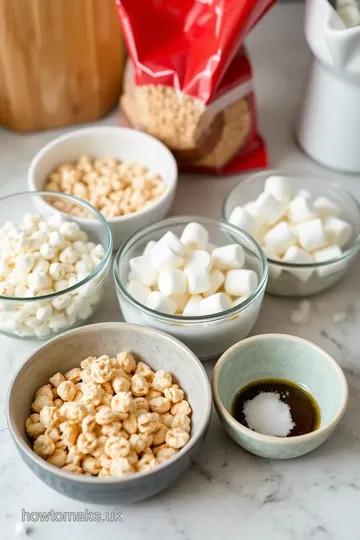
Starting with the core ingredients, remember that quality is king. for our crisply sweet creation, you’ll primarily need 4 cups (90 g) of crispy rice cereal, 10 oz (280 g) of mini marshmallows, and 4 tablespoons (57 g) of unsalted butter.
But hang on a second! freshness tips are crucial. when picking out your marshmallows, look for those super fluffy ones, as they melt like a dream.
Check the packaging too. a solid expiration date means a tasty treat is on the way! keep them stored in a cool, dry place; they can last a few months if sealed just right.
When it comes to butter, cool storage is key. if your butter’s too warm, it may affect the texture of your treats.
Just be careful not to let it sit out too long—room temperature butter isn’t your best friend here.
Signature Seasoning Blend
Now, we can’t forget about flavor boosters! while this treat shines on its own, a pinch of salt adds depth.
If you want to get fancy, add 1 teaspoon (5 ml) of pure vanilla extract to bring out the sweetness.
You could even mix in some 1/4 cup (40 g) chocolate chips or colorful sprinkles for that extra flair; i’m all about those fun variations!
I mean, who's not down for some chocolate and marshmallow treats , especially for birthday parties or cozy nights with friends? That’s where leveraging regional variations can bring in a whole new world of indulgence! Think about cinnamon or nutmeg for your own flair!
Smart Substitutions
Oh, life can throw us curveballs—maybe you’re out of marshmallows or need a dairy-free option! Panic not! A common alternative for rice cereal desserts is cornflakes.
If you’re in the middle of making this and realize you’re babysitting kids with nut allergies, creamy peanut butter can replace butter (for a totally different, yet delightful, treat).
Just a heads-up though—adjust the sweetness when you do this!
Kitchen Equipment Essentials
Let’s chat gear. you only need a few must-have tools for this creation: a medium saucepan, a large mixing bowl, and a spatula or wooden spoon will do the trick.
Seriously, simplicity is key!
If you’re in a pinch for a baking dish, just grab a loaf pan or even a pie dish. It’s all about creativity here; easy baking projects can work with what you have!
And oh, clean-up can be a hassle. that’s why i always recommend lining your dish with parchment paper. it not only makes for easy removal, but it also saves time on scrubbing later.
Rustle Up Some Creation
Alright, folks, grab your ingredients and kitchen tools because it’s time to dive into the delightful process of making our easy marshmallow rice crispy treats ! enjoy the nostalgia, the messiness, and the deliciousness that is about to unfold.
Prepare to revisit those heartwarming childhood memories, one chewy rice crispy square at a time—and don’t be shy, let’s have fun baking with the kids!
Let’s get cooking!
Mastering the Professional Cooking Method
Cooking isn't just about throwing ingredients together. it’s about transforming those humble ingredients into something spectacular. whether you’re whipping up a feast for family or hosting a backyard bbq, mastering some professional cooking methods can elevate any dish.
Let's dive into essential preparation steps that set the stage for success, and trust me, it all starts with being organized!
Essential Preparation Steps
Mise en place: sounds fancy, right? it just means “everything in its place.” before you cook, gather all your ingredients and tools.
Chop those veggies, measure out your spices, and lay it all out. this makes cooking smoother and avoids that "oh snap, i forgot the garlic!" panicky moment!
Time management tips: set a timer for every step. seriously! whether it’s the butter melting or a pot of water coming to a boil, timers help you stay on track.
You won’t believe how much easier cooking becomes when you check your watch instead of just winging it!
Organization strategies: a tidy workspace keeps your mind clear. clean as you go; it reduces stress and makes for less chaos.
It is mind-blowing how much doing dishes in between cooking cuts down on the clean-up afterwards. you’ll thank yourself later.
Safety considerations: don’t be a hero—use oven mitts for hot pans and always handle knives with care. keep a first-aid kit handy, especially if your kitchen skills are still a bit.
.. "under construction." better safe than sorry, right?
Step-by-Step Process
Let’s break it down into easy, numbered instructions. Starting with your mise en place:
- Prep Your Ingredients. Wash, chop, and measure.
- Heat Control: For most sautéing, aim for a medium heat (around 350° F / 175° C) so you can cook things without burning.
- Cook for the Right Time: You want to nail that timing—overcooking can lead to mushy veggies. Keep an eye on things!
- Visual Cues for Doneness: Use color and texture as your guide. Is that chicken golden brown? Perfect! You’re approaching deliciousness.
Expert Techniques
Now, let’s get to those pro tips that’ll have your friends asking for your secrets.
Professional Methods: Did you know that resting cooked meats can enhance flavor and juiciness? Let your steak chill for about 5- 10 minutes before slicing.
Critical Steps Explained: When baking, use room temperature ingredients for even mixing. Incorporating cold eggs into warm batter can lead to disaster (I’ve learned this the hard way!).
Quality Checkpoints: Always taste as you go. Is that sauce missing something? Maybe a squeeze of lemon? Take a moment to adjust your flavors.
Troubleshooting Tips: If a dish turns out too salty, balance it with a pinch of sugar or some fresh herbs. A little creativity can save your meal.
Success Strategies
When it comes to cooking, avoiding common pitfalls is key.
Common Mistakes to Avoid: Don't overcrowd your pan. If you do, you’ll end up with steamed, soggy ingredients instead of seared perfection.
Quality Assurance Tips: Invest in a good thermometer; it’s essential for meats. For chicken, you want that magical internal temp of 165° F or 75° C .
Perfect Results Guide: Practice makes perfect, folks! Don’t get discouraged if things don’t go as planned. The more you cook, the better you’ll get.
Make-Ahead Options: Who doesn’t love a little prep ahead of time? Marinades or sauces can often be made days in advance for deeper flavors—oh, heavenly taste!
Now that you’ve got the nitty-gritty on professional cooking, let’s transition to something equally delightful: Additional Information .
You might want to check out some easy dessert recipes like easy marshmallow rice crispy treats - delightful . seriously, these are the ultimate rice cereal dessert that brings a wave of sweet nostalgia straight from our childhood snacking days.
Perfect for parties or a cozy movie night with the fam. these marshmallow snacks are a breeze to prepare, requiring no-bake magic.
Stay tuned; i've got tips and tricks coming up for these delicious dessert bars that everyone will love!
Pro Tips & Secrets
Let me tell you, making easy marshmallow rice crispy treats - delightful is so simple, anyone can do it! here’s the scoop on how to nail it every time.
First off, freshness is key! use fresh marshmallows —they melt beautifully and keep your treats nice and gooey. if they’ve been sitting in your pantry for months, you might end up with hard clumps instead of that lovely fluffiness.
Also, want to save time? melt the butter and marshmallows together in a medium saucepan over low heat. stir gently and don’t walk away! the moment those marshmallows start to melt, you’ll want to jump in and keep stirring.
If you get distracted, your marshmallows could never melt right, leading to... well, sad treats.
And here’s a little trick: spray your hands with a hint of cooking spray when you press the mixture into the pan.
Seriously, it saves you from ending up with sticky hands! you can also throw in some sprinkles or chocolate chips while mixing if you're feeling fancy.
Oh my gosh, talk about a flavor party!
Perfect Presentation
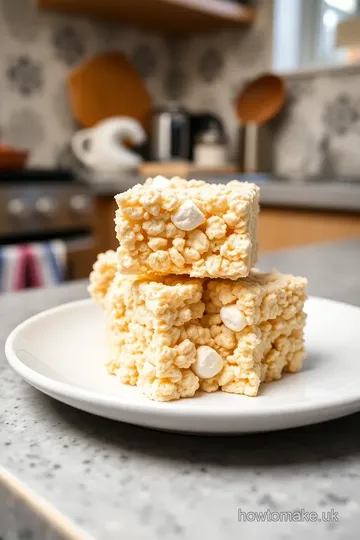
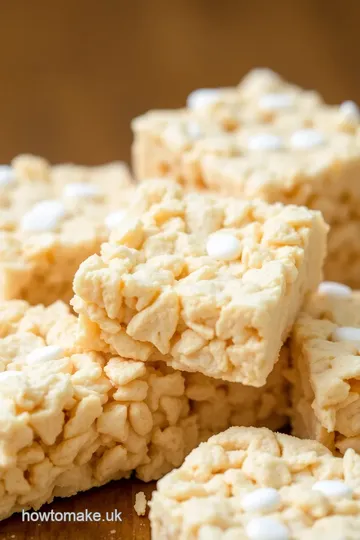
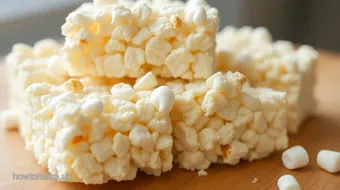
Now, when it comes to putting those treats on display, presentation matters, right? i mean, who doesn’t love eye candy? to plate your chewy rice crispy squares , consider cutting them into fun shapes—think hearts or stars.
It makes them perfect for birthday parties or just a fun weekend treat!
Garnishing is super fun too. try adding a few colorful sprinkles on top before they set; they make the treats pop! and if you want to go full-on dessert mode, drizzle some melted chocolate over the top.
The contrast of colors not only looks fabulous but also adds an extra level of sweetness. perfect for sweet snacks for kids !
Storage & Make-Ahead
So, you've made a big batch of these no-bake treats —what’s next? if you've got leftovers (which, let’s be honest, is a miracle), store them in an airtight container to keep them fresh.
They should last about 3 to 5 days at room temperature. want to keep them even longer? you can freeze them! just pop them in a freezer-safe bag with a sheet of parchment paper between layers to avoid sticking.
They'll last up to 2 months .
When it comes time to eat those frozen treats, let them thaw at room temperature for about 30 minutes. No one likes frozen, crunchy marshmallows, right? Just make sure you keep an eye on them so they don’t go stale!
Creative Variations
One of the best things about these marshmallow delights is how easy it is to get creative . looking to shake things up? try adding peanut butter into the mix for a nutty twist.
Or, celebrate summer with s’mores-inspired treats by mixing in some crushed graham crackers and mini chocolate pieces. seriously, you can create a new childhood memory every time you make them!
For a seasonal treat, substitute pumpkin spice flavor during the fall or sprinkle in some crushed peppermint candies during the holidays.
It’s amazing how you can transform this rice cereal dessert according to what's in season or your mood!
Complete Nutrition Guide
Alright, let’s talk about the health side of these treats. while they’re definitely a sweet tooth’s dream, understanding what’s in them helps keep things balanced.
Each serving has about 150 calories —not too shabby for a dessert, right? it includes some good energy from the carbs, but keep in mind it’s also loaded with sugar.
For families with dietary needs, don’t fret! you can use allergy-friendly options like gluten-free cereal or substitute with dairy-free butter.
Just remember, these treats are more about indulgence and less about health, so enjoy them occasionally!
Expert FAQ Solutions
So, you might be asking yourself, "What if my treats don’t set?" First off, relax; you can always pop them back on low heat and mix in a bit more melted marshmallow.
Or, if you want them softer, let them chill in the fridge for a bit before cutting. remember, it’s all about trial and error.
That’s what kid-friendly baking recipes are all about—fun and creativity!
Wrapping Up with Some Encouragement
Now that you’ve got all the tips and tricks, get in that kitchen and start whipping up your easy marshmallow rice crispy treats - delightful ! whether you’re enjoying them at a picnic, movie night, or a family gathering, these treats are bound to bring a bunch of smiles.
So roll up those sleeves and get ready for a gooey, joyful experience. trust me, you won’t regret it! happy baking!
Delightful Easy Marshmallow Rice Crispy Treats Card
⚖️ Ingredients:
- 4 cups crispy rice cereal
- 10 oz mini marshmallows
- 4 tablespoons unsalted butter
- 1 teaspoon pure vanilla extract
- Pinch of salt (optional)
- 1/4 cup chocolate chips (optional)
- 1/4 cup colorful sprinkles (optional)
🥄 Instructions:
- Step 1: Line a 9x9-inch baking dish with parchment paper for easy removal later.
- Step 2: In a medium saucepan over low heat, melt the butter, stirring gently until completely liquefied.
- Step 3: Stir in the mini marshmallows and continue to mix until melted and smooth.
- Step 4: Remove from heat and add vanilla extract and a pinch of salt, mixing until incorporated.
- Step 5: In a large mixing bowl, add the crispy rice cereal and pour the melted marshmallow mixture over it. Gently fold together until all the cereal is coated.
- Step 6: Pour the mixture into the prepared baking dish and press down gently with wet hands or a spatula to create an even layer.
- Step 7: Allow the treats to cool at room temperature for about 30 minutes, or until set.
- Step 8: Once set, remove from the dish using the parchment, and cut into squares to serve.
Previous Recipe: How to Bake Crisp Salt and Pepper Chips in 30 Min: My Favorite Snack!
Next Recipe: Delicious Simmered Veggie Piccalilli Delight: 5 Easy Tips to Enjoy!