How to Make Peach Vinegar: 5 Easy Steps for Refreshing Flavor
Looking to capture summer's essence? Let me show you how to make peach vinegar in 5 easy steps. You’ll love the tangy burst it adds to salads and drinks!

Have you ever taken a bite of a juicy peach on a hot summer day? it’s pure bliss! now, picture capturing that incredible flavor in a bottle.
How to make peach vinegar: 5 easy steps for refreshing flavor isn’t just a neat kitchen trick—it’s a way to savor those summer vibes year-round.
Honestly, i never thought i could make my own vinegar, especially from fruit! but once i cranked out my first batch of homemade peach vinegar , i felt like a culinary rockstar.
It’s not just about saving those peaches from becoming mushy; it’s about transforming them into something so much more.
Peach vinegar is a unique condiment, and its origins are all about preserving fruit. people have been getting creative with fermented fruit vinegar for ages, using various methods to keep their favorite flavors alive.
With so many trendy recipes and diy kitchen staples, peach vinegar is having a major moment today. and let’s be real: it’s easy to whip up, taking just 15 minutes of hands-on time, though you'll need to be patient during the fermentation process.
You'll be just two weeks away from peachy perfection!
Recipe Overview
When you think about vinegar, it might not sound super exciting, right? but peach vinegar is different! it’s like summer in a bottle.
The peaches give it that sweet and tangy vibe that can jazz up salads, marinades, or even homemade cocktails. you can thank the fermentation process at home for turning simple ingredients into a flavor explosion.
And the best part? peach vinegar is budget-friendly—you're looking at about $5 to make your own, and it yields around two cups.
Key Benefits
Okay, let’s talk benefits because who doesn’t love a win-win situation? first off, peach vinegar is not only delicious, but it also packs some great health perks.
Vinegar is known for its potential weight loss benefits—hello, low-calorie condiment options! plus, it can enhance your digestion. you can even think of it as a natural flavor enhancer that gives your dishes a little pizzazz.
Perfect for summer cookouts, peach vinegar adds flair to salads. imagine fruity marinades for grilled meats—yum! you can also make tangy salad dressings that'll impress your friends.
It’s perfect for special occasions, too. just imagine bringing a homemade bottle to a picnic. everyone will want to know how to use peach vinegar !
Over other similar recipes, peach vinegar stands out because of its unique flavor. sure, you can buy vinegar at the store, but why not have fun and make your own? not only is homemade more irresistible, but it also allows you to control the sweetness and tartness.
Plus, it's a super fun project to do with friends or even with the kiddos when they're curious about where their food comes from.
Now, if you’re ready to jump into this fruity fermenting adventure, let’s check out the ingredients you’ll need to get started. Trust me, your taste buds will thank you later!
Essential Ingredients Guide
Alright, folks! if you’re diving into the world of cooking like i often do, understanding your essential ingredients is key.
Let’s break it down so you're all set to whip up amazing dishes, starting with something as exciting as homemade peach vinegar !
Premium Core Components
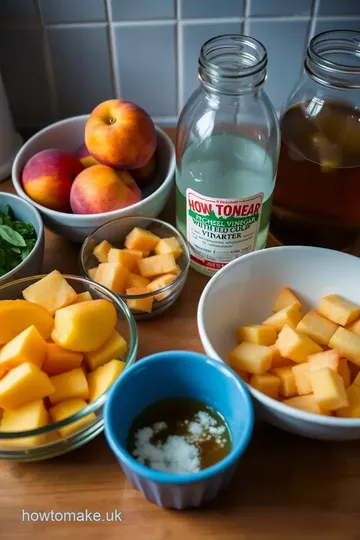
First things first, let’s talk about quality. When you're picking your ingredients, look for quality indicators —you want those ripe peaches that smell like summer! For anyone worried about measurements, here’s the scoop:
- Fresh Peaches : Around 4 ripe peaches (about 500g ), pitted and chopped.
- Water : You’ll need 2 cups (or 480ml ).
- Apple Cider Vinegar : Grab 1 cup ( 240ml ), and make sure it's raw and unfiltered for the best flavor.
Now, don’t toss those peaches in just any old spot! keep them in a cool, dry place . they usually last about 3-5 days at room temperature, or you can pop them in the fridge to extend their life a tad longer.
Signature Seasoning Blend
Alright, let's jazz up that peach vinegar. the beauty of this recipe is that the flavors are all about that balance of sweet and tangy.
You definitely want to make a signature seasoning blend . here are a couple of essential herbs and spices to consider when you're dressing things up.
Go for fresh herbs like basil or mint —they work wonders with that sweet-tangy peach goodness. You can even think about adding a bit of jalapeño if you're feeling feisty.
Smart Substitutions
Life happens! Maybe you’re out of peach or just want to mix things up. No worries, I got you! Here are some common alternatives .
- Instead of apple cider vinegar , try white wine vinegar . It gives a different twist but still keeps things flavorful.
- No sugar? Use honey or even coconut sugar for a natural sweetener that adds its own depth.
- If you’re in a pinch and need a quick pickling solution , you can use any fresh fruits like berries instead of peaches, giving you that fruity vinegar vibe.
Kitchen Equipment Essentials
Now, before we get into the fun part—making your vinegar—let’s chat about the must-have tools. You don’t need fancy gadgets, folks! Here’s a quick rundown of what to have on hand:
- A large glass jar (1-2 quart capacity is perfect).
- Fine mesh strainer or cheesecloth. This is how you’ll strain out those chunky bits post-fermentation.
- A rubber band or some string to secure that cheesecloth over the jar.
Keep it simple! The most crucial part is letting the mixture breathe during the fermentation process . You want that tangy flavor to develop.
Wrapping It Up
With all this info, you’re ready to dive into your peach vinegar making journey . Just imagine drizzling your homemade vinegar over fresh salads and creative dishes, adding a unique flair to your meals—talk about an upscale condiment!
If you’re keen to learn more about the actual steps, don’t miss out on the upcoming section. i’ll show you how to make peach vinegar: 5 easy steps for refreshing flavor.
Your taste buds will thank you!
Professional Cooking Methods: Elevate Your Kitchen Game
Okay, friends, let’s talk about stepping up your cooking skills! whether you're whipping up a quick weeknight meal or hosting a dinner party, mastering professional cooking methods can save you time, enhance flavors, and make you look like a boss in the kitchen.
Buckle up because it’s about to get nifty with some pro tips and tricks!
Essential Preparation Steps
Mise en place . sounds fancy, huh? it just means having everything prepped and ready before you start cooking. chop up your ingredients, measure your spices, and maybe even pour a glass of wine (just saying!).
It’s a game-changer when you don’t have to rummage through your cabinets mid-cook.
Time management tips are crucial, too. think about the steps in your recipe and organize tasks. for example, if you're making a killer pasta sauce and garlic bread, start with the sauce.
While it simmers away, you can focus on getting that bread ready. boom—double the deliciousness without the madness.
Organization strategies help you know which tools to grab. have your cutting board out, your pan heated to the right temp (around medium heat , folks), and don’t forget about your safety.
Always use knives wisely and keep your workspace tidy to avoid any pesky accidents. nobody wants to cut a finger when they're trying to impress!
Step-by-Step Process
Here’s the scoop on how to put it all together. Follow these clear, numbered instructions for success:
- Prep your ingredients. You can feel like a pro when everything is laid out.
- Control your temperature. If you're searing meat, aim for a hot pan—like 400° F —for that delicious crust.
- Timing is everything! Follow your recipe closely for cooking times. That chicken? You want it to reach 165° F to be safe and scrumptious.
- Watch for visual cues for doneness. Is that steak getting a nice color? If so, it’s getting close! Trust those eyes.
Expert Techniques
Let’s dive into some professional methods that’ll make your food sing. one biggie? basting . it means spooning hot liquids over your dish while it cooks.
If you're roasting chicken, basting helps to keep it juicy. just be careful to keep a good eye; you don’t want to overdo it.
Critical steps also include tasting as you cook. it sounds simple, but trust me, it’s a must! the last thing you want is a bland dish.
Use your senses. trust your taste buds!
When it comes to quality checkpoints , always check for seasoning before serving. A bit of salt or acid can elevate your dish instantly.
Troubleshooting tips? If your sauce is too thick, add a splash of broth or water. Too salty? A little sugar might balance that out.
Success Strategies
Now, let’s make sure you don’t trip over common mistakes. one classic error is not reading the entire recipe first.
You might think you’re cruising, but running last minute for an ingredient is a buzzkill.
Quality assurance tips mean checking your produce. No one processes bad fruit for homemade vinegar, am I right?
For perfect results, aim for consistency in your cooking. Measure ingredients accurately—nobody wants a baking bomb because guesswork went awry.
And if you’re about that meal-prep life, consider some make-ahead options . soups and stews often taste even better the next day.
Just store them in the fridge until you're ready to dig in!
Wrapping Up: Peach Vinegar Magic
Now, if you're feeling inspired and curious, let me spill the beans on something super cool: how to make peach vinegar: 5 easy steps for refreshing flavor .
It’s not just any vinegar recipe; it’s a luscious, tangy condiment that kicks up salads and marinades. seriously, this homemade peach vinegar brings the essence of summer to your kitchen.
So, if you're down for a sweet and tangy project, stay tuned! we’ll dive into the world of peach vinegar recipes in the next section.
Trust me; it's an amazing way to whip up some deliciousness right from your home. and if you ask me, a little homemade vinegar can elevate your dishes to gourmet status—let’s go!
Pro Tips & Little Secrets
Alright, let’s dive into the nitty-gritty of making homemade peach vinegar. I’m tellin’ ya, there’s a few pro tips that can turn your peach vinegar experience from "meh" to "wow!"
I learned through trial and error that using ripe peaches is key. those juicy, sweet ones pack way more flavor.
Oh my gosh, when you chop them and mix them with apple cider vinegar , it’s like a summer party in your kitchen!
Also, keep an eye on the sweetness. You can add 1-2 tablespoons of sugar, but those taste buds are yours! If it feels too tart, toss in a little more sugar.
Time-saving technique? Use a large glass jar and cover it with cheesecloth. Yup. Forget the lids! That way, you’ve got airflow for fermentation while making sure fruit flies don’t crash the party.
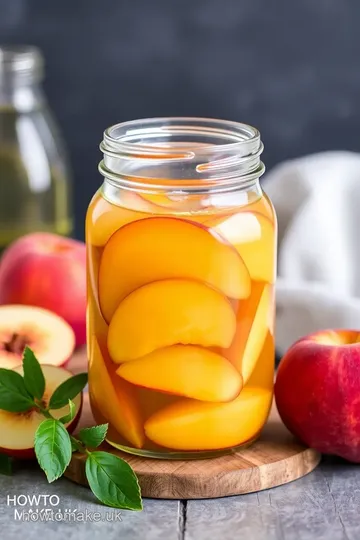
Perfect Presentation
Once you’ve got that peachy goodness ready, it’s time to shine. Plating techniques can transform your dish from ordinary to Instagram-worthy.
You can pour your vinegar into a beautiful bottle and drizzle it over a colorful salad. Believe me, the looks on your friends’ faces? Priceless!
Think about garnishing too! fresh mint or basil sprigs not only look good but elevate that flavor. and if you are pouring some over grilled veggies? use those colors—vivid greens, deep reds, and, of course, the golden peaches.
Storage & Make-Ahead
So you’ve made a decent batch of this homemade peach vinegar. Now, how long does it last?
Storage guidelines are simple: Keep your freshly made vinegar in the refrigerator. This helps maintain its freshness . Honestly, you can enjoy it for up to a month, maybe more if you store it right!
To reheat ? Nope, you don’t need to. Just pour it cold on salads or into cocktails.
Creative Variations
Feeling adventurous? Let’s talk about some creative variations .
Maybe you want something a bit spicy? Toss a jalapeño slice into that fermenting jar alongside the peaches! Trust me, it’s a game-changer.
Also, if you’re trying to lighten up your meals, think about using peach vinegar in place of creamy dressings . It gives you that sweet and tangy kick without all the calories!
And for a seasonal twist, why not mix peaches with blackberries or strawberries? The fermentation process becomes a fun experiment, I swear every batch leads to something new.
Complete Nutrition Guide
Now, let’s touch on the nutritional benefits of your homemade peach vinegar. a tablespoon only brings around 15 calories , so it’s a super low-calorie condiment! pair that with the health perks of apple cider vinegar—like regulating blood sugar and helping digestion—and you’ve got yourself a winner.
Portion guidance is straightforward : A tablespoon is all you need to jazz up those salads or marinades.
Wrapping It All Up
So, there we have it! making your peach vinegar not only adds flavor but also brings a bit of summer into your kitchen year-round.
Remember, how to make peach vinegar: 5 easy steps for refreshing flavor is all about fun, experimentation, and making memories.
Whether you’re drizzling it on a salad or using it for a tangy cocktail, homemade peach vinegar is your new secret weapon in the kitchen.
Who knew something so simple could be so delightful? now get out there, indulge in some sweet and tangy recipes , and create your very own peachy masterpiece!
Frequently Asked Questions
What is the basic recipe for how to make peach vinegar?
To make peach vinegar, you will need ripe peaches, water, raw apple cider vinegar, and sugar. Simply chop the peaches, combine all ingredients in a large glass jar, and let it ferment for 2-4 weeks. Strain and store once you've achieved your desired flavor.
How can I customize the flavor of my peach vinegar?
You can create variations such as spicy peach vinegar by adding slices of jalapeño during fermentation, or herbal peach vinegar by including fresh herbs like basil or mint. Mixing different fruits, like blackberries or strawberries, can also introduce exciting new flavors.
How should I store peach vinegar once it's ready?
Store your prepared peach vinegar in a clean, sealed bottle in the refrigerator. This will help maintain its freshness and flavor. If kept properly, peach vinegar can last for several months.
What can I use peach vinegar for in cooking?
Peach vinegar is versatile—drizzle it over salads, use it as a marinade for meats, or mix it into cocktails and mocktails for a refreshing twist. It pairs beautifully with goat cheese and nuts in salads, enhancing the overall flavor.
Is making peach vinegar difficult for beginners?
No, making peach vinegar is quite easy and requires minimal cooking skills. The most challenging part is waiting for the fermentation process to complete, but the steps involved are straightforward and manageable for any home cook.
How to make peach vinegar: 5 easy steps for refreshing flavor—are they time-consuming?
The active preparation time is only about 15 minutes, followed by a fermentation period of 2-4 weeks. While you do need to wait, the process itself is simple and doesn't require frequent attention—just a few gentle stirrings and a taste check along the way.
How to Make Peach Vinegar: 5 Easy Steps for Refreshing Flavor Card

⚖️ Ingredients:
- 4 ripe peaches, pitted and chopped (about 500g)
- 2 cups (480ml) water
- 1 cup (240ml) apple cider vinegar, raw and unfiltered
- 1-2 tablespoons (15-30g) sugar (adjust to taste)
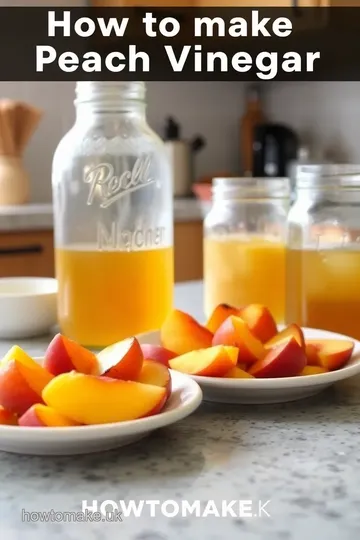
🥄 Instructions:
- Step 1: Wash and chop peaches. Measure water, apple cider vinegar, and sugar.
- Step 2: In a large glass jar, mix chopped peaches, water, and sugar. Pour in apple cider vinegar.
- Step 3: Cover the jar with cheesecloth secured with a rubber band to allow airflow while keeping contaminants out. Store the jar in a cool, dark place for fermentation.
- Step 4: Let the mixture sit for 2-4 weeks
- Step 5: Once desired flavor is achieved, strain the mixture through a fine mesh strainer or cheesecloth to remove solids. Pour the resulting liquid into a clean bottle for storage.
Previous Recipe: Deliciously Easy Lion's Mane Tea: 7 Benefits You Need to Know
Next Recipe: 5 Deliciously Easy Ways to Delight Your Taste Buds with My Favorite Protein Jello