Delightfully Infused Anise Extract in 6 Weeks
Craving rich, aromatic flavors? Discover how to infuse anise extract in 6 weeks delightfully and elevate your desserts with this homey recipe.

- Discovering the Delight of Anise Extract
- Recipe Overview: The Heritage of Anise
- Key Benefits: Why Anise Extract Rocks
- Essential Ingredients Guide
- Elevate Your Culinary Game: The Professional Cooking Method
- Pro Tips & Secrets for Your Anise Infusion
- Perfect Presentation for Maximum Appeal
- Storage & Make-Ahead Tips
- Creative Variations for Your Anise Extract
- Complete Nutrition Guide
- Expert FAQ Solutions
- Recipe Card
Discovering the Delight of Anise Extract
Picture this: it’s the middle of winter, and you're snuggled up on the couch, sipping a cozy cup of tea.
The aroma of star anise wafts through the air, reminding you of indulgent holiday desserts and warm family gatherings. ever wondered how to bring that delicious anise flavor into your kitchen? well, let me tell you about my journey to infuse anise extract in 6 weeks delightfully .
Trust me, it’s easier than it sounds and oh-so-rewarding!
You know, the first time i decided to play mad scientist in my kitchen was with a simple idea: why not create my own homemade anise extract ? it felt like something out of a food blog, but it was really my way of connecting to tradition.
Anise has been used in cooking and baking for ages – just think of those classic italian cookies or fragrant chai teas! fast forward from that snowy day, and here i am, ready to share everything i learned!
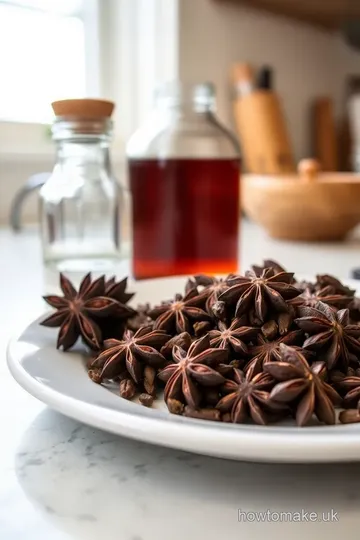
Recipe Overview: The Heritage of Anise
Anise extract , derived from the star anise pod, has roots deep in culinary history. this spice has been used since ancient times for its bold flavor and medicinal benefits.
Today, it’s making a comeback, and people are obsessed! whether you want to elevate your baking or add a little zing to your cocktails, this extract is where it’s at.
Making your own is a fun project. sure, it takes six weeks of waiting, but hey, good things come to those who are patient! preparation is pretty simple – give yourself about 15 minutes to whip everything together.
The hardest part? just letting it steep! and if you’re like me, that waiting game can feel like forever.
Before we dive into cooking, let’s talk cost . you know what’s wild? this flavorful extract can be made for under $20! you get roughly a cup, which means you’ll have plenty for all your culinary adventures.
Key Benefits: Why Anise Extract Rocks
Now, onto the good stuff – why even bother with homemade extract? first, there are health benefits to anise spice.
Packed with antioxidants and known for its digestive properties, it’s like having a home remedy tucked away in your pantry!
Plus, think about the unique flavor it adds to your goodies. picture it: your best friend’s birthday party, and you whip up a cake with hints of that anise flavoring for desserts .
Trust me, folks, everyone will be talking about your baking for ages! it's especially great in cookies and gives an incredible twist to cocktails.
I mean, who wouldn't love an anise extract in cocktails ? talk about sophisticated!
Use this extract for special occasions like thanksgiving dessert tables or cozy holiday gatherings. it makes for beautiful gifts in jars, perfect for thoughtful friends and family.
Just imagine making someone’s day with a homemade blend!
So, you might wonder, what makes this method stand out? the vodka infusion technique ensures the purest flavor shines through.
Forget pre-made options filled with preservatives or weird additives; this is all about natural flavor extracts that let your creativity fly! plus, the shelf life of homemade extracts is fantastic.
You can stash it away for months and it will last if stored properly.
Alright, ready to dive into the nitty-gritty? You might just find it’s easier to follow than you think. Let’s gear up for ingredients and see what you’ll be needing for this flavor-packed journey!
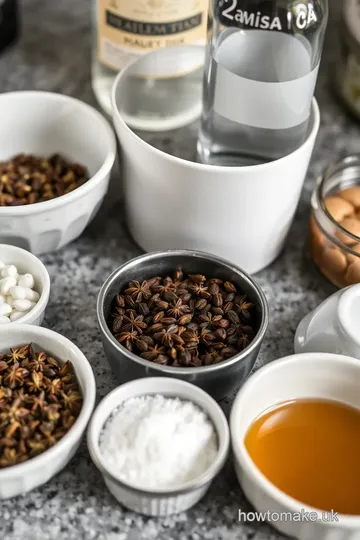
Essential Ingredients Guide
Gather around, folks! today we’re diving into the basics of cooking with herbs and spices, and trust me, this is your one-stop-shop for everything you need to get crackin’ in the kitchen.
We’re serving up essential ingredients and i promise you'll be whipping out amazing dishes quicker than you can say “star anise.
”
Premium Core Components
Let’s chat about the premium core components that should be in every cook’s pantry. you know, those ingredients that’ll elevate your dishes from flat to fabulous.
For instance, when considering fresh spices , think about what's actually fresh! look for vibrant colors and fragrant aromas. trust me, quality matters.
Measurements? Okay, note this down:
- 1 cup = 240 ml . Simple!
- When it comes to storing, the shelf life for herbs can be a bit tricky. Generally, dried herbs last around 1 to 3 years , while fresh herbs only hold on for about 1 week in the fridge. You want those flavors fresh and ready to rock your dishes!
Signature Seasoning Blend
Now let’s sprinkle in some magic with a signature seasoning blend . you’ve got your essential spice combinations. think cinnamon and nutmeg for sweet dishes, or chili, garlic, and cumin for a savory kick.
And herbs? oooh, let’s not forget about parsley, basil, and that ever-so-sweet dill. pair them right, and you'll have your friends begging for second servings!
Need a secret? anise flavoring for desserts is such an underdog—definitely something unique to play with. the regional variations are endless—you might find a cajun blend in louisiana or an italian herbs mix in a family naples-style wood oven.
The world is your spice rack, so get creative!
Smart Substitutions
Ever caught without an ingredient when you’re ready to rumble in the kitchen? no stress— smart substitutions are your best pals! got no black pepper? try red pepper flakes to spice things up.
If you’re diving into herbal extract recipes and you're out of fresh basil, don’t sweat it—dried will do in a pinch.
Ask yourself, “what else could i use?” this is particularly crucial when catering to dietary modifications—they can sneak up on ya! if you’re looking for a vegan substitution for that creamy sauce, consider using cashew cream instead.
Remember, it’s about being resourceful!
Kitchen Equipment Essentials
Alright, moving on to kitchen equipment essentials —let’s be real, you don’t need a million gadgets cluttering your counters! start with the must-have tools: a good knife, cutting board, and a trusty pot.
Honestly, if you’ve got those, you're golden.
Alternatives can come in handy too. don’t have a fancy citrus juicer? just use a fork to squeeze that lemon.
I once had to get creative for a dish by using a strainer instead of a fancy gadget for my infused spirits recipes.
Talk about resourcefulness!
Let’s not forget about the practicalities of storage—keep your spices in a cool, dark place, away from sunny windows, to maintain their freshness.
It’s amazing how proper storage can make those flavors pop!
So, we’ve covered some serious ground on how to prep, store, and maximize your kitchen game. And if you’re digging all this, then we’re about to kick it up a notch with a delicious DIY project!
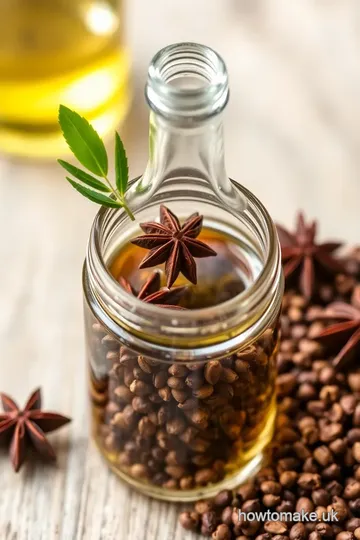
Time to Get Infusing!
Now that you've got a handle on your ingredients and tools, it's time to infuse anise extract in 6 weeks delightfully .
This process not only makes a fantastic homemade anise extract but also fills your kitchen with a delightful aroma. using star anise, you'll create a flavorful extract for baking or even adding to your favorite cocktail recipes!
Just imagine the magic you’ll create with that anise extract in cakes or a cozy cup of tea. So grab your vodka, star anise, and let’s get cooking!
Elevate Your Culinary Game: The Professional Cooking Method
Cooking is an art, and like any artist, the best chefs have their methods and tricks up their sleeves. Today, let’s break down the Professional Cooking Method and discover how to level up your kitchen skills with some neat, essential preparation steps, followed by a step-by-step process you can easily follow!
Essential Preparation Steps
First off, let's chat about mise en place ; it’s fancy french for “everything in its place.” trust me, this is the secret sauce for success! when you're prepping your ingredients, chop, measure, and set everything out so it’s ready to go.
This cuts down on chaos when you're in the thick of things—it’s just you and the food.
Now, time management is key! when i cook, i usually set a timer. like, if i know i need to cook something at 350° f for 30 minutes , i’ll set a timer for 25 minutes to start checking for doneness.
It’s all about staying ahead, my friend!
Being organized is crucial, too. Keep your workspace tidy. Wipe up spills and keep used tools in one spot. You don’t want to be digging through a mountain of dirty dishes when you’re going for that dinner bell ring!
And let’s not forget about safety! always use a cutting board, and keep those knives sharp—blunt knives can lead to accidents.
Also, be cool with your hot pots and pans. remember, those mugs of boiling water can be as dangerous as your ex after a breakup!
Step-by-Step Process
Alright, now that we've set the stage let's break it down into manageable steps.
- Preparation : Gather everything you’ll need. Step 1 : Preheat your oven to 350° F .
- Cooking (Temperature Cues) : Always keep an eye on those temperatures. If you’re roasting veggies, a final 425° F can give a nice caramelization.
- Time Matters : Cooking's all about timing. For instance, when baking cookies, set the timer for 10 minutes but check them at 8 minutes . You want that perfect soft edge!
- Visual Cues : Is something baking? Look for that golden crust. If it’s a roast, the internal temperature should hit 165° F for chicken.
Expert Techniques
Let’s dive into some expert techniques that can really turn the heat up in your kitchen!
- Searing meat : This locks in moisture and flavor. Get that skillet hot—really hot. You want it to hiss like a snake when the protein hits the surface.
- Checking Quality : Be your own quality inspector. Look for those deep, rich colors in your sauces and feel the texture. If it isn't smooth, it needs more love!
- Troubleshooting : Oh, it happens to the best of us. If your sauce is too thick, add a little broth. If it's too salty, toss in some sugar to balance it out. Bam, back on track!
Success Strategies
Now that we’ve covered the technical stuff, I'd love to share some success strategies!
Avoid common mistakes. For example, don't overcrowd the pan—your food won’t brown. Give each piece its space, kinda like how we all need a little bubbling room at a party!
Quality assurance? Always taste as you go. Trust your palate! If something feels off, add some seasoning. Just a pinch of salt or a dash of pepper can make flavors pop!
And hey, if you’re busy, consider make-ahead options. Soups and stews hold up beautifully in the fridge for days. Plus, they get better over time. Talk about a win-win!
Infusing Anise Extract in 6 Weeks Delightfully
Speaking of managing time well, have you considered diy recipes? i once made homemade anise extract , a six-week infusion recipe , and let me tell you, it was an awesome experience.
You just need vodka and star anise pods! sure, it takes a while, but the rich, licorice-like flavor it adds to cakes or even cocktails is so worth it.
Additional Information
So there you have it! the professional cooking method is all about organization, timing, and quality. by mastering these elements, you’ll crank your cooking game up a notch.
And when you finally get to infuse anise extract in 6 weeks delightfully, you’ll have all the skills needed to make the best out of your aromatic creations.
Whether you're blending it into desserts or adding it to that spicy chili, it’ll be the flavor kick you didn't know you needed.
Pro Tips & Secrets for Your Anise Infusion
Alright, my friends! let’s talk pro tips . when you’re diving into crafting your own homemade anise extract , you want it to be spot-on, right? first off, use quality vodka ! seriously, it makes a difference.
Go for a smooth, neutral spirit — you want the star anise to shine, not be overpowered by nasty flavors.
Now, here’s one of my favorite time-saving techniques : when preparing your jars, crank up the hot soapy water, rinse, and let those jars chill while you get everything together.
Also, don’t skip shaking the jar once a week. this helps the anise release its flavor faster, making sure you infuse anise extract in 6 weeks delightfully !
Want to enhance flavors even more? try adding a vanilla bean to the mix. it’ll create this beautiful fusion that’ll elevate all your baked goodies.
Trust me; your cakes and cookies will be begging for this touch of greatness.
Oh, and don’t forget about presentation ! you can’t just toss your extract in a random bottle. use a pretty jar and label it nicely.
It makes your homemade gifts in a jar look legit!
Perfect Presentation for Maximum Appeal
Speaking of pretty jars, let’s chat about plating techniques and garnish ideas . anise extract is golden for flavoring desserts, but it also looks fab when you showcase it.
If you’re drizzling it over desserts, a little swirl can be a showstopper. add in some fresh herb sprigs or a sprinkle of cocoa powder for texture.
And color combinations? earthy tones of your anise extract paired with whites or cream can create a stunning visual. think about warm spices like cinnamon or nutmeg on your coffee or desserts.
It’s all about that visual appeal, folks !
Storage & Make-Ahead Tips
Now that your extract is ready, let’s talk about storage guidelines . once you’ve strained and stored your extract, keep it in a cool, dark place to maintain that flavor.
Light is the enemy of flavor, you know?
As for how long it’ll last? You’re looking at a decent shelf life of 1-2 years if stored right. But if you’re like me and always pulling it out for baking, it won’t last long anyway!
Oh! speaking of “make-ahead”, the beauty of this recipe is you can whip it up now and enjoy it when the season calls for warm desserts.
It’s perfect for cozy nights in with a cup of chamomile tea, right?
Creative Variations for Your Anise Extract
Let’s get a little wild with creative variations ! want to adapt the flavor? try infusing other spices along with the star anise.
Fennel seeds offer a sweet touch too! you could even consider seasonal twists; add some cardamom during the holiday season for that spiced nostalgia.
If you’re following any dietary considerations, just know that the base for the extract can be switched out. maybe you prefer rum or another spirit—go for it! the world of infused spirits recipes is your oyster.
Got some leftover extract? you can even whip up flavored cocktails that'll impress your friends.
Complete Nutrition Guide
Alright, let’s get real about what you’re working with nutritionally. one cup of this delightful concoction has about 32 calories , mostly negligible in the grand scheme of things.
You won’t exactly be guzzling down cups of it, after all.
But think of the health benefits of anise! It can aid digestion and has some antioxidant properties. It’s amazing how the simplest culinary uses for anise pack such a punch.
Expert FAQ Solutions
Got questions? here’s a quick troubleshooting guide . if your extract doesn’t taste strong enough after 6 weeks, keep it steeping.
Patience is key. maybe your star anise was a little stale, which can happen. for success, always start with fresh spice usage to keep those flavors vibrant.
Want to experiment? Go nuts with variations. You’d be surprised how unique baking flavors emerge with just a bit of creativity!
In conclusion, why not get started with your own anise extract today? you’ll transform your kitchen adventures and impress your friends with this aromatic treat.
It doesn’t matter if you're seasoned or just stepping into this affair; the joy of creating your own diy spice extracts is unparalleled.
So roll up those sleeves, pour that vodka, and let’s infuse some magic! your taste buds will thank you later.
Delightfully Infused Anise Extract in 6 Weeks Card
⚖️ Ingredients:
- 1 cup (240 ml) vodka (or other neutral spirit)
- 5-6 whole star anise pods
- 1 glass jar with a tight-sealing lid
🥄 Instructions:
- Step 1: Prepare the Jars: Clean the jar thoroughly with hot, soapy water and rinse well. Ensure the jar is completely dry.
- Step 2: Combine Ingredients: Add the star anise pods to the jar. Pour in the vodka, ensuring the anise is fully submerged.
- Step 3: Seal and Store: Seal the jar tightly and store in a cool, dark place for 6 weeks.
- Step 4: Shake Occasionally: Shake the jar gently once a week to help the extraction process.
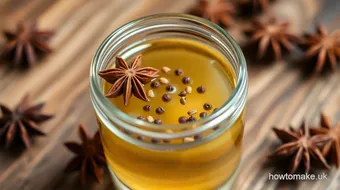
- Step 5: Strain the Extract: After 6 weeks, strain the mixture through a fine-mesh strainer or cheesecloth and discard the star anise pods.
- Step 6: Bottle and Label: Pour the strained extract into a clean bottle using a funnel. Label the bottle with the date and store it.
Previous Recipe: How to Make the Best Blend Oreo Milkshake: A Delightful Treat!
Next Recipe: How to Whip Breastmilk Lotion for Silky Smooth Skin: My Family's Secret