Make Cake Pops from Leftover Cake Easily
Ever wondered how to make cake pops from leftover cake easily? With just a few steps, you can create scrumptious, bite-sized treats that delight everyone! Let's dive in!

- Make Cake Pops from Leftover Cake Easily: A Delicious Journey from Waste to Wonder
- A Sweet Slice of Cake Pop History
- So, Why Should You Make Cake Pops?
- Time to look into into the Ingredients
- Your Essential Ingredients Guide to Cake Pops
- Professional Cooking Method: Transforming Leftover Cake into Delightful Cake Pops
- Additional Recipe Information: Mastering the Art of Cake Pops
- Recipe Card
Make Cake Pops from Leftover Cake Easily: A Delicious Journey from Waste to Wonder
Let me take you back to a day that practically changed my dessert game forever. it was one of those days where the fridge was littered with bits of cake left from last weekend’s birthday bash.
I was staring at this mountain of cake remnants, thinking, “what in the world am i gonna do with all this?” and just like that, inspiration struck! make cake pops from leftover cake easily.
I mean, let's be real; we all have those moments of culinary crisis, right? you wanna be resourceful, and who doesn’t love a fun, bite-sized dessert? plus, the best part? these little delights can bring smiles to a birthday party or just be a special treat on an ordinary tuesday.
A Sweet Slice of Cake Pop History
Cake pops started popping up in the 2000s as a whimsical way to use cake scraps. they’re basically little balls of cake, coated with chocolate and rolled in toppings—what’s not to love? fast forward to today, they’re practically a dessert staple at parties and events all across the nation.
The appeal? easy cake pops are the perfect blend of creativity and taste, not to mention any kid (or adult, let's be honest) loves a good bite-sized dessert.
You won’t need a baking medal for this; it’s super easy and takes about 50 minutes from start to finish.
And the good news? you can whip up approximately 20 cake pops without breaking the bank.
So, Why Should You Make Cake Pops?
Let’s talk about the goodness packed in these bites. not only are cake pops a fun way to reduce food waste, but they also offer a unique opportunity to get creative with flavors and coatings.
There are so many benefits that make these treats a hit.
Health Benefits and Recipe Highlights
While cake isn't exactly a health food, these leftover cake ideas allow you to sneak in some fun without guilt.
You can control the ingredients! if you're aiming for something a bit healthier, consider using gluten-free cake and dairy-free chocolate options for those special dietary requirements.
Plus, they’re great for any occasion. whether it's a kid’s birthday party or a cozy gathering with friends, these pops will stand out.
Don’t you just love the feeling of homemade treats? they’re not only delicious but thoughtful, too.
Easy Customization and Unique Toppings
One of the coolest parts about making easy cake pops is that you can switch up the flavors and toppings to match your mood (or what’s left in your pantry).
From crushed nuts to colorful sprinkles or even drizzled chocolate, the sky's the limit! plus, they’re so easy to decorate and impress the pants off your guests.
Who wouldn’t want to serve chocolate-covered cake bites with unique toppings?
Time to look into into the Ingredients
Alright, so you might be wondering how to transform that leftover cake into delectable pops. before we get our hands dirty, let’s go over what you'll need.
Grab your leftover cake (any flavor works), a bit of frosting, and some chocolate melts or chocolate chips. got that? great! now, let’s dive into how to make these delightful cake pops that are sure to impress.
Remember, the process is remarkably straightforward. you're essentially mixing your crumbled cake with frosting to create a dough-like base. chill it, dip it in melted chocolate, sprinkle on your chosen toppings, and voila! delicious cake pops are ready to be enjoyed.
I can’t wait for you to give this a shot! trust me, once you make these cake pops, you’ll wish you had leftover cake every day.
Let's roll up those sleeves and turn your cake crumbs into gold!
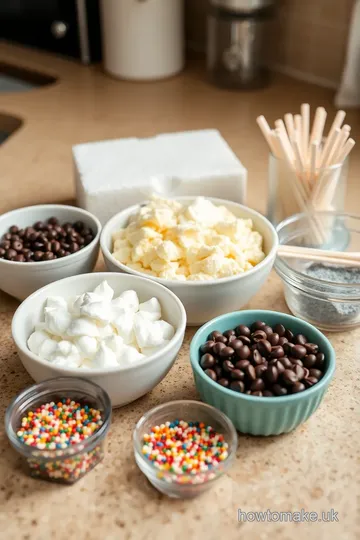
Your Essential Ingredients Guide to Cake Pops
Hey there fellow bakers! if you’ve ever looked at leftover cake and wondered what to do with it, let me tell you— cake pops are the answer! these little wonders are perfect for parties, snacks, or even just a fun little dessert for yourself.
So, let’s dive into the ingredients and equipment you’ll need to make cake pops and give that leftover cake a new life.
Premium Core Components
To whip up these delightful treats, you’ll need some essential ingredients. Here’s what I typically use:
- Cake Crumbs: About 2 cups of leftover cake crumbs (that’s roughly 240g ). Use any flavor—vanilla, chocolate, or even red velvet works beautifully!
- Frosting: You’re gonna need about ½ cup of frosting ( 120g ). It can be store-bought or homemade, whichever floats your boat!
Next, let’s talk about quality. look for fresh cake . if it’s a bit stale, don’t sweat it— cake pops can handle it.
Just make sure the frosting is spreadable, not rock hard. when storing your leftover cake, keep it in an airtight container, and it should last about 3-4 days at room temperature.
If you want it to last longer, stick it in the fridge for about a week.
Signature Seasoning Blend
Now, cake pops can use a nice touch of flavor, right? The beauty is in the toppings! Here’s a short list of flavorful options that are crowd-pleasers:
- Chocolate Coating: For that luscious finish, grab about 1½ cups of chocolate melts or chocolate chips (around 255g ).
- Oil: A tablespoon of vegetable or coconut oil about 15ml , helps your chocolate coat smoothly.
And if you want to jazz them up, think about toppings! Sprinkles, crushed nuts, or coconut can keep things colorful and festive.
Smart Substitutions
You might be wondering, "What if I don’t have everything I need?" No problem! Here are some common alternatives for your cake pops :
- Use crumbled cookies instead of cake crumbs for a different flavor.
- You can toss in nut butter or yogurt in place of frosting if you're feeling adventurous.
These quick cake recipes are super flexible, letting you get creative with what you’ve got on hand!
Kitchen Equipment Essentials
Gonna whip up these easy cake pops? Grab yourself some must-have tools:
- A mixing bowl
- A microwave-safe bowl (for that chocolate magic)
- A cookie scoop or tablespoon for shaping
- A Styrofoam block or cake pop stand (to set those beauties while they cool)
Prepping this stuff is a breeze, but storing your cake pops? just keep those in an airtight container in the fridge for up to a week.
You might even want to create a fun cake pop stand for display!
Making Magic Happen
Okay, ready for the part where we create these fun bite-sized desserts ? you’re going to absolutely love how easy it is to make cake pops from leftover cake easily .
It all starts with crumbling that cake and mixing it with frosting until you have a dough-like consistency, then rolling them into balls.
Don’t forget to chill them before dipping in that delicious chocolate for the best results.
And trust me, once you dip and decorate them, you’ll have the most colorful dessert ideas that’ll impress every guest at your party! plus, they’re so easy to customize with the toppings you choose.
So why not grab your leftover cake, and let’s get this party started? I can't wait to show you how to make these tasty treats even more scrumptious! Now, here comes the fun part—check out my detailed instructions, and let’s create some magical cake pops together!
Professional Cooking Method: Transforming Leftover Cake into Delightful Cake Pops
Oh my gosh, have you ever looked at that leftover cake and thought, “what on earth am i gonna do with this?” if you’re nodding, then you’re in luck! today we’re diving headfirst into the world of easy cake pops , showing you not just how to make ‘em but also how to wrap your head around the professional cooking method behind this creative and delicious transformation.
So let’s get this party started!
Essential Preparation Steps
To create those homemade cake pops , we need to start with some key prep work. first up, let’s chat about mise en place .
Fancy french term, right? but it just means having everything ready before you start. measure out your 2 cups of leftover cake crumbs and ½ cup of frosting .
Save yourself from chaos by keeping things organized.
Now, let’s sprinkle in some time management tips . you’re looking at a total of around 50 minutes here, but you’ll be surprised how quickly it goes when you get your groove on.
Ten minutes of prep, about 30 for chilling, and just 5 for melting chocolate.
Speaking of safety considerations, when you’re melting those chocolate chips—remember to go slow! Use 30-second bursts in the microwave. We don’t want a scorched chocolate mess on our hands, trust me.
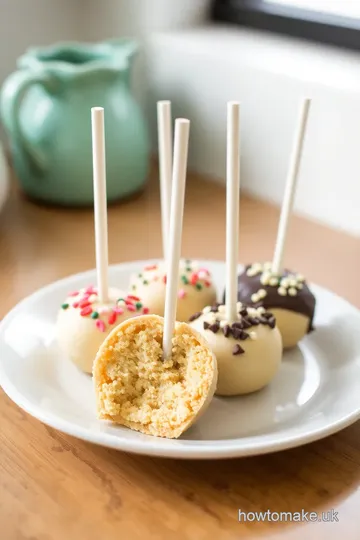
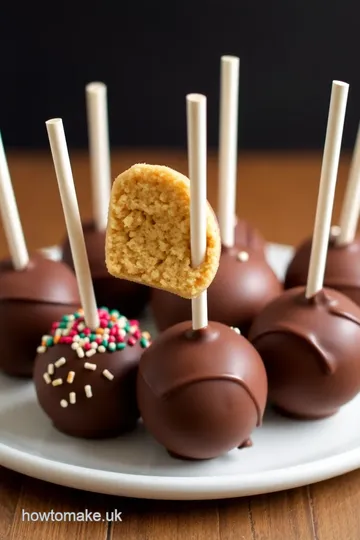
Step-by-Step Process
Alright, now for the fun part! Let’s break this down into simple, clear steps:
-
Prepare Your Cake Base: Crumble that leftover cake in a bowl and mix in the frosting until you achieve a dough-like consistency.
-
Form Cake Balls: Get your hands messy! Use a cookie scoop to grab about 1 inch of this mix. Roll it into a ball and place on a lined baking sheet.
-
Chill the Cake Balls: Pop those balls in the fridge for 30 minutes . This is crucial for making sure they hold their shape when you dip them.
-
Melt the Chocolate Coating: Combine your chocolate with a bit of oil in a microwave-safe bowl. Remember those 30-second intervals ? Stir well each time. You want a smooth melting magic!
-
Dip the Cake Pops: After chilling, grab some lollipop sticks and insert them into your chilled balls. Then, dip into that glorious melted chocolate.
-
Add Toppings: While the chocolate is still wet, sprinkle on your desired toppings. Get creative—sprinkles, crushed nuts, you name it!
-
Set the Cake Pops: Let them firm up by standing them in a foam block or custom cake pop stand. Patience pays off!
Expert Techniques
Now, here’s the deal about professional methods : it’s all about perfecting your technique. have your chocolate at the right temperature (around 90- 100° f ) for that glaze-like finish.
Keep an eye on the timing; you don’t want to be waiting around too long.
Quality checkpoints? Check for doneness by giving your cake pop a slight tug. If the chocolate feels too soft or wobbly, it’s not ready yet.
And if trouble strikes—like if your cake pops start cracking—just melt a touch more chocolate and use it as glue. Simple fixes for a sweet outcome!
Success Strategies
Before you dive in, here are some common mistakes to avoid: don’t over mix the cake and frosting, or you’ll have a soggy mess! also, skip setting them out in too warm of a room—chilling is your friend here.
Lastly, let’s talk quality assurance . Make sure the chocolate coating isn’t too thick; that smooth finish makes all the difference.
Oh, and if you have leftover cake pops after your party? Store them in an airtight container in the fridge for up to a week. Perfect for snack attacks!
Now that you’re all set to make cake pops from leftover cake easily , let's slide into the last section of our journey: additional information .
Whether you want some flavor variations, storage tips, or more creative dessert presentations, i’ve got you covered! you’ll be the cake pop queen or king in no time, delightful treats in hand!
Additional Recipe Information: Mastering the Art of Cake Pops
Alright, friends! let’s dive into the fun world of cake pops —you remember those little beauties, right? they’re not just eye candies; they’re your golden ticket to use up all that leftover cake.
I mean, seriously, who wants to toss perfectly good cake ? not us! with these tips and tricks, you'll not only learn how to make cake pops from leftover cake easily but also up your dessert game for celebrations big or small.
Pro Tips & Secrets
First things first, let's talk about some chef's personal insights . believe me, i’ve learned a thing or two the hard way.
Time-saving techniques ? if you’re melting chocolate, do it in 30-second bursts. you’d be surprised how quickly you can mess it up if you walk away!
For flavor enhancement , experiment with different frostings. go crazy—mix chocolate cake crumbs with vanilla frosting for a tasty surprise! honestly, it’s such a game-changer.
And don’t skimp on the presentation advice . pretty cake pops won’t just taste good; they’ll be instagram-worthy!
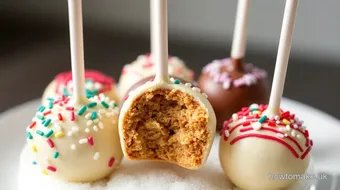
Perfect Presentation
Let’s face it: we eat with our eyes first. when it comes to plating techniques , you want these cake pops to shine.
Use a simple foam block or a pretty cake pop stand to display them nicely. a cute presentation says, "i know what i'm doing!"
Got toppings? here’s where you can get creative! think colorful sprinkles or crushed nuts to add texture. go for color combinations that pop—like white chocolate with rainbow sprinkles.
Your guests will be snapping pics before they get the chance to take a bite. visual appeal tips ? height can be striking.
Try stacking them in a jar for that wow factor!
Storage & Make-Ahead
Now you’ve got some stellar cake pops, and you might be wondering: how do i store these gems? keep them in an airtight container in the fridge, and they’ll last for up to a week.
If you’re thinking ahead, you can always prep make-ahead cake pops . just freeze the cake balls before coating them. when you're ready to impress, pull ‘em out, dip, and enjoy!
Creative Variations
Let’s spice things up! flavor adaptations include mixing leftover cake with unique frostings like pistachio or lemon for a seasonal twist.
For dietary modifications , gluten-free and dairy-free options are totally possible! use gluten-free cake and vegan chocolate for those special dietary needs.
Feeling adventurous? Try regional variations ! What about a southern-style caramel sauce instead of chocolate? Heck yes! Your cake pops will be the talk of the town.
Complete Nutrition Guide
You might be wondering about the complete nutrition guide for these sweet treats. each cake pop averages about 120 calories.
Not bad, right? they can pack in some protein and happiness too! though if you’re keeping track of sugar intake, it's good to know they have about 10g of sugar.
They’re perfect for parties as bite-sized desserts that can bring joy without the guilt!
Expert FAQ Solutions
Let’s address some common questions. how do i avoid crumbling cake pops? the trick is all in how you mix your dough—find that sweet spot between too dry and too wet.
If they’re not sticking together, add a bit more frosting! also, i get asked about cake pop tips and tricks all the time—chill those cake spheres! it truly makes a difference when dipping them.
And just so we’re clear, different cake pop flavors could kick your party into high gear. why stick to chocolate when you can offer raspberry, peanut butter, or even matcha? the possibilities are endless.
Wrapping It All Up
So there you have it, folks! you’re now armed with everything you need to know about turning your cake remnants into glorious, colorful cake pops.
By following these tips, you’ll be the star of your next gathering with easy party snacks that everyone will love.
Just think of all those treats from leftover cake—you’re practically saving the world!
So, get into the kitchen, grab those leftover cake crumbs, and let’s make some homemade cake pops that’ll wow family and friends alike.
Happy baking, and remember to treat yourself with those final bites—you deserve it!
Make Cake Pops from Leftover Cake Easily Card
⚖️ Ingredients:
- 2 cups leftover cake crumbs (any flavor, about 240g)
- ½ cup frosting (store-bought or homemade, about 120g)
- 1 ½ cups chocolate melts or chocolate chips (white, milk, or dark, about 255g)
- 1 tablespoon vegetable oil or coconut oil (about 15ml)
- Sprinkles, desiccated coconut, crushed nuts, or mini chocolate chips (optional)
🥄 Instructions:
- Step 1: Prepare Your Cake Base: Crumble the leftover cake into a mixing bowl. Stir in frosting until a dough-like consistency is reached.
- Step 2: Form Cake Balls: Use a cookie scoop to portion the mixture and roll into 1-inch balls. Place the balls on a parchment-lined baking sheet.
- Step 3: Chill the Cake Balls: Refrigerate the cake balls for at least 30 minutes until firm.
- Step 4: Melt the Chocolate Coating: In a microwave-safe bowl, combine chocolate and oil. Microwave in 30-second intervals, stirring until smooth.
- Step 5: Dip the Cake Pops: Insert lollipop sticks into the chilled cake balls. Dip each ball into the melted chocolate, coating evenly.
- Step 6: Add Toppings: Quickly sprinkle or dip the chocolate-coated pops in your desired toppings before the chocolate sets.
- Step 7: Set the Cake Pops: Place the coated pops upright in a foam block or stand until the chocolate hardens.
Previous Recipe: How to Make Soup Maker Leek Potato Comfort Dish: A Creamy Delight!
Next Recipe: How to Bake Cannabis Cake with Sweet Vanilla Flavor: A Deliciously Unique Treat!