Delicious Chocolate Krispie Cakes
Craving something sweet? Let me show you how to make Chocolate Krispie Cakes in 40 minutes! These delightful treats are perfect for kids' parties!

A Sweet Journey: Making Chocolate Krispie Cakes in 40 Minutes
You ever had one of those days where you just crave something sweet and want it now? a few weeks ago, i was sitting on my couch scrolling through some old family photos.
I stumbled upon a picture from my childhood birthday party, balloons everywhere, and guess what was front and center? a big ol’ plate of chocolate krispie cakes ! instantly, i was hit with that nostalgia wave! the crunch, the chocolate—oh my gosh, it transported me back! it hit me—why not share how to make chocolate krispie cakes in 40 minutes ? these easy treats are a hit at kids’ parties, or honestly, any occasion where you want to impress your pals.
A Bit of History Behind the Goodness
Now, some folks might not know this, but chocolate krispie cake has roots in british confectionery. it’s been delightful snack food for kids and adults alike for generations.
These cakes are super popular, especially in the uk, but they’re making waves over here in the states too! they’re like the cool cousin of rice krispie treats , but with chocolate.
Who doesn’t love a good crunch?
And hey, don’t let the easy peasy steps scare you off! you can whip this up with just a handful of ingredients.
Seriously, it’s like a 10-minute prep and then a chill-out session in the fridge. it’s perfect for those unexpected guests or an impromptu dessert for movie night.
And the best part? it won’t break the bank; all you need is your common pantry stuff.
Why You’ll Love These Cakes
Alright, let’s talk perks! one of the best things about chocolate krispie cakes is that they get you those sweet satisfaction feels without a ton of fuss.
They’re not just an easy chocolate snack ; they also pack some fun, making them ideal for kids’ party desserts .
Plus, they’re a great way to get the kiddos involved in the kitchen—who doesn’t love a little fun cooking for kids ?
And let’s not forget those health and nutrition highlights! okay, i know we’re talking dessert here, but you can actually make these a tad healthier by swapping in alternative sweeteners for desserts if you wanna cut down on sugar without losing flavor.
Toss in some nuts for added crunch because who doesn’t need more nut-free dessert ideas in their life?
The Perfect Time for Chocolate Treats
These little wonders are perfect for any occasion, right? think birthday parties, picnics, or just a chill night in. they’re flexible too! change up the toppings, add whipped cream, or even throw some fruit on the side if you’re feeling adventurous.
Trust me, it’s all about the personalized dessert ideas here. whether you want a basic chocolate fix or to impress with creative chocolate decorations, these cakes fit the bill.
Did I mention they’re also super easy to eat? No forks or spoons required! Just grab and go. They make an awesome, quick dessert idea when you need a little sugar rush.
So, are you ready to dive into the world of no-bake treats ? Grab your ingredients, and let’s get going! Before you know it, you’ll have a batch of deliciously crunchy cakes ready to share—or not—because honestly, who wouldn’t want to keep these all to themselves?
Stay tuned, because up next, we’re diving into what you need to whip up these beauties! trust me, you’ll want to make these all the time once you see how simple it really is.
Essential Ingredients Guide: Your Go-To for No-Bake Sweet Treats
When it comes to whipping up delightful sweets, having the right ingredients is key. so, let’s dive into the essential ingredients that’ll get you ready for making those fantastic chocolate krispie cakes in just 40 minutes .
Whether you’re a rookie in the kitchen or a seasoned pro, this guide is here to help you nail it every time.
Premium Core Components
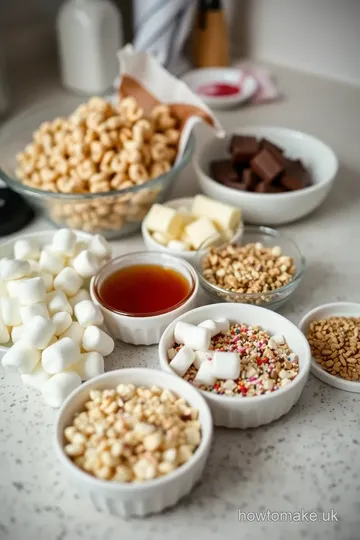
First off, here are some premium core components you'll need for any sweet treat, especially our crunchy cakes.
-
Detailed measurements: for the american crowd, that means using cups, tablespoons, and ounces; if you’re feeling fancy or international, i’ve got metric measurements too! for instance, you’ll need about 200g (7oz) of chocolate—trust me, precise measurements make all the difference.
-
Quality indicators: Look for rich, high-quality chocolate. Think creamy, smooth, and without that weird waxy texture. It should just melt in your mouth—yum!
-
Storage guidelines: most baking ingredients can hang out for a while, but chocolate? it likes to stay cool and dry.
Store it in a pantry away from heat. and for those marshmallows? airtight containers work wonders to keep them fluffy!
-
Freshness tips: Sniff your ingredients! If the chocolate smells off or the cereal feels stale, toss it. Freshness means flavor, and we want our Chocolate Krispie Cakes to shine!
Signature Seasoning Blend
Now, let’s spice things up! While our main ingredient is chocolate, a little seasoning can make a world of difference.
-
Essential spice combinations: Think about adding just a pinch of salt to highlight that chocolatey goodness. It may sound odd, but it totally works!
-
Herb selections: Those wouldn’t go near a Chocolate Krispie Cake , but in broader baking, mint works great with chocolate. However, stick to the classics for these beauties!
-
Flavor enhancers: Vanilla extract is your best buddy here. Just a splash can elevate your no-bake desserts from good to amazin’!
-
Regional variations: You can jazz it up by adding a hint of cinnamon or cayenne for a spicy kick. Why stick to the tried and true when you can have fun experimenting?
Smart Substitutions
Oops, ran out of something? No problem! Here are some smart substitutions .
-
Common alternatives: If you don't have golden syrup, honey or corn syrup are solid swaps for that gooey sweetness.
-
Dietary modifications: Need it gluten-free? No sweat! Just use certified gluten-free crisp rice cereal.
-
Emergency replacements: Short on butter? Coconut oil does the trick too! You'd be surprised how versatile these ingredients can be.
-
Seasonal options: Swap out chocolate for white chocolate when it’s spring. Throw in some berries for a fresh fruity twist!
Kitchen Equipment Essentials
Alrighty, last but not least—let’s talk kitchen equipment essentials .
-
Must-have tools: You’ll need a heatproof bowl, a saucepan, and a trusty wooden spoon or spatula. Simple right? You don’t need all the gadgets to whip up an amazing dessert.
-
Alternative equipment: If you don’t have a muffin tin, silicone molds make great substitutes.
-
Preparation tips: Always have your stuff ready before you start. It makes the process feel smooth, and who doesn’t love a stress-free kitchen time?
-
Storage solutions: An airtight container does wonders for keeping your Chocolate Krispie Cakes fresh and delicious for days! If they last that long, of course!
Now that you’ve got the lowdown on ingredients and equipment, you're all set to start creating your sweet masterpiece. remember, it’s all about sharing good times with good treats, especially when you're making chocolate krispie cakes .
So, grab your ingredients, and let's dive into the easy-to-follow steps for this delightful recipe!
Get Ready to Make Chocolate Krispie Cakes in 40 Minutes
Ah, the sweet world of no-bake desserts! if you’ve got a sweet tooth or you’re looking for a quick dessert idea , then these chocolate krispie cakes are calling your name.
Trust me, whipping these up is as easy as pie... or should i say cake? let’s dive into how you can create this simple chocolate dessert that’s perfect for kids' parties or an afternoon snack and, oh surprise, you can make chocolate krispie cakes in 40 minutes .
Yes, really!
Essential Preparation Steps
First things first, let’s talk about preparation. no pro chef goes into the kitchen without a game plan, right? this is where your mise en place comes into play.
Before you even think about melting chocolate, gather all your ingredients. we’re talking about 200 g of milk chocolate, 100 g of unsalted butter, and that golden syrup that adds just the right amount of sweetness.
Time management? key! set a timer – it’ll keep you on track. you’ll need about 10 minutes for the prep and 30 minutes to chill while you sip on some coffee, or, more likely, chase your kids around the house.
And hey, safety first! remember: melted chocolate can be hot stuff. keep a close eye on that double boiler and don’t let it get too crazy.
You want smooth chocolate, not a scorched mess.
Step-by-Step Process
Alright, let’s lock this down with some clear steps.
-
Melt the chocolate mixture:
in a heatproof bowl, combine the chopped chocolate , unsalted butter , and golden syrup .Pop that bowl over a saucepan of simmering water. stir, stir, stir until it’s all gooey and smooth. so satisfying!
-
Prepare the krispie base:
while that chocolate is melting away, grab a large bowl and add 150 g of rice cereal.If you’re feeling adventurous, toss in 50 g of mini marshmallows for extra chew. then, pour that dreamy chocolate mixture over the cereal.
Fold it all together, but gently. you don’t want to crush those crispy bits!
-
Shape the cakes:
line a muffin tin with plastic wrap or parchment. this is your mold. spoon the mixture into each cup, pressing down lightly.You want them packed but not too tight. chill in the fridge for 30 minutes to let them set.
-
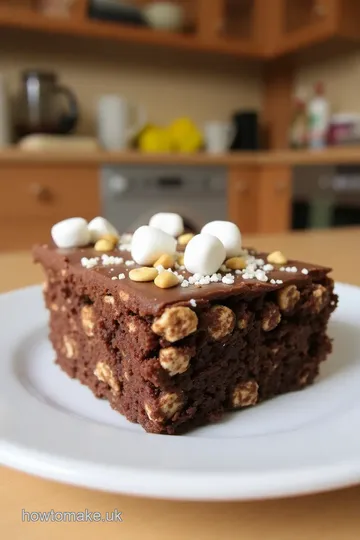
Serve and Decorate:
After chilling, pop those beauties out. Drizzle with some melted dark chocolate if you’re feeling fancy, and toss on sprinkles or crushed nuts for a stylish touch.
Expert Techniques
Now, let’s make sure those cakes turn out perfect every time. here’s the lowdown. keep an eye on that chocolate – if it gets too hot, it might seize up, ruining your effort.
Not fun.
Quality checkpoints? Give your chocolate mixture a taste before combining it with the cereals. Too sweet? Add more rice cereal. Not sweet enough? Just a pinch more syrup can fix that.
And if things go awry, don’t sweat it! If it seems too crumbly, melt a little more chocolate and mix it in.
Success Strategies
Here’s the scoop: nobody wants to bite into a messy dessert. One common mistake is not chilling long enough. Trust me; you want to wait that full 30 minutes .
Tip: For the perfect results , serve these right after chilling. They’re crunchy, chocolatey, and about as close as you can get to a twelve-year-old's party dream dessert!
And hey, if you want to prep ahead, just make the mixture a day early and let it set overnight.
Transition to Additional Information
These chocolate krispie cakes are not just a snack; they’re a fun activity to get kids involved in the kitchen—perfect for kids cooking activities .
Imagine them pouring the cereal or decorating the cakes with chocolate drizzle!
And if you’re on the hunt for more inspiration, stick around. in the next section, we’ll explore more about creative chocolate decorations and fun variations that can turn these treats into something even more special.
So, get your kitchen ready, because amazing things are coming your way!
Deliciously Crunchy Chocolate Krispie Cakes in 40 Minutes
Alright, friends! if you’re hunting for the perfect blend of crunch and sweetness, then let’s dive into the world of chocolate krispie cakes .
Seriously, these things are like little bites of joy, and guess what? you can make chocolate krispie cakes in 40 minutes ! they’re super easy and fun to whip up, making them ideal for kids' parties or just as a simple afternoon snack.
Plus, who doesn’t love a good chocolate treat? let’s talk tips, tricks, and all the good stuff!
Pro Tips & Secrets
First off, don’t skip out on making this a family job! get the kiddos involved. honestly, they’ll love helping to mix and press the crispy rice treats into the molds, making for a great bonding moment.
Now, for some chef's secrets: always melt the chocolate slowly. use a double boiler (or a heatproof bowl over simmering water) to ensure that your chocolate stays smooth.
If you heat it too fast, it can become all gritty. also, if you want a little extra flavor, toss in a pinch of salt! it really enhances that chocolatey goodness.
Here’s a time-saving tip : while the cakes are chilling for 30 minutes, tidy up! seriously, clean as you go.
It saves you from a messy kitchen later. and if you want to take your cakes to the next level, drizzle some melted dark chocolate on top once they cool.
Talk about presentation goals !
Perfect Presentation
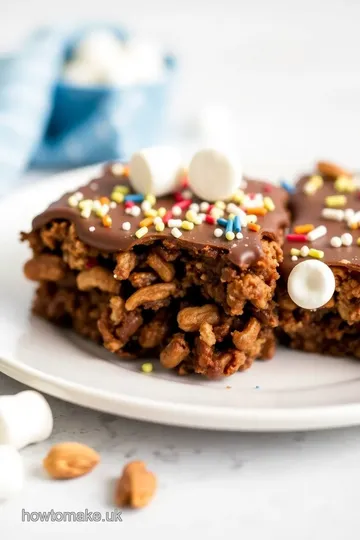
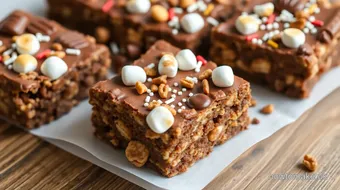
Speaking of presentation, let’s make these cakes beautiful! when you’re ready to serve, think about plating techniques . you can stack them on a cute cake stand or just arrange them beautifully on a plate.
For garnishes, try adding sprinkles or a drizzle of melted dark chocolate. it’s all about those color combinations ! maybe even toss on a few berries for that pop of color.
It’s like giving your dessert a little outfit change!
Trust me, those visual appeal tips go a long way. People eat with their eyes first, right? A lovely sprinkle of crushed nuts or colorful candies can take your no-bake treats from good to show-stopping !
Storage & Make-Ahead
Now, if you find yourself with leftover crispy rice treats (which is a miracle!), here’s how to store them. they can go in an airtight container and should last about a week.
Just make sure they’re completely cooled before you store them to maintain that crunch. if you want them to last longer, you can freeze them! just wrap them tight in plastic, and they’ll be good for up to a month.
And as you prepare these easy chocolate snacks , keep in mind that they’re great for make-ahead options. you can whip them up earlier and save the fun for later.
Which is perfect for busy weekdays or last-minute parties!
Creative Variations
Feeling funky? go wild with creative variations ! want a peanut butter delight ? just swirl in some peanut butter before you’re done mixing.
That little twist adds a whole new dimension of flavor. not to mention, if you’re looking for healthy dessert options , you can swap out the golden syrup for honey or use nut butter instead.
But wait; there’s more! you can totally adapt this recipe for different diets. want gluten-free? check out gluten-free treats and use rice cereal that’s certified gf.
And hey, if you’re feeling seasonal, add some spices like cinnamon or even a dash of peppermint extract if it's holiday time!
Complete Nutrition Guide
Now, let’s chat about the nutrition part. these chocolate treats for kids aren't just fun; they have some solid goodies, too.
A slice of heaven has about 200 calories, with a nice balance of fats, sugars, and just enough fiber to keep things rolling.
But remember, portion guidance is key—sometimes just one of these little beauties is all you need.
Expert FAQ Solutions
You might still have questions. don't worry; i’ve got your back! if your cakes don’t hold together, it might be that they didn’t get packed tightly enough.
Press them down while filling the molds. and if you run into chocolate melting issues, just reduce the heat! love experimenting? that’s where the fun lies; feel free to mix it up with chocolate-covered rice cereal or even mini marshmallows for extra chewiness.
Wrapping It Up
So, there you have it! making these homemade chocolate desserts is like a little adventure for your taste buds. quick, simple, and super satisfying.
Whether it’s for a kids' party or just because, these crunchy chocolate snacks will hit the sweet spot! give it a go and watch those happy faces light up.
Happy baking (or should i say, no-baking)! 🍫
Delicious Chocolate Krispie Cakes Card
⚖️ Ingredients:
- 200 g milk chocolate, chopped
- 100 g unsalted butter
- 2 tablespoons golden syrup or corn syrup
- 150 g rice cereal (e.g., Rice Krispies)
- 50 g mini marshmallows (optional, for added chewiness)
- 50 g dark chocolate, melted (for drizzling)
- Sprinkles or crushed nuts (for garnish)
🥄 Instructions:
- Step 1: In a heatproof bowl, combine chopped milk chocolate, unsalted butter, and golden syrup. Set the bowl over a saucepan of simmering water (double boiler method) and stir until smooth. Remove from heat and let cool slightly.
- Step 2: In a large bowl, add the rice cereal and optional mini marshmallows. Pour the melted chocolate mixture over the cereal. Gently fold until all cereal is coated.
- Step 3: Line the muffin tin with plastic wrap or parchment paper if using. Spoon the mixture into the prepared muffin tin, pressing down gently to pack. Smooth the tops and refrigerate for 30 minutes to set.
- Step 4: Once set, carefully remove the cakes from the tin. Drizzle with melted dark chocolate and sprinkle with desired toppings. Serve immediately or store in an airtight container.
Previous Recipe: How to Bake Butterfly Cakes: Delightful Sweet Treats for Every Occasion
Next Recipe: How to Make Chocolate Rice Krispie Cakes Quickly: A Delicious Treat!