Quick & Easy Chocolate Rice Krispie Cakes
Wondering how to make Chocolate Rice Krispie Cakes quickly? This easy, no-bake recipe combines crispy textures with rich chocolate for an irresistible snack!

- A Decadent Delight: Quick & Easy Chocolate Rice Krispie Cakes
- Your Go-To Essential Ingredients Guide for Delicious No-Bake Chocolate Rice Krispie Cakes
- Mastering the Art of Professional Cooking : A Delicious Journey
- Pro Tips & Secrets for Making Chocolate Rice Krispie Cakes Quickly
- Perfect Presentation for Those Chocolate Treats
- Storage & Make-Ahead Tips
- Creative Variations to Keep It Fun
- Expert FAQ Solutions
- Wrap It Up with a Sweet Note
- Recipe Card
A Decadent Delight: Quick & Easy Chocolate Rice Krispie Cakes
Oh my gosh, do you remember the first time you sunk your teeth into a chewy, crunchy, chocolatey rice krispie treat? that first bite is pure magic.
They were always a hit at every birthday party i attended, and let me tell you, they practically disappeared faster than i could say "chocolate lovers dessert!" with that in mind, isn't it time we dive into how to make chocolate rice krispie cakes quickly , adding our own twist? trust me; your taste buds will thank you!
A Sweet Slice of History
These little gems hail from the uk, where they took the no-bake dessert scene by storm. while some might argue that the americans put their own spin on rice krispie treats, the original idea of combining crispy rice cereal with melty marshmallows has a universal appeal that spans generations.
Today, these cakes are popular on both sides of the pond. they're not just nostalgic; they’re modern classics! plus, with only a handful of ingredients and zero oven time, it's no wonder they shine among easy chocolate recipes and simple snack ideas .
Wanna know the best part? you can whip these up in about 50 minutes— 30 minutes of chilling time included! and with roughly 12 servings per batch, they are perfect for parties, lunchboxes, or just when the sweet tooth strikes as you binge-watch your favorite show.
Why You'll Love Them
Okay, let’s chat about the key benefits of these beauties. first, they are family-friendly recipes that you can make with the kids—trust me, nothing beats the laughter and mess of making homemade treats together.
Plus, they’re nut-free! so, you can send them to school without worrying about allergy issues.
Nutritionally, they’re not the heavy hitters when it comes to health food, of course, but they do provide a sweet source of energy and joy.
With crispy rice, marshmallows, and a chocolate topping, you’re looking at some sweet snacks that can brighten anyone's day! they’re especially great for birthday treats, festive gatherings, or just when you crave a quick dessert fix—as in “fast chocolate cakes” mode.
Have a sudden cold front? toss them in the fridge and enjoy a chilled dessert that’s ideal for snacking on those cozy evenings.
What better way to warm up your heart than with some crispy chocolate bliss?
Making It Happen
Ready to tackle this simple recipe? gather your ingredients: rice krispies, marshmallows, butter, and your choice of chocolate—semisweet or otherwise! the only tools you’ll need are a saucepan, a mixing bowl, and a baking pan.
Sounds easy-peasy, right?
And here's the kicker: you don’t have to be a pro at baking without an oven to ace this. all it takes is a little patience as you melt everything together, combine it, and let it chill.
Oh, and if you're feeling extra adventurous, you can throw in chocolate topping ideas or even some chopped nuts to give it that extra crunch .
At the end of it all, these quick party desserts can be just the ticket for your next gathering. with minimal effort and maximum satisfaction, you’ll have your friends and family smiling from ear to ear.
So, are you ready to dive into the ingredient list? let’s make some magic happen and transform simple ingredients into a chewy, chocolatey masterpiece that’s bound to be a hit.
Get those snacks ready; you’re in for a treat!
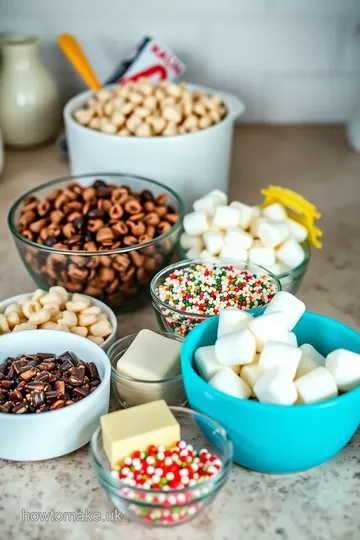
Your Go-To Essential Ingredients Guide for Delicious No-Bake Chocolate Rice Krispie Cakes
Alright, friends, let's get right into it! if you want to make chocolate rice krispie cakes quickly , you've stumbled into the right spot.
These little bites of joy are pretty easy to whip up, and today, we’ll not only talk about the recipe but also break down some essential ingredients that'll make your kitchen life easier.
Premium Core Components
First off, if you're going to bake—or in this case, no-bake—it's all about knowing your premium core components . Here’s the deal:
-
Detailed measurements : for those of you who like precision, we’re talking 4 cups (100g) of rice krispies and 1 package (10 oz/280g) of mini marshmallows.
Use that kitchen scale if you have it!
-
Quality Indicators : Fresh marshmallows and real chocolate chips make a world of difference. Check the expiration dates, and for chocolate, look for a glossy finish.
-
Storage Guidelines : Keep those marshmallows in an airtight container for up to 2 months. And store leftover cakes (if there are any—good luck!) in the fridge for about a week.
-
Freshness tips : if you want to keep everything crispy and delightful, make sure to keep your rice krispies sealed tight.
A tight container can keep them fresh for a month or more!
Signature Seasoning Blend
Now, we aren't talking spices here, but you may want to think about flavor enhancers:
-
Essential Spice Combinations : While this recipe doesn’t call for many spices, a pinch of salt can make a world of difference. Salt brings out that rich chocolate goodness.
-
Herb Selections : Herbs in dessert? Not exactly, but a sprinkle of sea salt or a touch of cinnamon could elevate your chocolate game!
-
Regional Variations : If you’re feeling adventurous, try swapping the chocolate for peanut butter or adding crushed candy canes for a festive twist!
Smart Substitutions
Let’s face it—sometimes you’re in a pinch, so knowing your options can save the day!
-
Common Alternatives : No marshmallows? Try marshmallow fluff! Just measure about 8 oz, and you’ll be golden.
-
Dietary Modifications : Looking for a nut-free treat? Use sunflower seed butter instead of any nut butter in your topping.
-
Emergency Replacements : Forgot those chocolate chips? Grab a candy bar and chop it up!
-
Seasonal Options : Want to make those Rice Cereal Treats pop in the fall? Toss in some pumpkin spice or crushed graham crackers for that autumn vibe!
Kitchen Equipment Essentials
Okay, let’s talk about the tools you need—not many, I promise!
-
Must-Have Tools : A large mixing bowl, a saucepan, and a spatula are, honestly, all you need for this journey into sweet goodness.
-
Alternative Equipment Options : No baking pan? Use a deep dish or even a lined cookie sheet. Just adjust your cutting later.
-
Preparation Tips : Always measure your ingredients before you start. It makes the process smoother than butter on a hot skillet!
-
Storage Solutions : Airtight containers are key for keeping those Crispy Rice Squares fresh.
Now that we have our essentials sorted, we’re primed and ready to dive into those instructions! just wait until you get your hands on those easy chocolate recipes .
You’ll be the hit of any party with these chocolate lovers desserts . stick around for the guide—it’s gonna be both fun and, most importantly, tasty! so, grab your marshmallows, and let’s do this!
Mastering the Art of Professional Cooking : A Delicious Journey
When it comes to whipping up a classic like chocolate rice krispie cakes , there’s an art to it. professional cooking might sound fancy, but it really boils down to some basic skills every home cook can master.
Here’s how to tackle these delightful treats, making sure you’re set for sweet success!
Essential Preparation Steps
First things first, let’s talk mise en place . this french culinary term just means having all your ingredients prepped and ready before you start cooking.
For our chocolate rice krispie cakes, make sure you’ve got your rice krispies , butter, marshmallows, and chocolate chips all measured out.
It’s like having your ducks in a row — it makes the process smooth sailing!
Time management is also key here. set yourself a timer for each step, especially when melting chocolate. keep an eye on it; you don’t want burnt chocolate chips ruining your sweet vibe.
Speaking of vibes, make sure your workspace is organized. a tidy kitchen makes cooking feel less chaotic.
And let’s not forget safety considerations . when you’re melting butter and marshmallows, the heat is on. watch out for splatters and burns.
Always have a damp cloth handy to wipe spills. safety first, sweetness second!
Step-by-Step Process
Ready to make these treats? Here’s a simple breakdown:
-
Prepare the Pan : Line your 9"x13" baking pan with parchment paper for easy removal.
-
Melt the butter and marshmallows : grab a saucepan, throw in 3 tablespoons of butter and 10 oz of mini marshmallows over medium heat.
Stir this dreamy mix until it’s melted and smooth. this usually takes about 5 minutes .
-
Combine with Rice Krispies : In goes the 4 cups of Rice Krispies . Fold it all together until every crunchy piece is coated.
-
Add Chocolate Chips : Mix in ½ cup of chocolate chips . This is where the fun happens, especially if you sneak a few bites.
-
Transfer to Pan : Pour that sticky goodness into your prepared pan. Press it down firmly with a spatula ~ it needs to hold together later.
-
Melt and spread chocolate topping : in a microwave-safe bowl, melt 1 cup of chocolate chips in 30-second intervals until smooth.
If you want a shinier finish, add 1 tablespoon of vegetable oil . spread this chocolate coating over your rice krispie layer.
-
Chill and Set : Pop the pan in the fridge for 30 minutes . Trust me, it’s worth the wait!
-
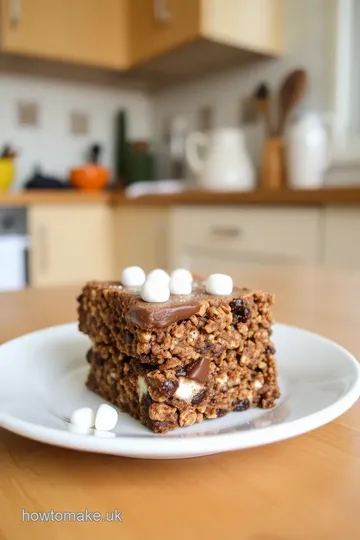
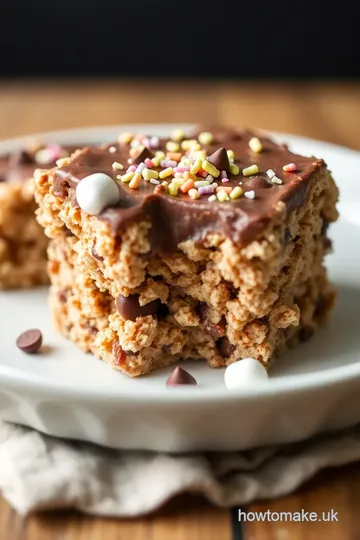
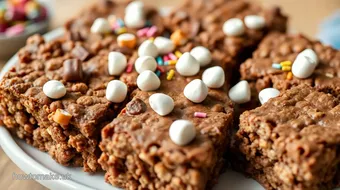
Cut and Serve : Once it’s set, lift it out of the pan and cut into squares. These beauties are ready to be devoured!
Expert Techniques
Now for some expert techniques to elevate your rice krispie cakes. use fresh ingredients ; they really do make a difference.
And when melting your chocolate, don’t rush it. use those brief intervals to prevent burning.
Quality checkpoints should be followed closely. keep an eye on that melting marshmallow mixture; it should be smooth and gooey.
If it’s grainy, start over. and if your cakes aren’t setting up right, chill them for longer. chocolate-covered problems can be fixed with patience!
Success Strategies
Here’s the deal: even the pros make mistakes. avoid common pitfalls like burning your butter or over-mixing your rice krispie mixture.
Quality assurance tips involve taste-testing (a must, am i right?). if it’s not sweet enough, adjust your chocolate levels.
If you need to prep ahead, these cuts can chill in the fridge for a couple of days. They make for easy lunchbox ideas or last-minute birthday treats.
Wrap-up and Transition
So, there you have it! a complete breakdown of how to make chocolate rice krispie cakes quickly — the fun, no-bake dessert everyone loves.
These sweet snacks are perfect for any gathering and so easy to whip up with the kiddos. just imagine, everyone devouring these crunchy treats while you sip your coffee (or tea).
As we dive deeper into more sweet creations, look out for Additional Information on other fun and easy chocolate recipes to satisfy that sweet tooth!
Pro Tips & Secrets for Making Chocolate Rice Krispie Cakes Quickly
Oh my gosh, when it comes to whipping up chocolate rice krispie cakes , the name of the game is simplicity! if you want to impress your friends or just want to have a sweet snack on hand, i’ve got some pro tips that’ll save you time and pack in some flavor.
Quick Tips from My Kitchen
First off, always use fresh ingredients . dated marshmallows can lead to a weird texture, and nobody wants that! when melting chocolate, go low and slow.
Microwave it in 30-second intervals , stirring in between. this way, you avoid that tragic moment when your chocolate turns into a burnt lump.
And if you want an extra crunch in those crispy rice squares , toss in some chopped nuts or seeds! seriously, it adds a great texture.
Chill Out!
Next, don’t forget about chilling. once you press your mixture into the pan, it’s essential to let it sit in the refrigerator for at least 30 minutes to set.
I know you’re excited to dive in, but trust me, patience here pays off!
Perfect Presentation for Those Chocolate Treats
Okay, let’s talk about how to make these treats look as good as they taste! after you’ve set the cakes, it’s time for some plating techniques .
Cut them into neat squares or rectangles using a sharp knife. a little tip: run the knife under hot water before cutting; it helps get those clean edges.
Garnishes that Wow
For garnish, think about what pops. a light sprinkle of sea salt can contrast beautifully with all that sweetness. you can also drizzle some extra melted chocolate on top for that extra chocolate topping idea .
If you’re feeling fancy, toss on a few edible flowers or a handful of colorful sprinkles. kids cooking recipes have never looked so delightful!
Storage & Make-Ahead Tips
What's great about these no-bake desserts is that they are perfect for making ahead of time. just store them in an airtight container, and they’ll stay fresh for up to a week.
If you know you won’t eat them all in one go, try cutting them into individual squares and wrapping them up.
It’s great for lunchbox ideas or just a simple grab-and-go sweet snack .
Reheating? Not Needed!
There’s no reheating required for these chilled delights. but if you ever do find them a bit too hard, leaving them at room temperature for about five to ten minutes before devouring will soften them right up.
Creative Variations to Keep It Fun
Always thought about spicing things up? play around with some variations! you can switch the chocolate chips. how about using white chocolate or even butterscotch chips? flavor adaptations like these can keep the recipe fresh and interesting.
Seasonal and Dietary Twists
If you’re feeling festive, fold in some crushed candy canes during the holidays, or swap out regular rice krispies for holiday-themed cereals like those with colorful marshmallows.
If you’re cooking for folks with dietary needs, try gluten-free cereal treats or even the nut-free version with sunflower seeds.
It's all about that balance, right?
Portion Guidance
While these treats are delicious, don't forget portion control! A serving is about one square—helps with that sweet tooth satisfaction without going overboard.
Expert FAQ Solutions
Now, let's get to some common questions i hear. “why are my treats falling apart?” this can happen if you didn’t pack the mixture tightly into the pan.
Don’t be shy about pressing down hard! another question i get is, “can i make these in advance?” absolutely! they’re perfect for dessert for gatherings because they can sit in the fridge.
Troubleshooting Made Easy
If your chocolate topping isn’t going on smooth, add a bit of vegetable oil to help it glide on effortlessly.
And remember, if your mixture feels too sticky, just give it more rice krispies!
Wrap It Up with a Sweet Note
Making chocolate rice krispie cakes quickly is not just about the end result; it’s about the journey of simple ingredients coming together to create something wonderfully delicious.
Whether it’s for a birthday, a cozy night in, or a last-minute party dessert, these treats will always steal the show.
So roll up your sleeves, gather your family or friends, and get ready for a fun-filled cooking experience that everyone will enjoy!
Quick & Easy Chocolate Rice Krispie Cakes Card
⚖️ Ingredients:
- 4 cups Rice Krispies cereal
- 3 tablespoons unsalted butter
- 1 package mini marshmallows (10 oz)
- ½ cup semisweet chocolate chips
- 1 cup semisweet chocolate chips for topping
- 1 tablespoon vegetable oil (optional)
🥄 Instructions:
- Step 1: Line the baking pan with parchment paper for easy removal (optional).
- Step 2: In a saucepan over medium heat, combine the butter and mini marshmallows. Stir continuously until melted and smooth. Remove from heat.
- Step 3: Add the Rice Krispies cereal to the melted mixture. Gently fold until the cereal is evenly coated.
- Step 4: Stir in ½ cup of chocolate chips until evenly distributed.
- Step 5: Pour the mixture into the prepared pan. Press down firmly with a spatula to create an even layer.
- Step 6: In a microwave-safe bowl, melt 1 cup of chocolate chips (and vegetable oil, if using) in 30-second intervals, stirring until smooth. Spread the melted chocolate over the Rice Krispie layer evenly.
- Step 7: Place the pan in the refrigerator for 30 minutes to set.
- Step 8: Once set, lift the Rice Krispie cakes out of the pan and cut into squares or rectangles. Serve immediately or store in an airtight container.
Previous Recipe: How to Make Delicious Chocolate Krispie Cakes in 40 Minutes
Next Recipe: Why You’ll Love Make Crunchy Chocolate Rice Krispies Treats: A Family Favorite