Make Colorful Fondant Cake Toppers Easily
Looking to impress at your next gathering? Discover how to make colorful fondant cake toppers easily with my kitchen-tested tips and fun techniques!

- Get Ready to Wow: The Magic of Fondant Cake Toppers!
- Essential Ingredients Guide
- Mastering the Art of Professional Cooking: Your Path to Culinary Greatness
- Pro Tips & Secrets for Easy Fondant Creations
- Perfect Presentation: Elevating Your Cake Toppers
- Storage & Make-Ahead: Keep It Fresh
- Creative Variations: Lots of Fun Options!
- Complete Nutrition Guide: Know What’s in Your Treats
- Expert FAQ Solutions: Clearing Confusion
- Recipe Card
Get Ready to Wow: The Magic of Fondant Cake Toppers!
Oh my gosh! i still remember the first time i laid eyes on a cake topped with colorful fondant decorations.
It was at my niece’s birthday party. the cake looked like something straight out of a fairy tale! i couldn't help but feel a rush of excitement.
What if i could create something that beautiful? if you've ever asked yourself how to make colorful fondant cake toppers easily , you’re in for a treat! let’s dive into the joy of whipped-up cake magic with fondant.
The Sweet History Behind Fondant
Fondant has a rich history that dates back to the middle ages, often used for cakes at royal celebrations. today, it’s a staple in the baking world, adding a touch of elegance to everything from creative birthday cake toppers to wedding masterpieces.
It’s incredible how food trends evolve, yet fondant remains a beloved favorite. with its smooth texture and dazzling potential, it’s no wonder that folks all around the country are getting into fondant cake decoration ideas .
look into Into Decorating: What You Need to Know
So, how long does it take to make these delightful toppers? you'll need about 50 minutes total — 20 minutes for active prep and 30 minutes for chilling.
It’s so easy that even my cat could probably pull it off (okay, maybe not!). we’re talking easy fondant recipes that yield around 12-15 gorgeous decorations .
Best of all, the ingredients won’t break the bank. just grab some white fondant, powdered sugar for dusting, and whatever food colors you want to get the party started!
Why Fondant Tops the Cake Charts
Let’s chat about the perks of making colorful fondant cake toppers. first off, they bring a personal touch to any cake.
Be it a birthday, wedding, or just because you felt like baking (ain’t that a valid reason?), these toppers shine.
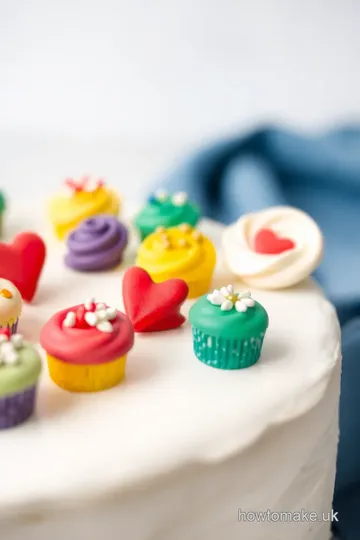
You also get to unleash your fondant shaping techniques —think about fun shapes for cake toppers like stars, hearts, or even little animals! who wouldn’t love that? each decoration can be a mini masterpiece.
Plus, the health aspect might surprise you. while fondant isn't the healthiest option out there, when used in moderation, it can still be a fun way to enjoy a sweet treat while adding a colorful flair.
Trying out simple fondant projects like this is perfect for any occasion! you can level up your skills or even get the little ones involved in cake decorating for kids .
I can’t tell you enough how much fun that can be—trust me, the laughter alone is worth it!
Ready to Roll?
Alright, my sweet-toothed friends, are you ready to work on our delightful fondant cake toppers? you’ll need some fondant tools and supplies to get things rolling—including a rolling pin, cookie cutters, and maybe even some edible glitter for that extra sparkle (because who doesn’t love a bit of bling?).
And here's a pro tip: if your fondant gets sticky, use a touch of powdered sugar on your hands. it’s a game-changer!
In the next section, I’ll lay down the list of ingredients you’ll need. So, grab your baking gear, roll up your sleeves, and let’s make these toppings happen! Your cake will thank you!
Essential Ingredients Guide
Jumping into the world of cake decoration? then you’re in for a treat! let’s get started with some essential ingredients you'll need, especially when you want to make colorful fondant cake toppers easily .
Trust me, having the right stuff on hand makes everything way more fun and successful!
Premium Core Components
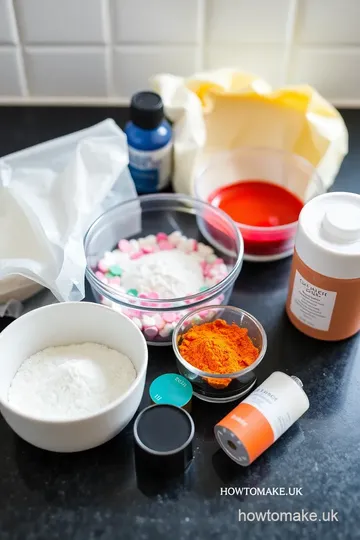
To kick things off, let’s talk about the premium core components for your cake toppers. Make sure you have:
- Fondant : You’ll want about 1 cup (225g) of white fondant, either store-bought or homemade . Think of it as the canvas for your art.
- Powdered Sugar : A half cup (60g) for dusting surfaces. It's like magic — no stickiness, just smooth rolling.
- Food Coloring : Grab 1-2 teaspoons (5-10ml) in your favorite colors. Go bold, go bright!
Quality indicators ? If it feels soft and pliable, you’re good to go.
Storage Guidelines and Freshness Tips
Keep in mind, fondant can be finicky. wrap it tightly in plastic wrap and store it in a cool, dry place.
Its shelf life can stretch up to a few weeks, but fresh is best! always give it a little knead before using to bring it back to life.
Signature Seasoning Blend
Alright, we aren’t talking about salt and pepper here. For fondant, let’s think of it as your signature seasoning blend of creativity:
- Essential Spice Combinations : Think vanilla extract or almond for that added flavor!
- Herb Selections and Pairings : While not quite applicable, the idea is to get creative with your colors and details.
- Flavor Enhancers : Get some lemon zest into that fondant for a zesty kick, if that's your jam!
- Regional Variations : Ever thought about using chocolate fondant? It’s a game-changer! You'll have the classic taste but with a rich twist.
Smart Substitutions
Stuck? Don't sweat it! Here are some smart substitutions if you run out of an ingredient:
- Common Alternatives : If you don’t have fondant, well, you can use chocolate modeling clay for decorations instead.
- Dietary Modifications : Vegan? Go for plant-based fondant made from alternative ingredients.
- Emergency Replacements : Need something fast? Grab marzipan if it’s lying around. It's sweet and moldable!
- Seasonal Options : Autumn? Pumpkin spice-flavored fondant sounds perfect!
Kitchen Equipment Essentials
Lastly, you’ll need some gear. Here’s your kitchen equipment essentials rundown:
- Must-Have Tools : A rolling pin, some cookie cutters, and toothpicks are a must! These little dudes will help you shape and detail your toppers.
- Alternative Equipment Options : No rolling pin? A clean wine bottle works wonders!
- Preparation Tips : Always dust your surface with that powdered sugar for easy rolling.
- Storage Solutions : Airtight containers for your finished toppers, especially if you’re prepping ahead.
To tie this all together, having the right ingredients and tools in hand makes it much easier to get those beautiful colorful cake topper techniques under your belt.
You’re really just a few steps away from creating amazing diy fondant decorations that’ll wow at your next party!
And now, let's dive deep into how to actually make colorful fondant cake toppers easily with some fun techniques and simple fondant recipes!
Mastering the Art of Professional Cooking: Your Path to Culinary Greatness
You ever catch yourself in the kitchen, wishing your cooking skills could just magically level up? oh, i’ve been there! today, we’re diving into the professional cooking method .
Trust me, it’s not as fancy as it sounds. let’s break it down into bite-sized chunks that even your cat could manage.
Essential Preparation Steps
Before you even think about tossing ingredients together, you gotta get organized. this part is called mise en place —fancy french for “everything in its place.
” grab your ingredients, measuring cups, and tools—basically, set up your kitchen like a pro chef.
Next up, time management is key. i can't stress enough how important this is. always set a timer! oh my gosh, those little kitchen timers keep you from burning your beautiful creations.
You’ve got to time it right, or it goes straight to the garbage bin. general rule? keep an eye on anything that needs to bake for 30- 40 minutes at 350° f .
Now, let’s talk safety considerations . when dealing with sharp knives, hot surfaces, or even that unexpected splatter of hot oil, your safety comes first.
Take your time, and keep the first aid kit nearby—just in case.
Step-by-Step Process
Alright, let’s get into the meat of it. Imagine you’re hosting your besties for dinner and want to wow them. Here’s how:
- Prepare Your Ingredients : Chop, measure, and line everything up.
- Cook With Purpose : If your recipe mentions a certain temperature (like 400° F for roasting veggies ), don’t skip that. It’s not just a suggestion!
- Timing is Everything : Keep a close watch on those 2-minute pancake flip tests so you don’t end up with burnt breakfast.
- Visual Cues : Looking for that golden-brown crust on your bread? That’s your sign to take it out.
Expert Techniques
As you become a seasoned cook, you’re going to want to incorporate some professional methods . take the time to learn about kitchen tools.
For example, how to use a thermometer —aim for 165° f for cooked chicken . nothing says “expert” like a perfectly done roast!
Don’t forget about your quality checkpoints . Always taste as you go. Adjust the seasoning here, add a dash of lime there—it's like a performance, and you’re the lead singer!
If things go wrong (and they will!), just take a deep breath. Got too salty? Add sugar. Did your cake collapse? Layer it in a trifle, and it’s suddenly gourmet!
Success Strategies
Now, for the fun part: keeping it real. Avoid these common mistakes :
- Forgetting to taste as you go. You’d be surprised how often I’ve salted something way too much.
- Not reading through the recipe before starting. Yep, done that one too. Have you ever started on a soufflé without knowing you need to let it rise? Yikes!
For fuzz-free quality assurance , a simple homework of practice makes perfect. trust me, cooking is all about the experience ! and if you want to avoid a pre-party panic, try making make-ahead options like marinated proteins that are ready to hit the grill straight from the fridge.
And hey, if you ever get into making colorful fondant cake toppers easily , remember to take your professional kitchen skills and sprinkle in some creativity.
Think vibrant shapes, edible glitters, and custom cake decorations that'll make you the star of any gathering.
So there you have it—a guide to elevate your cooking game. now, before you rush off to heat those pans, let’s chat about additional information .
Because trust me, you’ll want all the tips you can get when it comes to being the ultimate kitchen superstar!
Pro Tips & Secrets for Easy Fondant Creations
Alright folks, let’s dive into the nitty-gritty of working with fondant. If you’ve ever thought, "How do I make colorful fondant cake toppers easily?", keep those notepads handy, 'cause I’ve got some golden nuggets just for you!
Chef's Personal Insights
When it comes to fondant cake decoration ideas , remember: patience is key. honestly, when i started decorating, i nearly threw my rolling pin out the window.
But with practice, it gets easier! don’t rush yourself; take time to mold those shapes with love.
Time-Saving Techniques
Want to whip up fondant toppers without breaking a sweat? try making a bigger batch of fondant at once. you can color them all and store whichever you don’t need right away.
Trust me; you’ll save time later when you don’t have to whip up more!
Flavor Enhancement Tips
Ever thought fondant tastes like sweet playdough? yeah, me too, at first! spice it up by adding a hint of flavor while mixing it.
A pinch of almond extract or a drop of vanilla can make your cake toppers not only pretty but also delish!
Presentation Advice
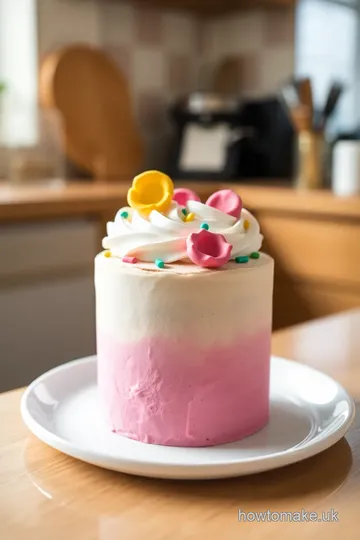
When you're done shaping those beauties, make sure they're presented like they belong on a magazine cover. garnish ideas ? i love using edible glitter or a dusting of powdered sugar over the toppers.
They sparkle and shine, making your cake a true showstopper!
Perfect Presentation: Elevating Your Cake Toppers
Now, let’s talk presentation because we all know that a cake is more than just a treat; it’s an event!
Plating Techniques
To really captivate your guests, use a clean, crisp platter. a vibrant contrast between the cake color and the platter can really elevate the look.
Think pastel toppers on a dark slate plate – absolutely stunning!
Garnish Ideas
Edible flowers or fresh fruits can add a touch of elegance. Don't just stop at the cake; sprinkle a few on the table for a festive vibe.
Color Combinations
Mix and match colors like a pro. pastels for a baby shower, or bold colors for birthday shindigs. stick to 2-3 colors max for a balanced look.
Too many can make it a hot mess, trust me on that one.
Storage & Make-Ahead: Keep It Fresh
Let’s keep those fondant decorations fresh, shall we?
Storage Guidelines
If you have a ton of fondant cake decorations left, store them wrapped tightly in plastic wrap. this keeps them from drying out.
You’d be amazed at how a little wrap goes a long way!
Preservation Methods
For extra safety, pop them in an airtight container. honestly, this saves you so much hassle later when you dig in your pantry and find fondant dinosaur toppers from last month still looking fabulous.
Reheating Instructions
Typically, you won’t need to reheat fondant unless you’re working on the details and it’s starting to dry out. just give it a quick knead or a microwave zap for a few seconds.
Creative Variations: Lots of Fun Options!
Feeling creative? Let’s spice it up!
Flavor Adaptations
Don’t stick to plain white fondant. Chocolate fondant can add a rich twist, especially for a wedding cake. You can also experiment with seasonal flavors!
Dietary Modifications
Making it vegan? Swap in natural alternatives for colors, like beet juice or turmeric. It’s all about being inclusive, right?
Seasonal Twists
How fun would it be to make themed cake toppers ? pumpkins for halloween, heart shapes for valentine’s day… you get the idea! my neighbors throw a themed birthday bash every summer, and their cakes are always the hit of the block.
Complete Nutrition Guide: Know What’s in Your Treats
Detailed Breakdown
Let’s keep it real. Fondant isn't exactly a health food, but it can be enjoyed in moderation! My mantra? A little indulgence never hurt anyone.
Health Benefits
While fondant is sugary, it can be low in fat. Pair it with a healthier cake recipe or some fresh fruit to balance the sweetness.
Portion Guidance
Control your servings by going easier on the fondant. You want those creative birthday cake toppers to be a star, not the whole show!
Expert FAQ Solutions: Clearing Confusion
With all this talk, you might have some questions. No worries!
Common Questions
A biggie: “Can I use homemade fondant?” Absolutely! Just keep it moist.
Troubleshooting Guide
If your fondant gets too soft, dust with powdered sugar. If it cracks, a little knead usually saves the day!
Success Tips
Always experiment and have fun. Cake decorating isn’t just a task; it’s a chance to unleash your inner artist!
Variations Explained
Curious about color mixing? Start light and build up – way easier than going dark and trying to lighten it!
So, there you have it! make colorful fondant cake toppers easily with these fabulous tips and tricks. remember, your cake is a canvas.
With a little creativity and these insights, you'll create stunning decorations everyone will rave about. now go out there and get your bake on! you got this!
Make Colorful Fondant Cake Toppers Easily Card

⚖️ Ingredients:
- 1 cup (225g) white fondant (store-bought or homemade)
- ½ cup (60g) powdered sugar (for dusting)
- 1-2 teaspoons (5-10ml) food coloring (gel or liquid, various colors)
- Edible glitter (optional)
- Nonpareils or sprinkles (optional)
🥄 Instructions:
- Step 1: Dust the surface with powdered sugar and gather all tools and ingredients.
- Step 2: Divide the white fondant into small pieces based on the number of colors you want. Add food coloring to each piece, kneading until evenly colored.
- Step 3: Flatten a piece of colored fondant with a rolling pin to about ⅛ inch (3mm) thick.
- Step 4: Use cookie cutters or molds to cut out desired shapes from the rolled fondant.
- Step 5: Use toothpicks or edible markers to add details or texture to the toppers.
- Step 6: Place completed toppers on a clean surface to dry for at least 30 minutes.
- Step 7: If not using immediately, wrap toppers in plastic wrap and store in a cool, dry place.
Previous Recipe: Easy Bake Strawberry Cheesecake Delightful Treat: A Sweet Journey in My Kitchen
Next Recipe: How to Bake Oreo Cake: Irresistibly Decadent Dessert for You!