Make Delicious Blackcurrant Jam
Ever wondered how to make delicious blackcurrant jam in 45 min? This vibrant spread captures the sweet-tart essence of fresh blackcurrants. Let’s get cooking!

- Looking Back to a Sweet Experience
- A Little Jam History
- Why You’ll Love This Jam
- Get Ready for the Fun
- Your Go-To Guide for Essential Ingredients
- Mastering Professional Cooking Methods for Jam: Get Ready for Blackcurrant Bliss!
- Pro Tips & Secrets for Making Blackcurrant Jam
- Perfect Presentation
- Storage & Make-Ahead Tips
- Creative Variations
- Complete Nutrition Guide
- Expert FAQ Solutions
- Recipe Card
Looking Back to a Sweet Experience
You ever have one of those days when everything is just... blah? well, let me take you back to a sunny saturday where i got an unexpected surprise from a neighbor: a basket overflowing with fresh blackcurrants ! honestly, my mouth watered just looking at those sweet-tart gems.
I wondered, “what can i do with all of these?" after some daydreaming, the answer jumped out at me— make delicious blackcurrant jam in 45 min .
So, if you’re curious about creating your homemade fruit preserves without any fuss, keep your reading glasses on!
A Little Jam History
Blackcurrants have been around forever—like, they even pop up in traditional european dishes. heck, they’ve been used in everything from jams to juices.
Normally, you'd think of jam only during harvest season, but these little berries are loved year-round. and if you haven’t tried blackcurrant jam, you’re totally missing out.
It’s all the rage in markets, and let me tell ya, once you try it, you’ll be hooked!
This particular easy jam recipe takes about 45 minutes from start to finish. yep, you read that right. you can whip it up in no time at all! it’s super simple, so even if you're not a kitchen wizard, you’ll totally be fine.
All you need are a few basic ingredients, some kitchen tools, and a little bit of patience. your wallet will be happy too, 'cause making jam at home is much cheaper than buying it off the shelf.
Why You’ll Love This Jam
Now, let's talk about the good stuff. blackcurrants are packed with nutrients. they’re rich in vitamin c, potassium, and antioxidants.
Seriously, this sweet-tart fruit is nature's candy. plus, making your own jam means you control what goes in it. no weird fillers or preservatives here!
This jam is perfect for so many occasions. breakfast? check. spread it on toast or slather it on pancakes. afternoon snack? you got it! it’s fabulous on yogurt, or you can spoon it over ice cream for a little extra joy.
Hosting a brunch? servin' up blackcurrant jam on a cheese platter with some sharp cheddar? absolute win!
Let’s not forget about the nostalgia factor. unwrapping a jar of homemade jam evokes sweet memories. it's that homemade gift in a jar that says, "i care.
" plus, it’s awesome for homemade gifts during the holidays or for special occasions. who wouldn’t appreciate a thoughtful jar of goodness?
Get Ready for the Fun
Making blackcurrant preserves is pretty straightforward. you don’t need a chef’s degree to do it. if you're even slightly interested in canning and preserving fruits , this is a perfect starter project.
You’ll be mixing, cooking, and maybe even humming along to your favorite tunes while waiting for the jam to thicken.
So, how do you get started? you need a handful of ingredients, some jam-making tools (nothing too fancy), and about 45 minutes to spare.
Soon, you’ll have delicious, thick-blackcurrant goodness that you can enjoy all year long.
Next up, we’ll dive into what you actually need to make this scrumptious jam happen. get ready to grab those fresh blackcurrants and let’s embark on this quick jam making adventure together.
You’re about to discover the joy of cooking with blackcurrants —trust me, your kitchen will thank you!
Your Go-To Guide for Essential Ingredients
Alright, friends! today we're diving deep into the world of essential ingredients , and trust me, knowing what to use can take your cooking from “meh” to “wow!” whether you wanna make delicious blackcurrant jam in 45 minutes or whip up something like grandma used to, having the right stuff on hand is key.
Premium Core Components
First things first, let’s get into premium ingredients . Here’s a simple framework to guide you:
-
Detailed measurements: whether you're all about the imperial system (think cups and teaspoons) or you swing more toward the metric side (grams and liters), having those measurements down is a lifesaver.
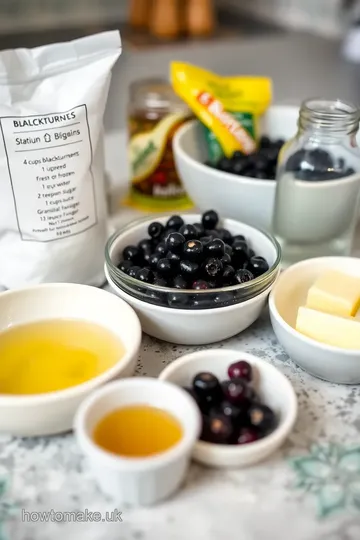
For our blackcurrant jam, you're gonna need 2 cups (300g) of fresh blackcurrants .
-
Quality Indicators: Keep an eye out for ripe blackcurrants—they should be a deep purple and firm to the touch. Dull berries are no good!
-
Storage Guidelines: Fresh blackcurrants can hold up in your fridge for about a week. You wanna keep ‘em in a breathable container to avoid mold.
-
Freshness Tips: Look for shiny skin and avoid berries with bruises. If you can’t find fresh ones, frozen blackcurrants are a solid option, just know they might be a bit saucy.
Signature Seasoning Blend
Now, let’s shift gears to seasoning blends —essential for elevating your dishes.
-
Essential Spice Combinations: If you’re trying to jazz up your jam or any dish, think cinnamon or a pop of nutmeg for a warm flavor. Anyone else drooling over that?
-
Herb Selections: Pairing herbs with your jam? How about some fresh mint when serving it up? Super refreshing!
-
Flavor Enhancers: A splash of vanilla extract in your blackcurrant jam makes a world of difference. Trust me, it’s worth it.
-
Regional Variations: Have fun with it! In parts of Europe, they love mixing berries, like in a raspberry-blackcurrant jam. So good!
Smart Substitutions
Let’s be real—sometimes you don’t have everything you need. So here are some smart substitutions to keep in your back pocket:
-
Common Alternatives: Can’t find blackcurrants? Blueberries or blackberries can work in a pinch. The jam will have a different flavor, but hey, it’s still jam!
-
Dietary Modifications: Going sugar-free? Use honey or maple syrup instead. Just remember that the texture could shift a bit.
-
Emergency Replacements: If you’re caught without granulated sugar, coconut sugar can do the trick.
-
Seasonal Options: In the summer, think about juicy strawberries or peaches. Seasonal fruit recipes bring all those summer vibes to your kitchen!
Kitchen Equipment Essentials
Let’s not forget about the tools of the trade. Here’s your toolkit for jam-making!
-
Must-Have Tools: A large saucepan is critical, along with a good spatula. You want something sturdy to stir up that jam!
-
Alternative Equipment Options: Don’t have a potato masher? A fork will do just fine to smash those blackcurrants.
-
Preparation Tips: Sterilize your jars ahead of time. It's a quick process—and you’ll be thankful when your jam lasts longer without spoiling.
-
Storage Solutions: Once you’ve jammed it up, make sure to store those jars in a cool, dark place. They can last you up to a year if done right!
So folks, there you have it! whether you're ready to dive into the blackcurrant jam recipe or just curious about whipping up some homemade fruit preserves, knowing these essential ingredients and tips will steer you in the right direction.
Next up, let’s get into those step-by-step instructions to start cooking! You won’t want to miss making your delicious blackcurrant jam soon. It’s time to jam!
Mastering Professional Cooking Methods for Jam: Get Ready for Blackcurrant Bliss!
Cooking jam might not sound like rocket science, but when you’re after that perfect sweet-tart balance, it’s like crafting a little piece of culinary art! today, i'll walk you through everything you need to know to make delicious blackcurrant jam in 45 min .
Not only will i share vibrant flavor profiles, but i'll sprinkle in some pro tips that’ll have you feeling like a kitchen superstar.
Essential Preparation Steps
Before we dive headfirst into cooking, let's get our ducks in a row, shall we? first up is mise en place .
It’s a fancy way of saying, “have everything ready to go!” rinse your 2 cups (300g) of fresh blackcurrants , remove the stems, and get your other ingredients measured out.
You’ll want 1 cup (200g) of sugar and 2 tablespoons (30ml) of freshly squeezed lemon juice at the ready. gather your tools, too.
A large saucepan, a wooden spoon, and canning jars are essential for this jam-making adventure.
Now, let’s chat about time management . giving yourself 15 minutes for prep is key. you don’t want to be scrambling around looking for a ladle while your jam is bubbling away.
Plus, stick to your timeline. you need to devote 30 minutes for cooking, making a total of 45 minutes to achieve that delightful jam consistency!
And hey, safety first! keep those fingers safe from hot pots and boiling sugar. i always use oven mitts or a thick kitchen towel, especially when handling hot jars.
Trust me; you don’t want to learn the hard way!
Step-by-Step Process
Here’s where the fun begins—let’s break it down:
-
Prepare the Blackcurrants: First, rinse ’em, then remove any pesky stems and leaves.
-
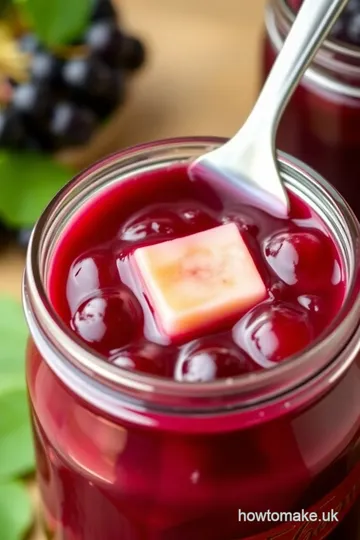
Combine Ingredients: Toss the blackcurrants, sugar, lemon juice, and a dab of butter into your saucepan. Butter’s optional, but it cuts down on foaming, and let’s be real: less mess is always a win!
-
Cook the Mixture: Heat it over medium heat and stir until the sugar melts away.
-
Simmer the Jam: Crank it to high heat and let it bubble while you stir! After about 10- 15 minutes , it’s time to check the consistency.
-
Check for doneness: use a spoon to take a dollop and place it on a cold plate. if it thickens as it cools, you’re golden! if you have a candy thermometer, aim for 220° f/ 104° c .
-
Add Vanilla (If Using): Stir in the vanilla extract now, if you want that extra pop of flavor.
-
Prepare for Canning: Remove the pot from heat, skim the foam, then ladle the jam into sterilized jars. Leave about 1/4 inch headspace .
-
Seal and Cool: Wipe the rims of the jars clean, slap on the lids, and let them cool. as it’s too hot in summer.
Expert Techniques
Now, let’s sprinkle in some expert techniques. for the best homemade fruit preserves , always opt for fresh blackcurrants. if they’re out of season, you can use frozen—just allow some extra cooking time.
And don’t shy away from testing the jam consistency ; it’s all about timing! if it doesn’t set, simply return it to the heat for a few extra minutes.
Success Strategies
It’s easy to make some rookie mistakes. one common slip-up? not testing the jam's doneness. make sure to give it a little taste; that flavor is what you’re after, right? also, don’t skimp on the sterilization of your jars.
It’s vital for keeping your jam fresh and safe for that sweet spread on toast or as a component in blackcurrant desserts .
When you’re done, check out ways to use your jam—spreading it on toast, whipping it into yogurt, or even dolloping it onto pancakes make for delicious toppings that’ll wow your friends! plus, if you’re thinking ahead to the holidays, this jam makes a fab homemade gift in jars.
As we round this off, just know that once you get the hang of this easy jam recipe , the world of fruit compote recipes and unique jam recipes will open right up for you! Get ready to impress everyone with your newfound skills and maybe even explore poppin’ flavors like a raspberry-blackcurrant jam variation !
Additional Information...
Looking to branch out? there's so much more to explore! from canning and preserving fruits to switching up flavors with different berries, the sky's the limit when you dive into the world of confectionery.
Pro Tips & Secrets for Making Blackcurrant Jam
Oh my gosh, making blackcurrant jam is like capturing the essence of summer in a jar! when i first tried to make delicious blackcurrant jam in 45 minutes , i had some epic wins and a few learning moments too.
Let’s kick things off with some pro tips and secrets to ensure your jam turns out perfectly every time.
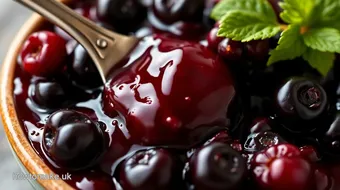
First up, timing is everything . keep an eye on your blackcurrants as they cook down. you want them to become all soft and meld together, but not to look like a sad mush.
For some time-saving techniques , prep your fruit while the sugar dissolves. this keeps things moving along in the cooking process.
For enhancing that sweet-tart deliciousness, a splash of lemon juice is your friend. it adds that zing that just elevates the flavor! oh, and if you're a vanilla fan like i am, a half teaspoon at the end of cooking gives the jam a cozy warmth.
Flavor-enhancing ingredients for jam are key, so don’t skip that!
And let’s not forget how important presentation is. You eat with your eyes first, right?
Perfect Presentation
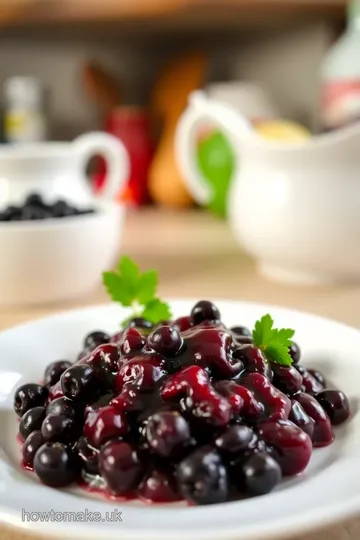
When it comes to plating your homemade jam, think color! that deep purple-black hue of the blackcurrant jam pops against a slice of buttery toast.
Try serving it in a cute jar on a wooden board with some fresh bread or scones.
For a little pizzazz, consider adding a sprinkle of zest from a lemon or a few whole blackcurrants on top as a garnish.
If you're feeling adventurous, use color combinations that include berries or even floral elements like edible flowers. it’s all about eye appeal!
Storage & Make-Ahead Tips
Now that you’ve made your easy jam recipe , let's talk about storage. for best results, your jam should be in sterilized jars with tight-fitting lids.
This can help preserve that vibrant flavor. if you're smart about it, you could make a double batch and stash one jar away.
Aim to eat your jam within one year for the best quality. to keep it fresh, always store it in a cool, dark place.
Reheating is simple—just pop it in the microwave for a few seconds or heat it on low on the stove.
No need to overthink it, just make sure it’s warm and spreadable for those fruity breakfast ideas .
Creative Variations
Now, here’s where the fun really begins! don't feel boxed in; creative variations are endless. how about trying a raspberry-blackcurrant jam variation ? a little mix can give a whole new vibe.
If you’re feeling adventurous, switch up the sugar for honey or maple syrup for a healthier twist.
Consider dietary modifications too—if you’re going for vegan blackcurrant jam , simply swap out any dairy ingredients and you’re good to go! and don’t be shy about seasonal fruits either.
This jam recipe is versatile enough to accept other fruits. trust me, in summer, strawberries play super well with blackcurrants.
Complete Nutrition Guide
Now, while we’re having fun, let’s talk about health! this blackcurrant preserve is not just tasty, it also packs a nutrient punch.
Blackcurrants are rich in vitamin c and antioxidants. they're a great addition to your diet if you're looking to boost immunity.
While you’re at it, keep an eye on portion sizes. a tablespoon here and there is a great way to enjoy the flavor without going overboard on sugar.
You can even help balance this sweet-tart fruit jam with some fresh yogurt for a nutritious snack.
Expert FAQ Solutions
I remember checking faqs when i first started canning. trust me, i had my fair share of troubleshooting moments . if your jam doesn’t seem to thicken, don’t panic! sometimes just a little more time on the heat will do the trick.
Just make sure you’re stirring frequently to avoid that dreaded burnt taste.
Conclusion
Making homemade fruit preserves like this blackcurrant jam is so heartwarming. it’s not just about the end product; it's about the memories we create in the kitchen.
Picture you and your family enjoying your jam on a sunny morning, or gifting a jar to a friend—you’ll be the rock star of snacks!
So gather your fresh blackcurrants and dive right in because this is a simple, fun process that lets you enjoy fresh flavors even in the dead of winter.
Trust me, once you’ve had your taste of blackcurrant jam, you’ll want to preserve summer fruits all year long! happy jamming!
Make Delicious Blackcurrant Jam Card
⚖️ Ingredients:
- 2 cups fresh blackcurrants, rinsed and stems removed
- 1 cup granulated sugar
- 2 tablespoons freshly squeezed lemon juice
- 1/2 teaspoon butter (optional, to reduce foaming)
- 1/2 teaspoon vanilla extract (optional for enhanced flavor)
🥄 Instructions:
- Step 1: Rinse the blackcurrants under cold water. Remove stems and any leaves.
- Step 2: In a large saucepan, combine blackcurrants, sugar, lemon juice, and butter (if using).
- Step 3: Place the saucepan over medium heat. Stir gently until the sugar dissolves completely.
- Step 4: Increase to high heat and bring the mixture to a rolling boil. Boil for about 10-15 minutes, stirring frequently, until the jam thickens.
- Step 5: Use a spoon to test the jam consistency on a cold plate. If it begins to set
- Step 6: Stir in vanilla extract for additional flavor, if desired.
- Step 7: Remove from heat and skim any foam from the surface. Carefully ladle the hot jam into sterilized jars, leaving about 1/4 inch headspace.
- Step 8: Wipe the rims of the jars with a clean cloth. Seal with lids and let them cool to room temperature.
Previous Recipe: How to Bake Cannabis Cake with Sweet Flavors: My Family’s Favorite
Next Recipe: How to Make Soup Maker Leek Potato Comfort Dish: A Creamy Delight!