Dino Jello Cups
Looking for a fun dessert? Make Dino Jello Cups: Fun and Tasty Treat! Kids love fruity layers and adorable gummies. Perfect for parties!

- Let's look into into Dino Jello Cups: A Nostalgic Treat!
- Why Dino Jello Cups Rock
- A Healthy Twist on Fun
- Special Occasions Made Even More Special
- Benefits That’ll Make You a Fan
- Setting Up for Success
- Essential Ingredients Guide
- Unleashing the Art of Cooking: The Professional Method
- Pro Tips & Secrets
- Perfect Presentation: Let’s Make It Eye-Catching!
- Storage & Make-Ahead: Planning Is Key
- Creative Variations: Fun for Everyone
- Complete Nutrition Guide: Sweet & Smart
- Expert FAQ Solutions: You’ve Got Questions, I’ve Got Answers
- Recipe Card
Let's look into into Dino Jello Cups: A Nostalgic Treat!
Oh my gosh, do you remember those hot summer days when you just wanted something fun and sweet to cool you down? i do! one memory that sticks out is when i made dino jello cups for my niece's birthday party.
Let me tell you, it was a blast! if you're looking to make dino jello cups: fun and tasty treat for your next gathering, you’re in for a wild ride.
Picture vibrant, fruity jello layered up in clear plastic cups with cute gummy dinosaurs peeking out. it’s like having a mini dinosaur party in every bite!
Why Dino Jello Cups Rock
You might think that jello is just a classic dessert from way back, but it’s made a roaring comeback! those colorful dinosaur-themed desserts are not just for kids anymore; they’ve become a staple at birthday parties, home get-togethers, and even cool summer bbqs.
They’re super easy to whip up and can be ready in about an hour! plus, the cost is friendly—what’s better than deliciousness that doesn’t break the bank? you can scoop up the ingredients for under ten bucks, and the yield is about six delightful cups.
Perfect for sharing!
A Healthy Twist on Fun
Now, don’t roll your eyes just yet. these little cups of joy aren’t just about bursts of flavor. dino jello cups offer a fun way to sneak in some hydration too! you’ll get a doze of fruity goodness, and if you choose gelatin that’s made with real fruit juice, you've got a treat that’s just a tad healthier.
There’s no crazy complicated stuff here, just easy jello recipes that kids can help with. perfect for home cooking for children , these cups are also a fantastic chance for them to unleash their creativity with layered jello designs or edible dinosaur decorations on top.
Special Occasions Made Even More Special
Can you imagine bringing these to your next family gathering? or how about making them for a summer kids' party? they scream fun food for kids and can be made to match any festive theme.
Got a dino lover on your hands? this is definitely a themed birthday treat they’ll remember! and honestly, if you’re throwing a party, serving these as party snacks for kids would surely be the highlight.
Benefits That’ll Make You a Fan
The beauty of dino jello cups is that they add a pop of color to any table setting. we all know that the eyes eat first! kids adore them, and you’ll see how much joy these kid-friendly snacks bring when they spot those gummy dinosaurs.
Plus, they can be customized. want different flavors? go for it! want a layered gelatin dessert ? heck yes! this flexibility gives them an edge over traditional desserts that can often feel boring.
And if you’re wondering about nutritional information, they’re not a sugar bomb either. with an estimate of only 150 calories per cup, you can feel pretty good about serving them.
Just top them with a little whipped cream, and you’ve got a winner!
Setting Up for Success
Ready to land on those creative dessert ideas ? making dino jello cups is a simple and quick process. you’ll need some basic kitchen gear—like mixing bowls, measuring cups, and those clear plastic cups to show off the vibrant layers.
Gather some fruity-flavored jello and gummy dinosaurs, and you’re all set!
It's all about gathering the ingredients and playing with colors. trust me, even if you are not a pro, this is one of those simple recipes for kids that’s foolproof.
Just remember to let each layer set before you go adding the next, and you’ll avoid a gooey mess.
So, are you ready to jump into the next delicious step? Let’s roll into the ingredient list and get cooking!
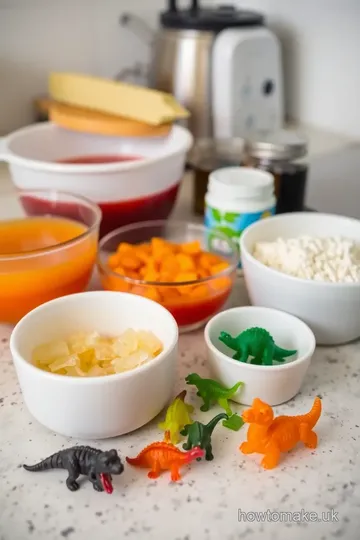
Essential Ingredients Guide
Alrighty, let’s dive into the good stuff! cooking is all about the ingredients , right? understanding what makes each component special can totally up your kitchen game.
So, whether you’re whipping up a family meal or preparing for those dinosaur-themed desserts for the kids, having a grasp on the essentials is key!
Premium Core Components
Let’s start with the basics. knowing the right measurements is crucial. for example, when you’re making treats like the dino jello cups , you’ll need 3 cups (720 ml) boiling water and a 3 oz (85 g) packet of flavored gelatin.
Not complicated, just straightforward! if you're more of a metric gal or guy, just remember that 1 cup equals about 240 ml.
Easy peasy!
When you're picking ingredients, look for quality indicators . fresh fruits should be plump and bright. gelatin should be well-packaged and within reach of the expiration date.
Trust me, stale gelatin is a major mood killer!
For storage , keep your goodies in a cool, dry spot. most dried spices and powders can last quite a while if unopened, but once opened, use them within 6 months for the best flavor.
Fresh items? just use ‘em speedy; think 3-7 days after buying!
Signature Seasoning Blend
Next up, let’s talk seasoning . no dish is complete without a sprinkle of personality! a go-to blend for desserts might include cinnamon and vanilla.
But remember! fresh herbs can take your creations to the next level, adding brightness. for something fun, try pairing basil with strawberries in a fruity dessert! just the thought of those colorful jello cups is making my mouth water.
You’ll also want to check out regional variations . maybe you’re feeling inspired by some southern-style peach cobbler or east coast blueberry pie.
Adjust your spices accordingly. it can totally change the vibe of your dish!
Smart Substitutions
Out of an ingredient? no sweat! a stocked pantry means quick substitutions . if you don’t have plain gelatin, try agar-agar.
This alternative is ideal for your vegetarian friends ! for those with dairy sensitivity, almond milk can swap right in for regular milk in most recipes.
For your kid-friendly snacks, think about emergency replacements too. missing gummy candies for your dino jello cups ? use some licorice or even chocolate candies instead.
You’d be amazed at how creative you can get with what’s on hand!
Kitchen Equipment Essentials
Let's not skip past the tools! you don’t need all the fancy gadgets to rock the kitchen. a sharp knife , a good cutting board , and some mixing bowls ? you’re golden! i swear, those three items have saved me more times than i can count.
If you’re budget shopping, look for alternative equipment options that won’t break the bank. that’s where thrift stores come in clutch.
Also, storage solutions—like mason jars—keep your pantry organized and, not gonna lie, look super cute on your shelves!
Wrapping Up
Once you've gathered all your ingredients and equipment, you're ready for action! before you know it, you’ll be preparing treats like those dino jello cups .
Seriously, if you’re looking for a fun treat for a kid’s party, this recipe is gold. with fruity flavors and adorable gummy decorations, parents and kids alike will get a kick out of them.
Plus, they’re perfect for summer since they’re cool desserts !
So, let’s jump over to how you’ll actually make these magical little cups. I’m so excited to share more about crafting these delightful layered jello desserts that are not only fun but also a slice of nostalgia! Happy cooking!
Unleashing the Art of Cooking: The Professional Method
Alright, folks! Let’s talk about how to step up your kitchen game with some professional cooking techniques. Trust me, once you nail these, cooking becomes so much more fun! So let’s dive right into those essential preparation steps that’ll make your cooking journey smoother and more enjoyable!
Setting Up for Success
Mise en place – oh boy, it’s french for “everything in its place.” and guess what? it’s super important! before you start cooking, gather all your ingredients and tools.
This means measuring out your spices, chopping up your veggies, and having that mixing bowl just waiting for action! it might seem tedious, but it saves you from scrambling later on when you’re elbow-deep in dough and suddenly realize you forgot the vanilla extract.
Now, time management is key! don’t forget to prep anything that needs longer cooking times first. for example, start with anything you need to roast or cook in the oven, then move to the stovetop.
A handy tip: keep your phone or a timer handy to check those important time points !
And speaking of organization, i can’t stress this enough – keep your workspace clean. a cluttered kitchen is not a happy place.
Create zones for chopping, cooking, and plating. plus, always remember safety first. keep a damp cloth close by to wipe spills as you go and ensure your cutting tools are sharp.
You don’t wanna mess around with kitchen safety!
Step-by-Step Process to Deliciousness
Now, let’s break it down, step by step! Here’s what I’m talking about:
-
Gather Your Ingredients: Start by bringing everything you need to your countertop. This saves heaps of time!
-
Control Your Heat: For sautéing those veggies, you’ll want the heat on medium-high. Don’t be afraid to adjust as needed. There’s nothing worse than burnt garlic – trust me!
-
Timing precision: set timers for each stage. if a recipe needs you to simmer for 15 minutes , do it! timing is everything, and it makes a difference between soggy and perfectly cooked.
-
Visual cues for doneness: this is where a bit of experience comes in. look for things like golden-brown edges on cookies or that bubbling surface on a casserole.
These cues tell you when your food is ready to rock!
Elevate Your Skills with Expert Techniques
When it comes to expert techniques , it’s all about those special moments. Here’s a breakdown of some critical steps:
-
Make sure you taste your food at each stage. It’s the best way to adjust flavors before it’s too late.
-
Use quality checkpoints. If you’re making a sauce, look for that glossy finish that tells you it’s ready.
-
Got a problem? Troubleshoot! If your sauce is too thick, whisk in a little broth. Cooking is all about adjusting and making it your own.
Strategies for Success in the Kitchen
Even the best chefs make mistakes, but here’s how to avoid them:
-
Don’t overthink! The simplest recipes often lead to the best outcomes. Follow your instincts.
-
Avoid the temptation to multitask – especially when you’re trying a new dish. Give each task your full attention.
-
Finally, plan make-ahead options. Soups, stews, and even those cute Dino Jello Cups can be prepped in advance for parties. The secret is in making flavorful dishes that get better with time.
Speaking of fun, let’s not forget about our kids' birthday celebrations! if you’re looking for creative dessert ideas, why not make dino jello cups: fun and tasty treat ? they’re colorful, fruity, and sure to be a hit! drawing in those dinosaur-themed desserts into your lineup makes for unforgettable kids' party treats.
So as we wrap up this piece, remember that cooking is a combination of art and science. use these tips, play around with flavors, and have fun in the kitchen! trust me, it’s totally worth it when you serve up amazing food that puts smiles on everyone’s faces.
Now, stay tuned for more kitchen hacks and additional information coming your way!
Pro Tips & Secrets
When it comes to making dino jello cups: fun and tasty treat , i've got a few insider tricks to share.
First off, keep an eye on your gelatin as it dissolves. i mean, there's nothing sadder than finding those little granules still floating around, right? just whisk it well! to save time, consider boiling water while you gather your ingredients – multitasking is the name of the game here, folks.
Want to punch up the flavor? try adding a splash of juice instead of all cold water. i’ve had great luck with fruit juices like orange or pineapple.
They'll give a sweet twist and surprise everyone. for presentation , layer different flavors for that wow factor. people eat with their eyes first, especially kids.
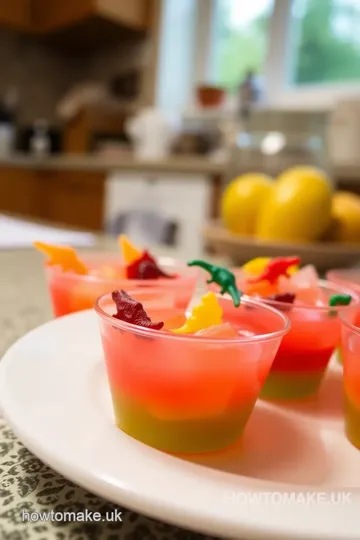
Perfect Presentation: Let’s Make It Eye-Catching!
So, let’s talk plating. these colorful jello cups are naturally eye-catching, but how about leveling up with some creative garnishing? first, use clear cups or even little mason jars.
They highlight those gorgeous layers! you could layer your jello to create a rainbow effect if you're feeling extra fancy, and, for the grand finale, top the set jello with a dollop of whipped cream – kids go bonkers!
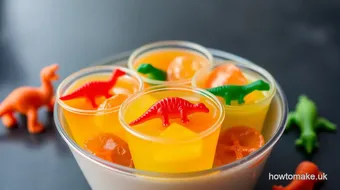
For some fun edible decorations, add gummy dinosaurs peeking out. you can also sprinkle some edible glitter or bright sprinkles for visual appeal .
I promise it’ll get your guests saying “oh my gosh!” before they even taste a bite.
Storage & Make-Ahead: Planning Is Key
Now, let’s say you want to prep these fun gelatin recipes ahead of time. good idea! feel free to make them a day or two in advance.
Just cover them tightly and keep in the fridge, where they can hang out until it's party time. if you see some condensation, don’t worry! this just means they’re extra chilly and refreshing.
For storage, it's best to consume them within three to five days . keep in mind that they might lose some of their vibrant colors or flavors as they sit, but hey, they’re still jello, right? when you want to enjoy one, just take out a cup and maybe pop it in the microwave for a few seconds if it's been in there a while.
Just enough to soften, though!
Creative Variations: Fun for Everyone
Want to spice things up? try blending a few flavors or adjusting the dessert to cater to dietary needs. if you’re looking at seasonal twists, consider pumpkin spice gelatin for fall or tropical fruit jello for those summer vibes.
You can even switch it up for layered jello desserts – all about combining flavors like lime with raspberry for a fruity explosion.
If your kiddos are gluten-free or vegan, swap out the standard gelatin for agave or a plant-based alternative. these little changes keep things interesting without sacrificing the fun and taste of those adorable dino cups.
Complete Nutrition Guide: Sweet & Smart
Now, let’s get down to the nitty-gritty. here’s a quick nutritional breakdown for the generous jello cups you’re about to whip up.
Each serving is a sweet treat with around 150 calories . sure, it’s high in sugar (28g, to be exact), but it’s all about balance, right? they make great kid-friendly snacks when paired with some healthy sides, like fruit kabobs or a refreshing smoothie.
Don’t let guilt stop you from enjoying these at a birthday bash or a backyard summer party. They’re fun, colorful, and definitely better than that store-bought cake!
Expert FAQ Solutions: You’ve Got Questions, I’ve Got Answers
Let’s wrap it up with a few frequently asked questions . one of the most common is about jello not setting.
If that happens, your water might’ve been too cold or your gelatin not mixed well enough.
Another biggie is about using other flavors. Absolutely! Just keep in mind that some flavors pair better together to maintain that themed birthday treats vibe—like the classic raspberry lime combo! As for keeping it kid-friendly, just ensure you’re using fun gummies and bright colors throughout!
So, there you have it! making dino jello cups is an easy, delightful experience. whether it’s for a birthday or just because, these cups will make everyone smile.
Get creative, have fun, and remember: cooking should be about joy and laughter. happy chilling!

Dino Jello Cups Card
⚖️ Ingredients:
- 3 cups boiling water
- 3 oz packet of flavored gelatin (e.g., raspberry, lime)
- 1 cup cold water
- 1 cup assorted dinosaur gummy candies
- Whipped cream (optional, for serving)
🥄 Instructions:
- Step 1: Bring 3 cups of water to a boil in a pot.
- Step 2: In a mixing bowl, combine the boiling water with the flavored gelatin powder. Whisk until fully dissolved.
- Step 3: Stir in 1 cup of cold water into the gelatin mixture.
- Step 4: Pour half of the gelatin mixture into the clear cups (about ¼ cup per cup). Refrigerate for 15 minutes or until slightly set.
- Step 5: Place one gummy dinosaur on top of the partially set jello in each cup.
- Step 6: Pour the remaining gelatin mixture over the gummies until cups are filled. Return to the refrigerator to chill for at least 30 minutes or until fully set.
- Step 7: Top with whipped cream if desired and serve chilled.
Previous Recipe: Your Ultimate Guide to Easy Dinner Rolls with Augason Farms Mix
Next Recipe: How to Make Easy Steam Corn Cakes with Sweet Freshness