Melted Marshmallow Rice Crispy Cake Delight
Craving a delicious treat? My Melted Marshmallow Rice Crispy Cake Delight is a nostalgic dessert that's super easy to whip up. Perfect for sharing at parties or enjoying with family!

- Essential Ingredients Guide to Whip Up Your Melted Marshmallow Rice Crispy Cake Delight
- The Secret Sauce to Professional Cooking Method
- Pro Tips & Secrets for Your Melted Marshmallow Rice Crispy Cake Delight
- Storage & Make-Ahead Advice
- Creative Variations to Try
- Complete Nutrition Guide
- Expert FAQ Solutions
- Recipe Card
Oh my gosh, who doesn’t love the gooeyness of melted marshmallows? back in the day, whenever someone said “rice crispy treats,” i instantly pictured my mom swatting me away from the kitchen as she worked on her famous melted marshmallow rice crispy cake delight .
Seriously, that treat was a staple in our house! it wasn’t just a dessert; it was a memory of gathering around the kitchen, sticky fingers, and the sweet aroma that floated around like a warm hug.
Now, let’s talk about why this nostalgic dessert is still a crowd-pleaser today. imagine layers of crispy rice cereal mixed with that signature marshmallow fluff, bringing both kids and adults together.
Whether you’re trying to impress guests or just want a relaxing night in, this is what you need. it’s one of those easy dessert recipes that require minimal effort but yields maximum delight.
And honestly, who can resist no-bake cakes like this?
Recipe Overview
This homemade rice crispy cake has a fun backstory that dates back to the 1930s when rice cereal first hit the shelves.
Its evolution from simple snack to a beloved layered dessert shows how creativity in the kitchen always finds a way to stand the test of time.
Today, it’s a popular choice at birthday parties, potlucks, and even summer picnics as a kid-friendly treat that everyone loves.
Plus, you don’t need an advanced degree in baking to whip it up – anyone can tackle this.
You’ll only need about 50 minutes – how cool is that? prep takes around 15 minutes , and then you let your creation chill for about 30 minutes .
With a total cook time of just 5 minutes , you can easily make this delightful dessert in no time without inviting stress to the party! and let’s not forget the cost – this budget-friendly recipe makes 12 servings, so sharing is no problem here.
It’s a win-win all around.
Key Benefits
One of the best things about the melted marshmallow rice crispy cake delight is that it’s not just delicious; it’s also surprisingly nutritious compared to other gooey desserts .
Rice cereal is generally low in fat, and adding in those marshmallows means you’re not loading up on heavy ingredients.
You’re getting a sweet treat without feeling overly stuffed afterward – perfect for gatherings.
I mean, who doesn’t want something light and airy while still being sweet? plus, you can get a little creative.
Want to add chocolate chips or sprinkles on top? go for it! the options are endless when it comes to marshmallow topping ideas .
You can even toss in a flavor twist like vanilla or a hint of almond extract to give it a unique flair.
This dessert is perfect for special occasions; imagine cutting into those soft layers at a baby shower or a backyard barbecue.
It screams “party!” while it’s incredibly simple, it outshines many other desserts that require complicated techniques or advanced baking skills.
I'd say that’s a pretty sweet advantage over other rice crispy treats .
So, are you drooling yet? i bet you’re ready to dive into the fun part – the ingredients! let’s gather what you need to make this melted marshmallow rice crispy cake delight come to life.
Get ready to channel your inner pastry chef, or better yet, just have fun baking with kids !
Essential Ingredients Guide to Whip Up Your Melted Marshmallow Rice Crispy Cake Delight
When it comes to creating that melted marshmallow rice crispy cake delight , you need to know your way around the essential ingredients.
Don't sweat it! i’ve got your back. let’s dive into everything you need to make this nostalgic treat, from important measurements to smart substitutions that’ll keep your kitchen game strong.
Premium Core Components
First up, let’s break down detailed measurements for each ingredient. You want it just right, don’t you? Here’s the scoop:
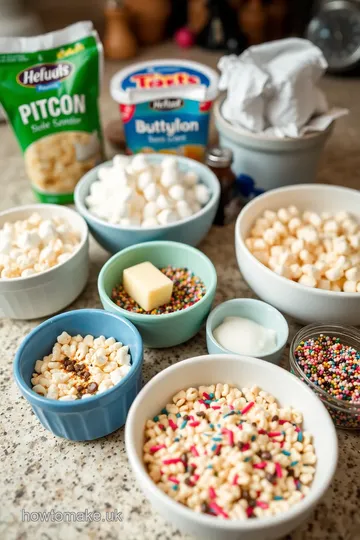
- Rice Crispy Cereal : 4 cups (approximately 120g ) – the star of any crispy treat.
- Unsalted Butter : 3 tablespoons ( 42g ) – for that rich, buttery flavor.
- Marshmallows : 10 oz (around 280g ) for the base + another 7 oz ( 200g ) for the filling (mini or regular; mini is a tad easier to melt).
As for quality indicators , you should always look for marshmallows that are fluffy and squishy, without any hard bits.
Fresh butter should smell creamy, not funky. trust me, no one wants that in their dessert.
Now, let’s chat storage guidelines and shelf life . rice crispy cereal lasts ages in a cool, dry pantry—up to six months! butter? keep it tightly wrapped in the fridge for about a month or in the freezer for six.
Marshmallows usually stick around for about 6-8 months if you store them in an airtight container. and when it comes to freshness tips , always check for sugar crystals or dryness when pulling out those marshmallows.
Gotta keep it gooey, right?
Signature Seasoning Blend
You know what really brings a dessert to life? the signature seasoning blend . though milk isn’t always included, adding 2 tablespoons ( 30ml ) of milk will give that marshmallow filling a lovely depth.
You can go the extra mile by tossing in a sprinkle of vanilla extract for a hint of warmth.
When it comes to that signature herb selection , i’d say skip the herbs for this one; let’s keep things classic and simple! but you can jazz up your melted marshmallow topping by using chocolate chips or hints of sea salt to elevate those sweet flavors.
Smart Substitutions
Now, let’s chat about smart substitutions because life is unpredictable. if you suddenly find yourself short on things, don’t panic! instead of marshmallows, you can use marshmallow fluff —it’s a smooth ‘n creamy lifesaver.
Need a rice crispy substitute? cornflakes work too; just crush them up a bit!
If you’re looking for dietary modifications , there are plenty of options. gluten-free rice cereal options are available at almost any store these days.
And for a nutty spin, you can even add in chopped nuts . so many ways to personalize those gooey desserts!
Kitchen Equipment Essentials
Last but not least, let’s highlight those kitchen equipment essentials . You’ll need a few must-have tools like:
- A large mixing bowl for combining.
- A saucepan for melting all the sticky goodness.
- A rubber spatula or wooden spoon – trust me, you’ll want something sturdy.
- A 9x13 inch baking pan to hold all that deliciousness.
If you’re feeling fancy, lining your pan with parchment paper will save you a huge mess when you try to slice those squares later on.
Oh, and here’s a pro tip: Use a little butter on your spatula when packing down the rice crispy mixture; it’ll keep everything from sticking like mad!
Time to Get Cooking!
Now that you’re equipped with all this info, it’s time to transition to the fun part: making the melted marshmallow rice crispy cake delight ! gather your ingredients, put on some tunes, and let’s create those gooey delights everyone will want to rave about.
Whether it's for an easy party dessert or a laid-back baking session with kids, this is the dessert for gatherings that’ll make you feel like a rockstar in the kitchen!
The Secret Sauce to Professional Cooking Method
Let’s kick things off with something super important: preparation . think of this as the foundation of your cooking journey. it’s all about getting everything lined up before the fun begins.
Ever heard of the term mise en place ? it’s a fancy way of saying, “have your stuff ready!”
Essential Preparation Steps
First, let’s talk about mise en place . This means chopping, measuring, and gathering everything you need before you cook. It's like setting the stage for a big show!
Next up is time management . cooking is like juggling. you need to know when to toss in the veggies, when to stir the pot, and when to set the table.
Honestly, set a timer if you have to. your future self will thank you!
Now, let’s organize that space. a clutter-free kitchen is a happy kitchen. lay your ingredients out in the order you’ll be using them.
Plus, it keeps you from running around like a chicken with its head cut off!
And don’t forget safety, folks! Sharp knives, hot ovens—these are real hazards. Always have a first-aid kit handy and keep those towels close for any spills. Safety first, right?
Step-by-Step Process
Okay, here’s where the magic really happens! Let’s break it down step-by-step.
-
Gather Your Ingredients : This includes everything for our delightful Melted Marshmallow Rice Crispy Cake Delight . You’ll need rice crispy cereal, marshmallows, butter, and any optional toppings you like.
-
Control That Temperature : You’ll want to melt your butter over low heat (around 250° F) until it’s smooth. Burning it is a real rookie mistake!
-
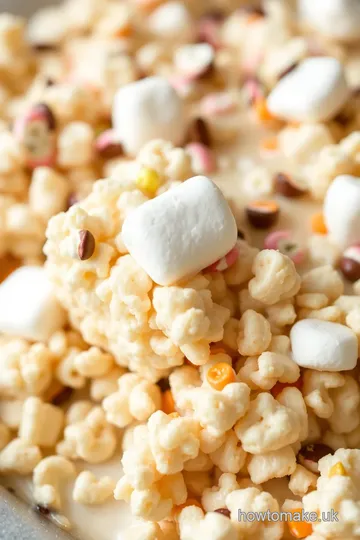
Timing Is Everything : Once you combine the melted butter with marshmallows, keep stirring until it hits that perfect gooey texture —about 5 minutes should do it.
-
Visual Cues : When it’s melted and smooth, that’s your signal to add the rice crispy cereal. If it’s clumpy or hard, you’re not there yet!
Expert Techniques
Now let's get into some of those pro tricks .
-
When you’re mixing, be gentle. You want to retain that light, airy texture of the rice crisps. Think of it as a gentle hug instead of a squeeze!
-
Check for quality at each step. did those marshmallows look fresh? is your butter nice and creamy? if something doesn’t look right, don’t be afraid to start again.
The payoff is worth it.
-
If it feels like a hot mess, cool down! Letting the mixture sit for at least 30 minutes so it can harden is key.
Success Strategies
Okay, everyone makes mistakes! Here are a couple of common ones to dodge:
-
Don’t pack the mixture too tightly—keep it light but firm. Otherwise, your rice crispy cake might end up more like a brick!
-
Always taste as you go! A pinch of salt can elevate your dessert from good to oh wow !
If you want to make it ahead, simply pop it in the fridge. Just be sure to wrap it well to keep it fresh.
Final Thoughts
Cooking can be a delightful adventure, especially when you whip up something as nostalgic as our classic melted marshmallow rice crispy cake delight .
Whether it’s a quick family treat or a fancy party dessert, these steps will help you navigate the culinary seas like a pro!
Next, let’s dive into some additional information about decadent variations and tips for creating chilled dessert recipes that’ll make your gatherings that much sweeter!
Pro Tips & Secrets for Your Melted Marshmallow Rice Crispy Cake Delight
Hey there, dessert lovers! let’s chat about some pro tips that’ll take your melted marshmallow rice crispy cake delight from good to out-of-this-world awesome.
First off, remember to always use fresh ingredients —a good bag of marshmallows goes a long way in making sure that gooey texture we all love.
Time-Saving Techniques
If you’re in a pinch, opt for mini marshmallows . they melt faster, so you can whip up this rice crispy cake recipe in no time.
And let me tell you, no one wants to wait forever when dessert is calling your name! if you've got kids around, let them help with the stirring—their little hands can get into the fun while you supervise!
Flavor Boosts & Presentation
Want to give your rice crispy treats an upscale twist? add a teaspoon of vanilla extract or a pinch of salt to the melted marshmallows.
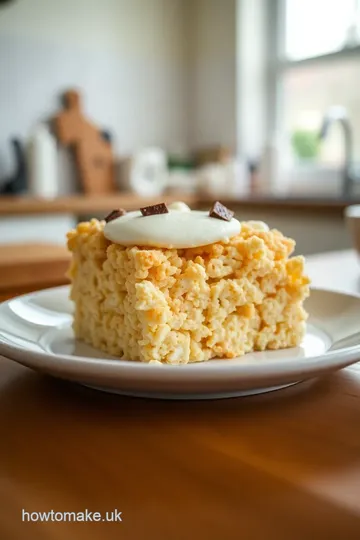
Seriously, it amps up the flavor profile big-time! for a show-stopping presentation, consider topping your delights with a drizzle of melted chocolate.
It looks fancy, but trust me, it’s super easy to do!
Perfect Presentation
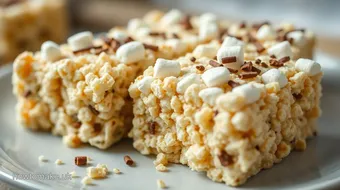
Now, let’s talk plating techniques. go rustic with a simple diagonal cut and arrange those squares on a colorful platter.
If you're feeling extra, toss on some colorful sprinkles for the ultimate aesthetic. people eat with their eyes first after all!
A quick note on garnishing : fresh berries or mini chocolate chips can add a pop of color. i always try to aim for at least three colors on my dessert plate—it makes everything feel just right.
Storage & Make-Ahead Advice
If you’re whipping these up for a gathering, you might want to make them a day ahead. just be sure to store them in an airtight container.
Honestly, they’ll stay fresh for about 3-5 days, but who are we kidding? they’ll be gone long before that!
If you want to preserve freshness , you can try separating the layers with parchment paper. ever had that tragedy when your treats stick together? yeah, we don’t want that! when it's time to reheat , just pop them in the microwave for about 10-15 seconds to bring back that delightful gooeyness.
Creative Variations to Try
Now, for the fun part—let's talk creative variations ! feeling adventurous? swap out some of that regular rice cereal for chocolate puffed rice.
It gives you a glorious chocolatey surprise in every bite—perfect for those chocolate lovers out there!
For a seasonal twist, try adding pumpkin spice in the fall or some mini candy canes during the holidays; it’ll totally change the vibe of this nostalgic dessert.
Trust me, everyone's gonna be talking about your easy party desserts
Complete Nutrition Guide
So, i know we just talked about making these treats all fancy and whatnot, but let’s keep it real—desserts are about enjoyment! here’s a detailed breakdown of what’s in your creation.
A serving of this delight is around 180 calories with 7g of fat and 29g of carbs. honestly, who can resist a good treat every now and then?
Also, don’t sweat if you’re keeping an eye on health; these are relatively light for a dessert. A little joy never hurt anyone, right? Just keep an eye on portion sizes because – let’s face it – it’s hard to stop at just one!
Expert FAQ Solutions
Here’s how you avoid common mistakes: if your rice crispy treats are too hard, you might have overcooked your marshmallows.
Cooking them on low heat is key! if you find your mixture too gooey to handle, just let it chill a bit longer before cutting.
And no judging, but i’ve totally just eaten the filling straight from the pan before. no one’s perfect, right?
Final Thoughts
In conclusion, making a melted marshmallow rice crispy cake delight is not just about mixing things in a bowl. it's about the fun and memories we create in the kitchen—especially if you involve kids or friends in the process.
So get in there, make a mess, and whip up this nostalgic dessert. trust me, you won’t regret it, and your taste buds will thank you later! happy baking, my friends!
Melted Marshmallow Rice Crispy Cake Delight Card
⚖️ Ingredients:
- 4 cups (120g) rice crispy cereal
- 3 tablespoons (42g) unsalted butter
- 10 oz (280g) marshmallows (mini or regular, but mini are preferred)
- 7 oz (200g) marshmallows (mini or regular)
- 2 tablespoons (30ml) milk (optional, for a softer filling)
- ½ cup (75g) chocolate chips or drizzled melted chocolate
- Sprinkles for decoration
🥄 Instructions:
- Step 1: Grease the 9x13 inch baking pan or line with parchment paper for easy removal.
- Step 2: In a saucepan over low heat, melt the unsalted butter.
- Step 3: Once the butter is melted, add 10 oz of marshmallows and stir until completely melted and smooth.
- Step 4: Remove from heat and gently fold in the rice crispy cereal until fully coated.
- Step 5: Press half of the coated rice crispy mixture evenly into the bottom of the prepared baking pan. Use a spatula to pack it down firmly.
- Step 6: In the same saucepan, melt another 7 oz of marshmallows with optional milk until smooth.
- Step 7: Pour the filling over the first layer in the pan and spread evenly.
- Step 8: Press the remaining rice crispy mixture on top of the marshmallow layer, ensuring it covers evenly.
- Step 9: Allow the cake to cool at room temperature for about 30 minutes or until set.
- Step 10: Once cooled, top with melted chocolate or sprinkles if desired before slicing into squares.
Previous Recipe: My Grandmother's Bake Cream Cake with Joyful Whipped Topping
Next Recipe: Easy Bake Strawberry Cheesecake Delightful Treat: A Sweet Journey in My Kitchen