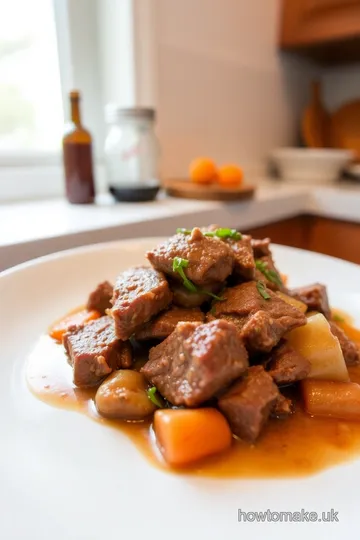
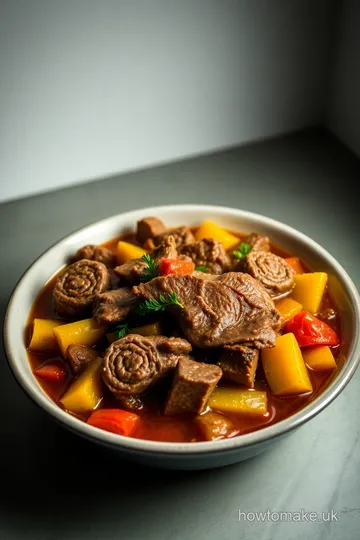
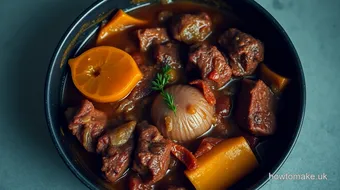
Savory Braised Silverside with Root Vegetables
Looking for the best way to prepare silverside? This savory dish, inspired by my grandmother's kitchen, brings tender beef and root veggies together for a heartwarming meal.

A Heartfelt Introduction to Braising Silverside
Picture this: it's a chilly sunday afternoon, and you're cozied up in your kitchen with the comforting smell of a slow-cooked meal wafting through the air.
That’s exactly how i stumbled onto the art of how to prepare silverside . a few years back, i had a craving for good old-fashioned comfort food.
I didn't want just any ordinary beef dish; i wanted something rich, savory, and full of warmth. so, i decided to give silverside a shot.
Now, if you’ve never tried it, you might be wondering, “what’s so special about silverside beef?” well, it's a cut that shines when it's braised; let it simmer for a while, and it transforms into a tender, juicy delight.
Trust me, once you dig into this juicy piece of meat coupled with melt-in-your-mouth root veggies, you’ll get it. this dish is an emotional hug on a plate.
Recipe Overview: A Journey Through Time
Silverside has been a staple cut of meat for generations, often used in traditional recipes passed down through families. it’s just one of those classic beef recipes that never goes out of style.
While beef might have taken a backseat in modern trends, silverside is seeing a comeback, especially with the rise of slow cooking and comfort food recipes.
Now, don’t get scared off by the idea of cooking with it! it’s medium difficulty—perfect for a weekend project. prepping takes about 20 minutes , and then it’s hands-off for a good two hours of cook time.
You’ll need a dutch oven or a heavy pot; once that's ready, you're golden!
As for cost, silverside won’t break the bank. depending on where you live, you can snag around $5 to $7 per pound .
It’s budget-friendly comfort food that can serve 4 to 6 people —perfect for a family dinner!
Key Benefits: Why You Should Love Silverside
Now let’s chat about some key advantages of this recipe. first off, the nutritional value of silverside is pretty impressive.
It’s high in protein and packed with b vitamins, which are great for your energy and metabolism. plus, when you pair it with root veggies like carrots and potatoes, you’re enhancing that solid nutritional punch.
This dish isn’t just about taste, though; it’s about the whole experience. imagine gathering your loved ones around for a hearty meal.
That’s one of the best parts! savory silverside dishes like this one are perfect for special occasions, family dinners, or even a cozy night in.
The beauty of braising is that it’s forgiving. if you're familiar with beef braising techniques , you know it’s all about low and slow cooking, which means you can relax while the flavors meld together beautifully.
Plus, unlike other similar recipes, this one really benefits from ideal seasonings. using a simple mix of bay leaves , thyme , and a splash of worcestershire sauce delivers a deep umami flavor that truly makes this dish shine.
And one more thing: those leftovers? you can whip up all sorts of meals with them! think sandwiches, pies, or even a comforting steak soup.
I promise you’ll get value for your $$.
So, are you pumped to dive into this juicy experience? Let’s move on to the ingredients and the exciting cooking process that’ll have your house smelling divine in no time!
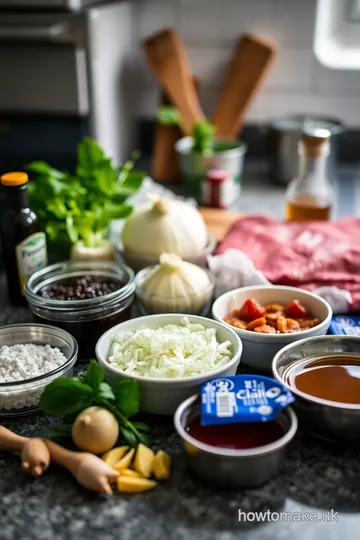
Essential Ingredients Guide
So, you’re diving into the world of silverside , huh? nice choice! cooking silverside isn’t just a great idea; it’s a fantastic way to whip up a meal that screams comfort food.
Let’s break down the essentials so you can nail your next silverside beef recipe .
Premium Core Components
First off, let’s talk measurements . you’ll want to have 2 to 3 lbs ( 900g to 1.4kg ) of silverside beef.
It’s a pretty forgiving cut of meat. when selecting your silverside, look for marbling—those little white flecks of fat. it’s a sign you’re getting quality beef.
Now, on to storage guidelines and shelf life ! keep raw silverside in the fridge for about 3 to 5 days.
If you’re not cooking it right away, throw it in the freezer for up to a year. when you defrost, do it in the fridge overnight for best results.
For those freshness tips , always give your meat a sniff before using it. If it has that funky smell, move on! Quality ingredients lead to tender silverside cooking .
Signature Seasoning Blend
The magic happens when you season your meat. You’ll want to throw together some essential spice combinations . Think salt, pepper, and maybe a touch of mustard powder to spark up that flavor!
For herbs, i love fresh thyme—it's like a secret weapon. pair it with bay leaves for an extra layer of aroma.
If you’re feeling adventurous, consider adding some rosemary for an herby punch. whatever you choose, make sure they complement the beef, not overpower it.
If you’re in a crunch, regional variations can keep your dish exciting. Swap in some paprika for a smoky twist or even add some chili flakes if you’re craving a kick.
Smart Substitutions
Planning to make this dish but can’t find silverside? don’t sweat it! there are common alternatives . look for brisket or chuck roast—they can work wonders too! if you're thinking about dietary modifications , hey, you could try a plant-based twist using jackfruit for a vegetarian option.
And let’s say you’re missing a few ingredients? that’s where those emergency replacements come into play. missing worcestershire sauce? try soy sauce or even a splash of balsamic vinegar.
Trust me, you’ll still end up with a savory silverside dish!
Kitchen Equipment Essentials
Before diving headfirst into how to prepare silverside, let’s gear up with the right tools! you absolutely need a large dutch oven or a trusty heavy pot with a lid.
Your kitchen equipment for braising is critical.
If you don’t have a dutch oven, grab another pot—just make sure it can handle high heat and is heavy enough to distribute warmth evenly.
A sharp knife is non-negotiable for prepping your veggies. speaking of veggies, slicing those root vegetables up takes a good cutting board and your favorite chef’s knife.
For preparation tips , sear your silverside before braising. it adds so much flavor! and when you're done, be smart about storage solutions .
If you have leftovers, store them in an airtight container in the fridge. use them for sandwiches or in a savory silverside with gravy the next day!
Alright, now that we’ve covered the essentials, you’re ready to jump into the real fun—starting with braised silverside preparation ! just remember, cook with love and a sprinkle of patience, and you’ll end up with a dish that’s bound to impress.
Happy cooking, my friend!
Mastering the Art of Braised Silverside
If you've ever had a tough piece of beef that just wouldn't soften no matter how hard you tried, it’s time to re-think your approach.
Today, i’m diving into the wonderful world of how to prepare silverside . trust me, once you get this method down, you’ll make a savory silverside dish that'll leave your family drooling for more.
Let’s break it down!
Essential Preparation Steps
First things first, you gotta get all your ducks in a row. the culinary term for this is mise en place .
It’s fancy french for “everything in its place.” gather your ingredients and tools before you start. you don't wanna be halfway through a recipe, and suddenly realize you're missing garlic or those oh-so-important bay leaves.
Time management is huge. set up a little timer and keep an eye on your cooking times. when braising, the magic hour is around 1 hour and 45 minutes , but you can keep it on low for longer if you’re looking for that melt-in-your-mouth goodness.
Now don’t forget about organization! keep your work area tidy. it’ll save you stress and help you stay in the flow.
And as always, safety first! be careful with sharp knives, hot pans, and those bubbling braising liquids. you want to end up tasting that savory silverside, not nursing a burn!
Step-by-Step Process for Silverside Bliss
-
Prep the beef: Before anything, pat down that 2 to 3 lbs silverside with some paper towels. Season it with salt and pepper to really bring out those flavors!
-
Sear the beef: heat up 2 tablespoons of olive oil in a dutch oven over medium-high. toss that beef in there like a boss and sear it for about 4- 5 minutes per side , until it’s browned all over.
-
Add aromatics: take the beef out for a moment and let it chill. in the same pot, toss in some chopped onions and minced garlic, sautéing for 3- 4 minutes until they’re nice and tender.
-
Deglaze! Pour in the Worcestershire sauce —don't miss out on those delicious brown bits stuck at the bottom of your pot. They’re packing in flavor!
-
Bring in the liquid: pop that beef back in and add 4 cups of beef broth , 1 teaspoon mustard powder , and 2 bay leaves .
Let it go on a nice simmer. cover it up and lower the heat—let it go for a solid 1 hour .
-
Let’s get those veggies involved: after an hour, add in your carrots, parsnips, and potatoes. make sure they’re nestled in that liquid.
Cover and cook for another 45 minutes or until that beef is fork-tender.
-
Rest and serve: this is the hard part. wait for 10 minutes after cooking before slicing the beef. it keeps all the juices where they belong—inside! serve it with that fabulous braising liquid poured over.
Expert Techniques for a Winning Silverside
Now that you know how to cook silverside , let's up the ante. for efficiency, use a meat thermometer. aim for about 190° f for that tender goodness.
And for a killer sauce, you can boil down that braising liquid after you take the beef out. it thickens beautifully!
One pitfall? Avoid overcooking that meat; keep an eye on the timer. You can easily end up with dried-out beef if you're not careful. Also, don’t forget to season!
Success Strategies for Perfect Silverside Every Time
Alright, listen up. here are some common mistakes to avoid. don't skip the searing part! you want that brown crust for flavor.
And please, don’t rush through the resting period afterward—it makes a world of difference in keeping the meat juicy.
If you find yourself with leftovers, they can be used in comfort food recipes for sandwiches or soups. Just remember, good silverside makes for great meals the next day, too!
Now that you're prepped and ready to conquer the world of silverside, it’s time for additional information on how to make this dish even better with some variations and tips.
Whether you’re trying out different seasoning ideas or exploring silverside recipes with vegetables , the journey doesn’t have to end here—it's just beginning! happy cooking!
Pro Tips & Secrets for Cooking Silverside
Oh my gosh! if you're looking to master how to prepare silverside like a pro, you’ve stumbled onto the right section.
You know, every chef has their little tricks up their sleeve, and i’m more than happy to share some of mine.
One of the biggest secrets to a gorgeous braised silverside preparation is searing it before cooking it low and slow.
It locks in those juicy flavors. take a hard look at your beef and pat it dry with paper towels.
Season generously, 'cause that salty goodness on the surface makes a world of difference.
Speaking of time-saving techniques, you can make this dish ahead of time! cook the silverside one day, let the flavors develop overnight in the fridge, and let me tell you – it’s a game changer for your next family dinner.
Honestly, that first bite the next day? you’ll feel like a kitchen wizard.
Oh! and when it comes to flavor enhancement tips , don’t skimp on your herbs! fresh thyme works wonders, and for a pop of zesty flavor, add a squeeze of lemon juice before serving.
It brightens the whole dish!
Perfect Presentation: Wow Factor
Okay, let’s talk about how to make your silverside dish instagram-worthy! plating techniques can elevate your meal, making it not just a feast for the taste buds but also the eyes.
Use a large spoon to pile those tender root veggies beside the thinly sliced beef. drizzle some of that rich braised silverside liquid over the top.
For garnishing, sprinkle some fresh parsley or thyme to add that burst of green color. it’s like giving your plate a little hug of flavor.
Color combinations? aim for vibrant carrots, parsnips, and potatoes next to the rich brown of the silverside. it’s all about that visual appeal, right?
Storage & Make-Ahead: A Lifesaver
Now, when it comes to storage, you wanna make sure your savory silverside dish stays fresh and tasty. place leftovers in airtight containers and they’ll last about 3-4 days in the fridge.
If you’d like to preserve it further, freeze individual portions. just remember, when you’re ready to feast on those homemade silverside leftovers , thaw them overnight in the fridge and reheat on a low flame to keep that juiciness.
Creative Variations: Switch It Up
Once you nail down the classic recipe, don’t hesitate to get creative! feel free to adapt flavors and try out different seasonal veggies or herbs.
How about a spicy silverside with some red pepper flakes? you could switch up the root veggies for some seasonal greens like brussels sprouts or if you're feeling wicked, try a sweet-and-sour twist with some apricots in the braise!
Think of the dietary modifications too. if you go for a more health-conscious route, try using turkey or a lean cut as an alternative to the traditional beef.
There’s no need to compromise on flavor!
Complete Nutrition Guide: Eat Smart
When whipping up this classic beef recipe , let's not forget about the nutritional value. silverside beef is packed with protein—about 40 grams per serving—which is great for muscle repair.
Plus, if you load it up with veggies, you’re adding fiber and vitamins. just remember, like with everything, moderation is key.
Keep an eye on those portions, especially if you’re serving it for a crowd!
Expert FAQ Solutions: Answering Your Curiosities
Got questions? don’t worry, i’ve been there. some of the common faqs include how long to cook silverside. it's generally around 2 hours for a tender bite, but cooking times for silverside can vary based on your cut and size.
For troubleshooting, if it's too tough, you might not have cooked it long enough.
And always remember: let that bad boy rest! This prevents the juices from running out when you cut into it, keeping every bite heavenly and tender.
At the end of the day, cooking silverside is not just about the recipe; it’s about the love you pour into it.
So, gather your family around, dive into this slow-cooked silverside adventure, and enjoy those comforting flavors together. happy cooking, my friend!
Savory Braised Silverside with Root Vegetables Card
⚖️ Ingredients:
- 2 to 3 lbs silverside beef, trimmed
- 2 tablespoons olive oil
- 1 onion, chopped
- 2 cloves garlic, minced
- 4 cups beef broth
- 2 tablespoons Worcestershire sauce
- 1 teaspoon mustard powder
- 2 bay leaves
- Salt and pepper, to taste
- 3 carrots, peeled and cut into chunks
- 2 parsnips, peeled and cut into chunks
- 2 medium potatoes, peeled and diced
- 1 tablespoon fresh thyme leaves (or 1 teaspoon dried thyme)
🥄 Instructions:
- Step 1: Pat silverside dry with paper towels. Season generously with salt and pepper on all sides.
- Step 2: Heat olive oil in a Dutch oven over medium-high heat. Sear the silverside for 4-5 minutes on each side until browned.
- Step 3: Remove the beef and set aside. Add onions and garlic to the pot, sautéing for 3-4 minutes until softened.
- Step 4: Pour in Worcestershire sauce; scrape up any browned bits from the bottom.
- Step 5: Return the beef to the pot; add beef broth, mustard powder, thyme, and bay leaves.
- Step 6: Bring to a simmer, cover, and reduce heat to low. Cook for 1 hour.
- Step 7: Stir in carrots, parsnips, and potatoes; ensure they are submerged in the liquid. Cover and continue cooking for another 45 minutes, or until beef is fork-tender.
- Step 8: Remove the pot from heat; let it rest for 10 minutes before slicing the beef. Serve with vegetables and ladle the braising liquid over the top.
Previous Recipe: How to Prepare Lambs Liver: My Grandma's Delicious Recipe!
Next Recipe: How to Cook Smoked Haddock: My Grandmother's Creamy Chowder Secret